Scan and upload receipts to Google Drive

applications| how-tos| phones| the cloud
Scan and upload receipts to Google Drive Android tip: Scan and upload receipts to Google DriveAre you a stickler for keeping your receipts? If so, there’s a new feature in Google Drive for Android that’s right up your alley.

Just point and shoot, and the Google Drive app will convert the image of your receipt into a PDF, and then upload the file directly to your cloud-based, accessible-from-anywhere Google Drive account.
Once uploaded, Google Drive will scour the image using OCR (short for Optical Character Recognition) technology, and if the image you snapped is clear enough, you’ll be able to search for any words of numbers that Drive managed to detect.
Before you get too excited, keep in mind that Google’s OCR accuracy is somewhat hit and miss; it does much better with words and letters than with numbers, and it also hates creases, so make sure to scan your receipts before folding them up in your pocket.
Still, Google Drive’s new scanning feature (which, for now, is only available on the Android version of the Google Drive mobile app) could be handy for anyone who wants to snap and store receipts, business cards, or any other paper documents on the fly.
Google Drive scanned receipt preview 575x1024 Android tip: Scan and upload receipts to Google Drive
You can preview scanned receipts and make adjustments with the edit buttons before uploading them to Google Drive.
Ready to scan some receipts? Let’s get started…
  • First, of course, you’ll need a Google Drive account (you should already have one if you’ve got a Google account) and the latest version of Google Drive for Android. Once you’re all set, fire up the Google Drive app.
  • Before you start scanning receipts, you might want to create a folder in which to file them all. Tap the three-dot Menu button in the top-right corner of the screen, tap “Add new,” tap Folder, then give your folder a name, like “Receipts.” (You can, of course, reorganize your Google Drive files anytime you like.)
  • Time to start scanning! Tap the three-dot menu again, tap “Add new,” then tap Scan. A viewfinder should appear on the screen; when it does, aim your phone’s camera at the receipt you want to scan, make sure it’s centered on the display, then tap the virtual shutter release.
  • Next, you’ll see a preview of the image. You can twirl the image around with a “pinch” gesture, or tap the Crop or white-balance buttons to make adjustments. Are you scanning a multi-page receipt? Tap the “+” button to scan the next page.
  • Everything look good? Then tap the “check” button to upload the image to Google Drive.

Bonus tip

Having trouble searching for text or numbers in your scanned receipts? Try searching by file name instead; by default, Google Drive stitches the date of a scan into the file name, like so: “scanned_20130523″ (for May 23, 2013).
Sumber: heresthethingblog.com
Scan and upload receipts to Google Drive

How to find and merge duplicate contacts

How to dedupe contacts on your Mac Mac tip: How to find and merge duplicate contactsMartin writes: Since converting from Microsoft to Apple, all my contacts have been duplicated—sometimes up to five times!
Some information is coming from Outlook Contacts but I can’t find the source and iCloud seems to be procreating without any help.
Please help me to eradicate these multiple contacts and regain my sanity.
Hi Martin! Sounds like there was a little confusion while your address book was making its way from your Windows PC to your Mac—and yes, it’s pretty annoying to get five results for a contact search when you were looking for just one.
Luckily, there’s a fairly easy way to seek out and merge duplicate entries in the Mac’s Contacts app.
Contacts look for duplicates option Mac tip: How to find and merge duplicate contacts
The Mac’s “Contacts” app can find and merge duplicate contacts automatically—but make sure to back up your contacts before starting the process.
Here’s how…
  • First, make sure to back up your address book before you start merging or deleting any contacts. Open the Contacts app, click File, Export, then Contacts Archive. Pick a place on your Mac’s hard drive that’s easy to remember (like the Documents directory), then click the Save button.
  • Next, click the Card menu at the top of the screen, then select “Look for Duplicates.”
  • After scouring your address book for a few seconds, the Contacts app will report back with its results. For instance, when I recently checked for duplicate contacts, I got a message that read: “17 duplicate cards and 10 duplicated entries were found.”
  • Now, time for the moment of truth. Click the Merge button to let your Mac merge any duplicate contacts it found. Unfortunately, you can’t review the changes before they’re made—and that’s why it’s so important to make a backup before the merge.
  • Once the “deduping” process is completed, give your contacts a look. See anything you don’t like? If so, you can restore the backup you made by clicking File, Import, and then selecting the Contacts archive you saved earlier.
  • If, on the other hand, everything looks good, then you’re all set—and remember, if you’re an iCloud user (and it sounds like you are, Martin), all your merged contacts should sync automatically with any iCloud-connected iPhones and iPads.
Source: heresthethingblog.com
How to find and merge duplicate contacts

Facebook for iPhone: 5 handy features you need to try

5 gotta try Facebook for iPhone features Facebook for iPhone: 5 handy features you need to tryWant to turn that photo you just shot on your iPhone into your Facebook profile picture? Sure thing—and yes, you can do it directly from the Facebook mobile app.
Read on for more gotta-try features in the rapidly evolving Facebook for iPhone app, from how to filter your news feed to an easy way to save snapshots posted by your friends.
Facebook for iPhone filter news feed 264x300 Facebook for iPhone: 5 handy features you need to try
Tap an option to see just the most recent news feed updates, only photo posts, stories from close friends, and more.

1. Filter your news feed

Don’t have time to scroll through dozens of random news feed updates? I know the feeling.
Instead, try this: when you first open your news feed on the Facebook for iPhone app, pull down on the first update you see.
When you do, you’ll open Facebook’s mobile news feed filter, which lets you view only the most recent updates, posts from those on your various Friend Lists (such as Family and Close Friends), photo posts, and more.

2. Save a photo to your Camera Roll

Until recently, there was no way to save a photo from your Facebook news feed to your iPhone other than taking a screenshot.
Facebook for iPhone save photo 276x300 Facebook for iPhone: 5 handy features you need to try
Thanks to a recent Facebook for iPhone update, you can now save photos posted by friends to your iPhone’s Camera Roll.
Thanks to a recent update, though, you can now save Facebook photos to your iPhone’s Camera Roll in just a few taps.
  • Tap a photo in your news feed to open it.
  • Tap the three-dot menu button at the bottom of the screen.
  • Tap the “Save Photo” button.

3. Change your profile photo or your “cover” image

Want to customize the look of your Facebook timeline while you’re on the go?
No problem—and in fact, you can easily replace your Facebook profile image or the “cover” photo at the top of your timeline with a fresh snapshot from your iPhone.
  • Tap the menu button in the top-left corner of the screen, then tap your name to go to your timeline.
  • Tap either your profile photo or the larger “cover” photo, then tap “Choose from Library” to pick a new image from your iPhone’s photo library, or “Take Photo” to snap a new image on the fly.
Facebook for iPhone hide a post arrow 300x240 Facebook for iPhone: 5 handy features you need to try
Tap the little arrow (see it?) to hide an unwanted post from your news feed.

4. Hide a post

Want to zap an annoying update or advertisement from your news feed? Easy.
  • Look closely at the top-right corner of a news feed post, and you’ll see a faint downward arrow. Tap it, and a trio of buttons will slide into view.
  • Tap the “Hide” button to hide an unwanted update from your news feed, or tap “Report/Mark as Spam” if you think a post is “spammy” or particularly offensive.

5. Generate a security code

Ever heard of Facebook’s “login approvals” feature? If not, you should, because it’s one of the best way to keep hackers from hijacking your account.
Once login approvals are turned on (here’s how to do it), Facebook will demand a six-digit code whenever anyone tries to log into your account from an unrecognized browser or mobile device.
Facebook for iPhone Code Generator 279x300 Facebook for iPhone: 5 handy features you need to try
Once activated, the mobile Code Generator will spit out a new six-digit security code every 30 seconds, no data connection required.

Normally, those special security codes are sent to your cell phone via SMS—but what happens if you’re trying to log into your account and there’s no cellular connection?
Luckily, the Facebook for iPhone app has its own “Code Generator” that spits out fresh six-digit codes every 30 seconds—and yes, the Code Generator works even without a data signal.
Just tap the menu button in the top-left corner of the Facebook mobile interface, scroll down, then tap Code Generator.
Once you tap the “Activate” button, a six-digit code will appear on the screen, and it’ll be refreshed every 30 seconds.
Source: http://heresthethingblog.com
Facebook for iPhone: 5 handy features you need to try

35 Basics tips for Mac X's You must know

Need a little help figuring out your new iMac or MacBook? You’ve come to the right place.
Check out our updated survival guide for the basics on Mac OS X, including details on the latest “Mountain Lion” features, illustrated guides for updating and backing up your Mac, must-know tips, and more.

The basics

What is Mac OS X?

It’s the software that powers all the day-to-day features on your iMac or MacBook. Every time you click a menu at the top of the screen, open a folder on your desktop, or search for a document on your hard drive, you have the Mac operating system (or “OS”) to thank.

OK, so what does the “X” in “Mac OS X” stand for?

It stands for “10,” as in the Roman numeral—and specifically, it means we’re currently using the tenth major version of the Mac OS. Mac OS X first arrived for desktop Macs way back in 2001, and had been preceded by—you guessed it—Mac OS 9.
Install Mountain Lion now or wait 300x189 Mac OS X: All the basics, plus 35 must know tips & how tos
“Mountain Lion” is the latest version of Mac OS X, the software that powers your iMac or MacBook.

What is “Mountain Lion”?

Over the past dozen years, there have been seven big updates to Mac OS X, and the latest update, 10.8, is nicknamed “Mountain Lion.” Previous updates to Mac OS X have been named “Panther,” “Leopard,” “Snow Leopard,” and plain-old “Lion.” Yes, it’s safe to say that Apple has a thing for felines.
Anyway, Mac OS X “Mountain Lion” (which came out in July 2012) adds more than 200 new features to the Mac operating system, including a “Notification Center” with alerts for incoming e-mail and calendar alerts, voice dictation, text messaging with iPhone, iPad, and other Mac users, and the ability to “mirror” a newer Mac’s display to an Apple TV-connected HDTV.
Check out Apple’s rundown of the 200 new features in Lion right here.

Where to get Mountain Lion

Lion is available for download from the Mac App Store for $20.
About This Mac window 300x175 Mac OS X: All the basics, plus 35 must know tips & how tos
The “About This Mac” window will tell you is your Mac is new enough for Mountain Lion.

Can your Mac handle Lion?

Generally speaking, you’ll need an iMac or MacBook Pro that was manufactured no earlier than 2007, or a MacBook circa 2008 or later.
Specific iMac and MacBook models have different requirements, however; click here for more details.

How to install Mountain Lion

The Lion installation process is fairly straightforward, but it will require at least an hour of your time.
Once you purchase Mountain Lion from the Mac App Store, your system will download the update and alert you when it’s ready to begin the installation process. Just follow the prompts (there are only a few), sit back and wait. After a restart or two, your Mac should be all et.

How to back up your Mac

Don’t even thing of updating your Mac’s operating system without backing up your hard drive first. Luckily, backing up your hard drive is easy thanks for a Mac OS X utility called Time Machine; here’s how to use it.

35 must-know Mac tips and tricks

How to pause notifications on your Mac 300x194 Mac OS X: All the basics, plus 35 must know tips & how tos
You can pause your Notification Center alerts with a quick swipe and click.

1. How to pause all your Notification Center alerts

Want a break from all the banners and alerts from the Mac’s new Notification Center? You put all your notifications on “pause” with a simple swipe and click.

2. Getting the hang of desktop “spaces” in Mission Control

The Mac’s handy Mission Control feature lets you manage multiple desktop “spaces” at once, each filled with its own assortment of open documents and applications. Sounds confusing, I know. But once you get the hang of it, these additional, virtual desktops can become addicting—and even essential.

3. Why “natural” scrolling feels backwards—and how to turn it off

Does scrolling on your Mac feel backwards to you? Blame Apple’s new “natural” scrolling feature. Luckily, turning it off is a cinch.
How to get scroll bars back on a Mac 300x181 Mac OS X: All the basics, plus 35 must know tips & how tos
Wish you could get your scroll bars back? All you have to do is tweak the right setting.

4. How to get your missing scroll bars back

Hey, what happened to the scroll bars on your windows? Don’t worry—you can get them back in a few clicks.

5. 12 handy trackpad gestures you need to try

Want to zoom in on a web page, twirl a snapshot in iPhoto, sneak a peek at the desktop, or look up the definition of a head-scratching word? You can do all that and more with a simple swipe, “pinch,” or tap on your Mac’s trackpad.

6. Turn on your Mac’s speaking clock

Your Mac has a built-in speaking clock that will read you the time every hour, on the hour—or the half hour, or even quarter hour. Here’s how to turn it on.
Create a new Mac Mission Control desktop1 300x300 Mac OS X: All the basics, plus 35 must know tips & how tos
You can add a new Mission Control desktop with a little help from your mouse.

7. Create a new desktop in Mission Control

Making a new “space” in Mission Control, the Lion feature that gives you a bird’s eye view of all your virtual desktops, is easy—if you know where to look.

8. Pin an app to a specific Mission Control desktop

There’s a way to assign an app to a specific desktop in Mission Control, perfect for keeping your programs in their proper “spaces.”

9. How to paste your signature into a PDF, no scanner or printer required

Got a contract or some other document that you need to sign and return via email? Just snap a photo of your John Hancock with your Mac’s iSight camera (just about any recent iMac or MacBook should have one), then paste it into the document you need to sign.

10. 8 ways to make the most of the Mac desktop dock

Thanks to the handy Dock at the bottom of your Mac desktop, your favorite programs, files, and folders are never more than a click away—and if you know where to look, you can make the Dock behave practically any way you want.
How to turn on sticky keys 300x177 Mac OS X: All the basics, plus 35 must know tips & how tos
“Sticky Keys” make for a clever alternative to playing “Twister” with your fingers.

11. How to enable “sticky keys”

Having a tough time maneuvering your fingertips around multi-key combos like SHIFT + ALT + DELETE? The “sticky keys” feature in Mac OS X can help.

12. 5 ways to take a “Quick Look” at almost any file

Meet “Quick Look,” a handy, built-in Mac tool that lets you take a quick glance at almost any file or folder without committing to firing up a program.

13. 12 Mac keyboard shortcuts you need to know

Switch applications, take a “quick look” at a file, get help, and more, all without touching your Mac’s mouse or trackpad.

14. 6 ways to give your Mac desktop icons a makeover

Got a jumble of icons cluttering your Mac’s desktop? Are you desktop icons too big—or too small? Wish they would just arrange themselves? Help is here!

15. 5 ways to make the most of the sidebar

Looking to add your own folders to the Mac sidebar? Or perhaps you’d rather make the sidebar bigger, smaller, or just plain gone. Help is here!
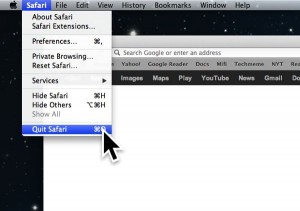
How to make the mouse cursor bigger 300x211 Mac OS X: All the basics, plus 35 must know tips & how tos
Just dip into your Mac’s system settings to make the mouse pointer bigger.

16. How to boost the size of the mouse pointer

Want to save both your eyesight and your sanity? Here’s an easy way: by dipping into your system settings and boosting the size of the mouse pointer.

17. How to control your desktop with “Hot Corners”

Turn on the Mac’s hot-corner feature to jump to Mission Control, clear your desktop, and more, all with a simple flick of your fingertip.

18. How to “unthread” your e-mail conversations

It’s easy to “unthread” the mail conversations in your Mac’s Mail inbox messages—or at least it is once you know the setting you need to tweak.

19. How to disable the Caps Lock key

Sick of striking the Caps Lock key by mistake? The good news is that turning off Caps Lock for good on a Mac is easy.

20. How to stop programs from launching automatically

How long does it take for your Mac to start up? Too long? Maybe your Mac is trying to launch too many apps when it’s first starting up.
How to zoom the display on your PC or Mac 300x183 Mac OS X: All the basics, plus 35 must know tips & how tos
You can zoom your Mac’s display with a few keyboard combinations.

21. How to zoom the display

Squinting at your computer screen? You can zoom the entire display on your PC or Mac, a handy trick for anyone with iffy eyesight. Here’s how.

22. Choose your default web browser

Sick of having Safari pop up when you really wanted another browser, like Chrome or Firefox? There’s single, centralized place on your Mac where you can set your default web browser once and for all.

23. Create a “recent files” folder on your desktop

It’s easy to create a folder on your desktop that’ll display only the files you’ve created or worked with in the past day, week, month … you name it.

24. Set your Mac to automatically start up (or shut down) each day

Want to wake up each morning to a freshly brewed pot of coffee and a fully powered-on Mac? It’s easier than you might think.

25. 16 Mac keyboard shortcuts you need to know

Want to switch applications, empty the trash, search your hard drive, or put your Mac to sleep, all without touching your mouse? Read on for 16 keyboard shortcuts that’ll let you zip around your Mac like a pro.
How to use the function keys without Fn on a Mac 300x188 Mac OS X: All the basics, plus 35 must know tips & how tos
By tweaking a single setting, you can use your Mac’s function keys without having to press and hold the “Fn” key.

26. Use the function keys without pressing “Fn”

On most Mac keyboards, the function keys—you know, those keys along the top of the keyboard marked “F1,” “F2,” “F3,” and so on—don’t get the luxury of having an entire key to themselves. Want to switch things around so you don’t need to press and hold “fn” to use a function key? No problem.

27. Set multiple “home” or “start” pages for your web browser

Want more than just a single home page to appear when you fire up your web browser in the morning? No problem.

28. Cram a bunch of files into a single “zip” archive

Got a bunch of little files that you want to send to a friend? Well, you could always drag them all into an email and send them as attachments, but talk about messy. A cleaner, tidier alternative is to take all those little (or not-so-little) files and compress them into an archive—or, to be more specific, a “zip” archive.

29. Turn any printable document or web page into a PDF

It’s actually quite easy to convert a Word document into a PDF, and you won’t have to pay a dime to do it. In fact, here’s the rule of thumb when it comes to turning documents or even web pages into PDFs: if you can print ‘em, you can convert ‘em.
How to click with a tap on a Mac 300x200 Mac OS X: All the basics, plus 35 must know tips & how tos
Tapping to click takes getting used to, but it’s surprisingly addicting, not to mention easier on your fingers.

30. How to “click” the trackpad with a tap

Having a hard time clicking the MacBook’s squishy trackpad? If so, here’s an alternative: setting the Mac trackpad to “click” with a simple tap rather than an actual click.

31. Share files between nearby Macs with AirDrop

Got a file on one Mac that you’d like to send to another Mac just a few feet away? A built-in Mac feature called AirDrop lets you…well, “drop” a file from one Mac onto another.

32. Change the default programs for your files

Annoyed that the Mac’s Preview app, and not Adobe Reader, always gets to open your PDF files? There’s a way to permanently change the “default” program that opens a given type of document.

33. Customize the buttons in program toolbars

Ever wish there were a Print button next to the Reply and Forward buttons in the Mac’s Mail app, or a pair of Zoom buttons on the top of every Safari browser window? Well, here’s the thing: you can add, remove, and rearrange the buttons in the “toolbar” of several familiar Mac programs.
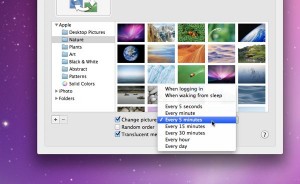
How to shuffle your Mac or PC desktop backgrounds 300x184 Mac OS X: All the basics, plus 35 must know tips & how tos
You can set your wallpaper to change at any interval you choose, from once a day to once every 5 seconds.

34. Put your desktop wallpaper on shuffle

Getting tired of the same old wallpaper on your Mac desktop? If so, try this: just set your Mac to shuffle some or all of your favorite desktop wallpaper (or “background”) photos, at any interval you choose.

35. 4 ways to right-click on a Mac trackpad

There are actually several different ways to right-click on the MacBook’s trackpad, which (nowadays, at least) is essentially one big button.

 35 Basics tips for Mac X's You must know

Save web links for later, even when you’re offline in iPhone

How to save web links for later on an iPhone or iPad iPhone/iPad tip: Save web links for later, even when youre offlineFound a link on your iPhone or iPad to a long, enticing web article that you don’t have time to read right now? Or maybe you do have time, but not the cellular signal.
Well, there’s a better way to save web links for later than, say, simply pasting them into your iPhone’s (or iPad’s) Notes app.
The trick: using Apple’s “Reading List” feature, which saves links from Mail, Safari, and other iPhone apps and (once you’ve got a data connection again) downloads full web pages to your iOS device’s memory.
Prefer using a third-party “read it later” app like Instapaper ($3.99) or Pocket (free)? We’ll cover them, too.
Let’s get started…
Reading List on iPhone 300x245 iPhone/iPad tip: Save web links for later, even when youre offline
You can access saved web links from the Reading List in your iPhone’s or iPad’s Safari bookmarks.

Using Reading List

  • So, you just found a web link you wanted to open on your iPhone or iPad, but there’s no cell connection—or you’re just short on time. First, tap and hold the link you want to open.
  • A series of buttons will slide (or pop up, on the iPad) into view: “Open,” “Add to Reading List,” and “Copy.” Tap “Add to Reading List”—and yes, this option will work even if your iOS device doesn’t have a data connection.
  • Once you’ve got time or a cell connection again, open Safari, tap the Bookmarks icon at the bottom of the screen, then tap Reading List. (You may have to tap the Back button at the top of the screen a few times to get to the main Bookmarks directory; Reading List sits at the top.)
  • Now you’ll see the list of links saved in your Reading List, and the link you just saved should be at the top of the list—and if you were offline when you saved the link, your iPhone/iPad will save the page to your handset’s memory once it gets a data connection back.
Copy web link to Instapaper 300x287 iPhone/iPad tip: Save web links for later, even when youre offline
You can save links to reading apps like Instapaper and Pocket even if your iPhone/iPad doesn’t have a data connection.

Using Instapaper or Pocket

  • Once again, tap and hold the link you want to save—but this time, tap the “Copy” button instead of “Reading List.”
  • Next, open the app with which you’d like to save your link—either Instapaper or Pocket. When you do, a prompt will ask if you’d like to add the copied URL to the app’s list of saved links. Tap OK (or “Read Later,” in the case of Instapaper).
  • Trying to save a link without a data connection? No problem. When you’re back in cellular or Wi-Fi range, open the app again, and app will automatically download the web page for the link you saved.
A Tip from heresthethingblog.com
Save web links for later, even when you’re offline in iPhone

How to add a contact to your Android home screen

Who needs phone favorites when you can just add a one-touch shortcut for your most important contacts, friends, and loved ones to your Android phone’s home screen?
Android contact shortcut 300x238 Android tip: How to add a contact to your home screen
Add a contact shortcut to your Android phone’s home screen for one-touch access to phone numbers, email addresses, URLs, and more.

Good question—and indeed, the ability to pin a contact directly to your home screen is such a no-brainer that I can’t believe it’s still not possible on an iPhone (or not without a third-party app, at least).
Anyway, adding a shortcut for a contact to your Android phone’s home screen is a snap.
Here’s how…
  • Open the People app on your Android phone, then browse or search for a specific contact. (Note: these steps may vary depending on the make and model of your Android phone. I tested this tip on a Samsung Galaxy Nexus running on Android version 4.2.2.)
  • Found the right contact? Tap the name, then tap the three-dot menu in the top-right corner of the screen.
  • Tap the “Place on Home Screen” option.
  • Android People app options 293x300 Android tip: How to add a contact to your home screen
    You can add a contact to your Android phone’s home screen in just a few taps.
  • Go back to your home screen to find the new shortcut for your contact. Can’t find it? If your main home screen is too cluttered, your contact may be sitting on a secondary screen; just flick left or right to shuffle through them all.
  • Tap the shortcut to get a pop-up window with a menu of phone numbers; tap one to make a call, or tap one of the little messaging icons on the right to compose a new text message. You can also tap the Gmail, Google Maps, and web tabs for email addresses, street addresses, and relevant URLs.
  • Don’t want a particular contact shortcut on your home screen anymore? Tap and hold it, then drag it up to the “Remove” icon near the top of the screen.

Bonus tip

Want to take all the contact icons on your various home screens and group them together? Just tap, hold, and drag one contact icon on top of another to create a new home-screen folder, then give it a name (like “My Favorites”).

From heresthethingblog.com
How to add a contact to your Android home screen

Hide the Microsoft Office “ribbon” until you really need it

Hide the Microsoft Office ribbon until you need it Microsoft Office tip: Hide the ribbon until you really need itOne of the most intimidating new Office features has to be the so-called “ribbon”—the thick stripe of settings and commands that sits at the top of every Word, Excel, Outlook, and PowerPoint window.
Sure, the ribbon comes in handy when you’re tweaking fonts in Word or tinkering with cell formulas in Excel.
But when it’s finally time to get creative, the ribbon tends to turn into an unwelcome (and kinda ugly) distraction—or at least, it does for me.
The good news, though, is that it’s easy to hide the Office ribbon until you really need it—particularly when it comes to the brand-new Windows version of Office.
Here’s what you do…
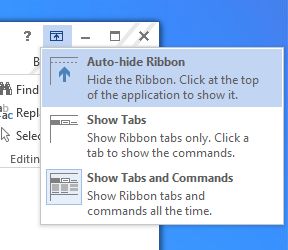
Office 2013 ribbon options Microsoft Office tip: Hide the ribbon until you really need it
Select the “Auto-hide” option to keep the ribbon hidden until you really need it.

Office 2013 for Windows:

  • Click the square icon with the upward arrow in the top-right corner of an Office window. When you do, a pull-down menu with three options—Auto-hide Ribbon, Show Tabs, and Show Tabs and Commands—will appear.
  • To keep the main headings (such as File, Home, View, and Page Layout) of the Office ribbon visible at all times while hiding everything else, select Show Tabs.
  • Want the entire ribbon to disappear so your document fills the screen? Select Auto-hide Ribbon. When you’re ready to peek at the ribbon again, just move your mouse to the top of the screen and click when the shaded stripe appears.
Office for Mac ribbon arrow Microsoft Office tip: Hide the ribbon until you really need it
Click the arrow to toggle the ribbon on and off in Office for Mac.

Office for Mac 2011:

  • See the little arrow sitting in the top-right corner of any Office windows? Click it to hide or reveal the ribbon.
  • There’s no auto-hide option for the ribbon in Office for Mac, but you can turn off the ribbon completely. Open the Word menu, then click Preferences, Ribbon, and uncheck the “Turn of the ribbon” box.
  • Here’s one more handy option: You can keep the ribbon hidden by default when you first open an Office document by unchecking the “Expand ribbon when document opens” box.

Bonus tip

You can customize the ribbon to your heart’s content in the Options section of Office 2013 for Windows. Click File, Options, then Customize Ribbon to get started. Be warned, though: there’s a dizzying number of options available.
The ribbon options in Office 2011 for Mac aren’t quite as extensive as they are in Windows, but you can access them by opening the Word menu and clicking Preferences, Ribbon, and heading for the Customize section.
From http://heresthethingblog.com
Hide the Microsoft Office “ribbon” until you really need it

Create a calendar event or contact directly from email

Create an iPhone event directly from email iPhone/iPad tip: Create a calendar event or contact directly from emailAn invite to a can’t-miss event just landed in your inbox, and you want to mark it in your iPhone’s calendar before you forget—and while you’re at it, you’d like to add the sender’s name to your address book.
Well, good news: you’re just a few taps away from saving the date in your iPhone’s (or iPad’s) Calendar app, or from creating a new entry in your Contacts app—all directly from the original email message.
Here’s how…

Create a calendar event from email

  • Open the email, look for the date and time (which should already be highlighted in blue by your iPhone), tap it, then tap the “Create Event” button from the slide-up window. Once you do, an “Add Event” window will appear with the salient details already filled in.
  • iPhone Add Event screen 249x300 iPhone/iPad tip: Create a calendar event or contact directly from email
    Once you tap the “Create Event” button, an “Add Event” screen will appear with the salient details already filled in.

  • Go ahead and edit the new event or add more information (such as a location or a reminder), then tap the “Done” button. You’re all set!
  • You can also tap “Show in Calendar” to see if you’re free during that time slot, or “Copy” to copy the date and time to the iPhone’s virtual clipboard.

Create a contact

  • Go to the top of the email, tap the name you’d like to save in the “From:” field, and then tap the “Create New Contact” button.
  • A new contact form will appear with the name and email fields completed. Edit or add more details as you see fit, then tap the “Done” button.
Create a calendar event or contact directly from email

4 ways to right-click on a Mac trackpad

How to right click on a Mac trackpad Mac tip: 4 ways to right click on a Mac trackpadNicole writes: In your article about changing a default program you say, “The first step is to right-click a PDF on your desktop.” But how do I right-click by tapping the trackpad of my MacBook Pro?
Hi Nicole! Yep, it’s a little weird that Mac users are constantly being asked to right-click (or “secondary” click) when their trackpads don’t have actual right-click buttons.
Never fear, though: there are actually several different ways to right-click on the MacBook’s trackpad, which (nowadays, at least) is essentially one big button.
For starters, you can…

Method No. 1:

Press and hold the CONTROL key, then click, or…

Method No. 2:

Click the trackpad with two fingertips at once instead of just one.
Mac right click options 300x250 Mac tip: 4 ways to right click on a Mac trackpad
There are, in fact, a few different ways to right-click on a Mac trackpad.
That’s a good start—but what if you want more ways to right-click?
No problem, provided you’re willing to take a few extra steps first.
Click the Apple menu in the top-left corner of the screen, select System Preferences, click the Trackpad icon, then make sure the “Point & Click” tab at the top of the window is selected.
Now, see the “Secondary click” heading? Click the “Click or tap with two fingers” setting to reveal…

Method No. 3:

Click in bottom-right corner of the trackpad, or…

Method No. 4:

Click in the bottom-left corner.
Source: heresthethingblog.com
4 ways to right-click on a Mac trackpad

How to Shrink wide messages to fill the screen (gmail)

Shrink wide Gmail messages to fit your Android screen Gmail for Android tip: Shrink wide messages to fill the screen

Ever find yourself swiping back and forth on your Android display just to read a sentence in a Gmail message? Annoying, right?
That’s because Gmail for Android zooms in a bit on some email messages—mainly those with large images, banners, or other graphics—so they’re easier to read.
The only problem with the zoomed messages, though, is that the actual text tends to spill off the side of the screen, meaning you’ll need to swipe to back and forth to complete a sentence.

Gmail for Android auto fit setting 300x189 Gmail for Android tip: Shrink wide messages to fill the screen
You can set Gmail for Android to automatically shrink wide messages to fill the screen.

Want to save yourself the trouble? All you have to do is tweak a single setting.
  • Open Gmail on your Android phone, tap the three-dot Menu button in the bottom-right corner of the page, tap Settings, then tap General Settings.
  • Near the bottom of the screen, tap checkbox next to the “Auto-fit messages” setting.
Now, go back and open a few Gmail message—and when you do, you’ll notice that the width of each message fills the screen, no swiping required.
Of course, shrinking your Gmail messages to fit the screen may result in teeny, tiny text—but if that happens, you can always “pinch” the screen to zoom in.
Sure, you’re swiping again, but at least you won’t have to swipe unless you really need to.
From heresthethingblog.com
How to Shrink wide messages to fill the screen (gmail)

How to completely turn off an app’s notifications

How to completely turn off iPhone notifications iPhone/iPad tip: How to completely turn off an apps notificationsSo, you thought you turned off the notifications for an iPhone or iPad app, but it’s still bugging you with unwanted banners, beeps and badges. What gives?
Well, just because you switched an app’s “Alert style” setting to “none” doesn’t mean you’ve turned off all of its alerts.
There are, in fact, a few more notification settings that need tweaking—and if you don’t, expect more messages on your iPhone’s “lock” screen, red badges on your home screen, and blaring alert tones when you least expect them.
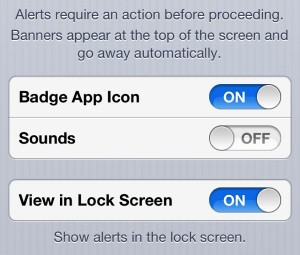
iPhone notification settings 300x255 iPhone/iPad tip: How to completely turn off an apps notifications
Make sure you don’t miss these options when tweaking your iPhone’s notification settings.
Read on for three notification settings that are easy to miss, starting with…

1. Lock-screen notifications

Even if you diligently turn off all the other alerts for a given app, the app may still flash alert banners on your iPhone’s (or iPad’s) “lock” screen from time to time.
Related tip: What’s the difference between an alert, a banner, and a badge?
Want to banish the banners for good?
  • Tap Settings, Notifications, then scroll down and tap the name of the offending app.
  • Scroll down again until you see the “View in Lock Screen” setting, and make sure it’s switched off.

2. Red app badges

Seeing lots of little red badges stuck to the apps on your iPhone’s home screen?
Those numbered alerts are there to notify you of…well, just about anything, from an unread email message to a nagging reminder that you haven’t played “Words With Friends” for a month.
How to get rid of the red badges on your iPhone apps 300x192 iPhone/iPad tip: How to completely turn off an apps notifications
Had enough of these nagging little red badges? You can turn them off in just a few taps.

If there’s a specific red badge that’s driving you particularly batty, you can turn it off in just a few taps.
  • Again, tap Settings, Notifications, and tap the name of the app that’s flashing an unwanted badge.
  • Scroll down once more, then switch off the “Badge App Icon” setting.

3. Sound alerts

You set your iPhone to “silent” for an important company meeting, only to hear an embarrassingly loud “beep!” coming from your pocket right in the middle of your boss’s presentation. Ack!
Yep, the alert tones for some iPhone apps may still sound off even when your handset’s ringer switch is off. Annoying, right?
To shush an app’s alert tones, just…
  • You guessed it—head back to the iPhone’s Notifications settings (Settings, Notifications) and tap the app you want to silence.
  • Scroll down until you get to the “Sound” setting and switch it off—or, if there’s a choice of alert tones, make sure it’s set to “None.”

Bonus tip

You can temporarily silence all iPhone notifications and calls by turning on the “Do Not Disturb” mode.
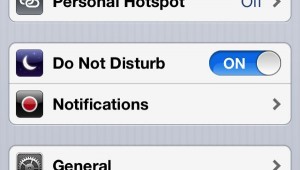
iOS Do Not Disturb mode 300x170 iPhone/iPad tip: How to completely turn off an apps notifications
You can get a temporary break from iPhone notifications thanks to the “Do Not Disturb” setting.

Tap Settings, then flip the switch next to “Do Not Disturb,” or tap Settings, Notifications, Do Not Disturb to schedule a daily quiet period.
Keep in mind, though, that Do Not Disturb will only block notifications while your iPhone is locked—and don’t forget to switch it back off when you’re ready to get calls again.
source http://heresthethingblog.com
How to completely turn off an app’s notifications

View your timeline as others see it

View your Facebook timeline as others see it Facebook tip: View your timeline as others see itNo matter how carefully you’ve checked your Facebook privacy settings, it can still be an eye-opener to see how your timeline looks to everyone else on Facebook—friends and strangers alike.
Facebook’s “View As” feature not only lets you see how the world sees your timeline, it can also show you how your timeline looks through the eyes of a specific friend.
It’s a handy way to see, for example, whether your updates, photo albums, and friends are viewable by complete strangers—or, say, a Facebook frenemy on your “Restricted” list.
Facebook timeline view as setting Facebook tip: View your timeline as others see it
Click the gear icon and select “View As” to see your timeline as others see it.
Here’s what you do…
  • Go to your timeline by clicking your name in the top-right corner of any Facebook page. Next, click the little gear icon in the bottom-right corner of your “cover” photo, then select “View As” from the drop-down menu.
  • You should now see your timeline as most people on Facebook see it—that is, anyone on Facebook who isn’t your friend. See anything public info that you’d rather keep private? If so, go back to your privacy settings (click the gear icon in the top-right corner of the page, then select Privacy Settings) and start tweaking.
  • Want to see your timeline as a specific friend sees it? From the “View As” version of your timeline, click the “View as Specific Person” link in the black strip along the top of the page, then type the name of one of your Facebook friends. Again, take a close look to see if a given friend can see anything on your timeline they shoudn’t.
  • All done? Click the little “x” in the black strip to return to the standard timeline view.
source : http://heresthethingblog.com

Reset the “furthest page read” of a book you’re re-reading

How to reset the last page read of a Kindle book Kindle tip: Reset the furthest page read of a book youre re reading

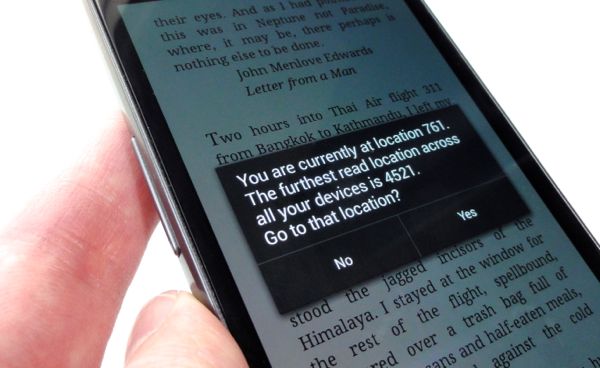
Thanks to the Kindle’s handy “Whispersync” feature, you can start reading a book on, say, your Kindle Fire, then pick up right where you left off on another Kindle-friendly device, like an Android phone or iPhone.
But if you try to re-read a Kindle book that you finished a year ago, your various Kindle devices will want to jump to the very last page you read—meaning, most likely, the end of the book—even if you only re-read to Chapter 2 the other day.
Ugh.
The good news, though, is that you can reset the “furthest page read” for any Kindle book you wish.
Once that’s done, the Kindle’s Whispersync feature (which also keeps track of your bookmarks, highlights, and notes) will essentially forget the last page you read in a given book and start over—and yes, that means you’ll again be able to jump back and forth between your various Kindle devices without losing your place.
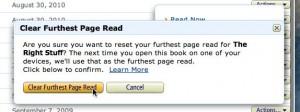
Kindle furthest page read settings 300x112 Kindle tip: Reset the furthest page read of a book youre re reading
You can reset the “furthest page read” for a given Kindle book from the “Manage Your Kindle” settings in your Amazon account.
Here’s how…
  • Log onto your Amazon account from a desktop browser, hover your mouse over the “Your Account” tab, then select “Manage Your Kindle” from the drop-down menu.
  • Browse your Kindle library until you find the book you’re re-reading, or just type the title into the search box.
  • Once you’ve found the right book, click the “Actions” button on the right side of the page and click the “Clear furthest page read” option.
  • Now, the next time you open that particular book, the first page it opens to will become the “furthest” page read as far as your Kindle devices and apps are concerned.
Source http://heresthethingblog.com
Reset the “furthest page read” of a book you’re re-reading