Find and disable programs that slow your PC’s startup

Disable programs that slow startup of a Windows 8 PC Windows 8 tip: Find and disable programs that slow your PCs startupWondering why your new Windows 8 PC is taking so long to start up in the morning? There’s a good chance that one of your installed programs is to blame.
The new Windows 8 Task Manager has a nifty feature that not only lists all the programs that launch when your system starts up, but also rates the “impact” they have on your PC’s startup speed.
Now, some “high” startup-impact programs will probably be ones that your system can’t live without—like, for instance, the “Rundll32″ application, an essential Windows app that helps other Windows program access shared “libraries” of computer code.
Others, however, may be programs that you forgot you even installed—and now they’re sitting on your PC, launching themselves whenever you hit the “power” button and gobbling up precious system resources.
So, ready to put a leash on programs that are slowing your system right out of the gate?
Task Manager Startup impact right click options Windows 8 tip: Find and disable programs that slow your PCs startup
Not sure what a specific startup program does? Right-click its name to get more details.
Here’s how…
  • To launch the Task Manager, just start typing “Task Manager” from the Windows 8 Start screen; you should see the Task Manager sitting at the very top of your search results. If you’re already in the “classic” Windows desktop, just press and hold CONTROL + ALT + DELETE and select Task Manager from the menu.
  • If it isn’t already, toggle the “More details” setting at the bottom of the Task Manager window to reveal a series of tabs at the top of the windows, then click the “Startup” tab.
  • You should now see a list of all the programs and processes that launch when your PC starts up. Click the “Startup impact” heading to sort the list from “High” startup impact to “Low.”
  • Now, take a look at the programs that are having the greatest “impact” to your system’s startup time. See any you don’t need? Select the slowpoke and click the “Disable” button to keep it from launching itself when your PC starts up. (I, for example, spotted Facebook’s “Messenger” app—which I never use—near the top of the list. Yep, it’s now disabled.)
  • Not sure what a particular startup program is for? Right-click its name and select “Open file location” to find out where the app sits on your hard drive; you can also “Search online” for more information or inspect the program’s “Properties.”
  • Change your mind about preventing a program from starting when you power-on your PC? Just open the Task Manager, select its name under the Startup tab, then click then Enable button.
Source http://heresthethingblog.com
Find and disable programs that slow your PC’s startup

4 ways to take a screenshot

4 ways to take a screenshot on your Mac Mac tip: 4 ways to take a screenshot
So, you know how to snap an image of your iPhone’s screen—but what if you want to take a screenshot of your Mac’s desktop?
Well, there are actually four ways to snap a screenshot on your Mac, and they’re all just a few keystrokes away.

1. Take a screenshot of the entire screen

Press and hold the SHIFT, COMMAND, and NUMBER 3 keys, and an image file of the screenshot will appear on your Mac’s desktop.

2. Copy an image of the entire screen to your Mac’s clipboard

Press and hold CONTROL, SHIFT, COMMAND, and the NUMBER 3 keys to snap a screenshot and copy it to your Mac’s clipboard, perfect for pasting the image (COMMAND + V) into another document.
Take a screenshot of a selected area of your Mac desktop 300x188 Mac tip: 4 ways to take a screenshot
You can take a screenshot of just a portion of your Mac’s screen; press and hold Shift, Command, and the number 4 key, then click and drag.

3. Take a screenshot of a selected area of the screen

Want to capture an image of, say, just a single corner of your Mac’s desktop, rather than the entire screen?
Press and hold the SHIFT, COMMAND, and NUMBER 4 keys; when you do, your mouse pointer will turn into a target.
Click, hold and drag your mouse over the area you’d like to capture, then release the mouse button. Your screenshot will appear as an image file on your desktop.

4. Copy an image of a selected area of the screen to your Mac’s clipboard

Same basic idea as the command above, except you’re copying a picture of the selected screen area to your Mac’s clipboard.
Press and hold CONTROL, SHIFT, COMMAND, and the NUMBER 4 keys, then paste the screenshot into a document by pressing COMMAND + V.

Bonus tip

Having a hard time pressing and holding all those keys? You can create new, easier keyboard shortcuts for taking screenshots from the Keyboard preferences pane.
Click the Apple menu in the top-left corner of the screen, select System Preferences, click the Keyboard icon, then click the Keyboard Shortcuts tab.
From here, you can tweak all kinds of keyboard shortcut settings—including those for screenshots. Just click the “Screen Shots” heading in the left column to get started. (I went ahead and picked the F5 key for snapping a screenshot of the whole screen.)
Sources http://heresthethingblog.com
4 ways to take a screenshot

Going to the movies with Passbook

Going to the movies with Passbook for iPhone iPhone tip: Going to the movies with PassbookIt’s been about eight months since Apple’s Passbook app made its debut on the iPhone—and like many of you, I’m guessing, I opened Passbook exactly once, looked at it for about 30 seconds, and promptly forgot about it.
But after a recent (and quasi-accidental) Passbook-assisted trip to the movies, my interest is suddenly piqued.
Passbook, as you may recall, is basically a digital wallet that lets you store concert tickets, coupons, loyalty cards, boarding passes, and more, all in a single iPhone app.
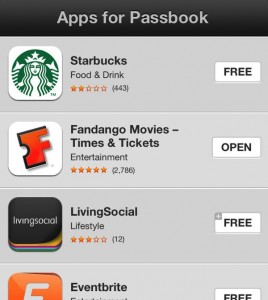
List of Passbook apps on iPhone 268x300 iPhone tip: Going to the movies with Passbook
The list of Passbook-friendly apps is limited, but (slowly) growing.
Well, not all your tickets and coupons, unfortunately. One of the biggest limitations of Passbook is that it only works with Passbook-supported iPhone apps, of which there were only 10 or so when Passbook launched last fall.
The Passbook app situation has improved somewhat in the past several months; there are now more than 30 Passbook-friendly apps, ranging from American Airlines and United to Dunkin’ Donuts and Starbucks.
Still, I hadn’t bothered to fiddle with Passbook again until just a few days ago, as my wife and I were heading to the movies.
We’d decided to stop for coffee and I figured I’d go ahead and buy the tickets (for “Before Midnight”—loved it, but whoa) while we were sitting at the counter.
iPhone Passbook banner 300x214 iPhone tip: Going to the movies with Passbook
Have a movie ticket stored in Passbook? When you approach the theater, a banner will appear on your iPhone’s screen; just swipe it to access your tickets.
I opened the Fandango movie app, bought our tickets, and was about to slip my iPhone back in my pocket when I noticed an “Add this ticket to Passbook” button. What the heck, I figured.
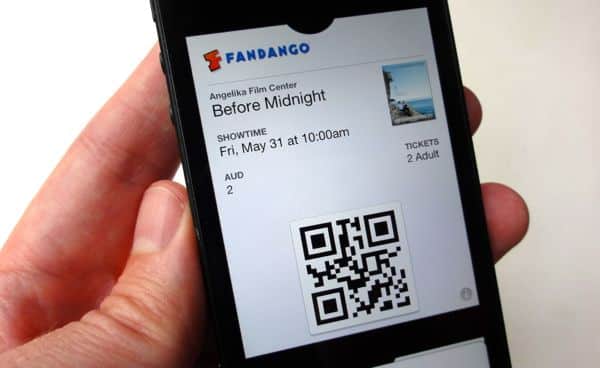
I tapped the button, opened Passbook (you’ll find the Passbook app on one of your iPhone home screens, provided you’ve updated your handset to the latest iOS 6 software), and a digital ticket for our movie slid into view, complete with theater details and a QR code.
So far, so good—but I was even more impressed when a banner that read “Fandango: Nearby” flashed on my iPhone’s lock screen as we arrived at the theater.
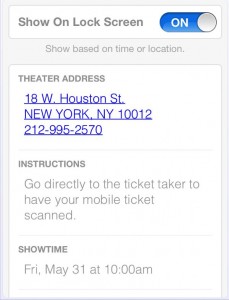
iPhone Passbook card details 229x300 iPhone tip: Going to the movies with Passbook
Tap the little “i” in the bottom corner of a Passbook card to see details and notification settings for your ticket or coupon.
Approaching the box office, I swiped the Fandango banner on my iPhone, and our tickets appeared on the screen.
The usher pulled out a handheld scanner, “dinged” the QR code on my iPhone’s display, and that was that. Easy.
Now, just to be clear, you can’t buy tickets at every movie theater with Fandango—and for that matter, Passbook won’t do you much good if you’re shopping at Walmart (although Target has a Passbook-ready app), nor will it help with daily deals at Rite Aid (but Walgreens is a go).
That said, I was pleasantly surprised by how smoothly and efficiently Passbook works when it’s in its element—and indeed, I used Passbook again a couple of days later for another movie night (“Star Trek Into Darkness”—loud, lots of punching).
So, got questions about Passbook, or a Passbook story you’d like to share? Let us know in the comments below!

Bonus tips

  • You can change the notification settings for your individual Passbook items by tapping the little “i” icon in the bottom corner of the digital card.
  • The settings screen also displays the venue’s location, as well as instructions on how to redeem your ticket or coupon.
  • Also: Want to see the current list of Passbook-compatible apps? Just open Passbook, then tap the “Apps for Passbook” button on the Welcome card.
Source http://heresthethingblog.com
Going to the movies with Passbook

How to force a frozen program to quit

How to force a frozen program to quit Mac/Windows tip: How to force a frozen program to quitI’m sure this has happened to you before: You’re checking mail on Microsoft Outlook or reading the news on Apple’s Safari browser when all of a sudden, your cursor turns into a spinning blue disc (on a Windows PC) or a beach ball (on the Mac).
That usually means something (hopefully minor) is amiss on your system. Maybe your computer is running low on memory because it’s doing a few too many things at once; or, perhaps, the program you’re using wandered into a situation it can’t get itself out of.
The best way to deal with either the spinning Windows disc (or an hourglass on an pre-Windows 7 or 8 PC) or the Mac’s beach ball is, typically, to do nothing. With any luck, your system or application will settle down after a few seconds or so.
Windows Task Manager window 300x281 Mac/Windows tip: How to force a frozen program to quit
You can force a misbehaving Windows program to quit with a little help from the Task Manager.
But if several minutes have passed and you’re still staring at a frozen program, it might be time to take matters into your own hands and force the stalled program to quit.
Doing so may, of course, lead to losing any unsaved data; then again, you may not have much choice.
Ready to unstick a stuck program? Here’s how.

For Windows:

  • Still seeing the hourglass or spinny circle after waiting a few minutes? Time to call up the Task Manager, a tool that details all the programs and other system “processes” that are currently running on your PC. To do so, press and hold the CONTROL, ALT, and DELETE keys all at the same time, then click the Task Manager option.
  • Once Task Manager is running (if you’re using a Windows 7 PC, make sure the Applications tab is selected), check out the list of running programs; you should see the misbehaving program flagged with a status of “Not Responding.” Click the program, then click the “End Task” button at the bottom of the Task Manager window.
  • Next, you’ll be prompted to either a) wait a little longer for the program to right itself, or b) go ahead and quit the program. Waited long enough? Then click “quit.”
Force Quit Applications on a Mac 300x147 Mac/Windows tip: How to force a frozen program to quit
Your Mac isn’t immune to frozen programs—hence, the Force Quit tool, which sits under the Apple menu.

For Mac:

  • Open the Apple menu (just click the Apple icon in the top-left corner of the screen) and select “Force Quit”—or, if you like, press the COMMAND, OPTION, and ESCAPE buttons all at the same time.
  • You should now see a list of all the running programs on your Mac, including the application that’s frozen (probably labeled “Not Responding”). Click the name of the program, then click the “Force Quit” keys in the bottom corner of the Force Quit menu.
  • A prompt will appear warning that you may lose any unsaved changes if you force the program to quit. Ready to put your program out of its misery? Click the Force Quit button once more, or Cancel if you’re rather wait it out.
source http://heresthethingblog.com
How to force a frozen program to quit