How to Erase All Your Personal Content from an iPhone or iPad

Do you have an older iPhone or iPad that you want to sell or give to someone and you want to remove all your personal data and apps? Or maybe your device has gotten clogged up after a lot of use and you just want to restore it back to its pristine factory condition. The procedure is quite straightforward and here is how it works.
  1. Open “Settings”
  2. Tap “General”
  3. Scroll to “Reset” and tap it
  4. A list of possible actions will be shown, as illustrated in the figure below
  5. To return the device to its original factory condition, tap “Erase All Content and Settings”
Resetting iOS devices
The process goes pretty quickly and then you will have a clean system with all your personal data and apps removed, including your Apple ID. Next time the device is turned on it will go through a first-time setup just as if it were new.
How to Erase All Your Personal Content from an iPhone or iPad

How To Sync Mail, Contacts & Calendars From Android To iOS

If you ever thought of switching from Android to iPhone or to use the iPhone or iPad Mini as a secondary device, then you certainly would want to sync your mail, contacts and calendar information on both devices. With the Google account used on your Android device to backup these information, a final backup will ensure that everything you need will be properly synced to your iOS device.
To get all your important mail and schedules paired up in your Android and iOS devices, there just 2 things you need to do: sync your Mail and Calendar, and sync your Contacts. All you have to do is sign in to your Google account, twice.

How To Sync Mail and Calendar

First, go to Settings > Mail, Contacts, Calendars > Add Account.

Mail and Calendar

Select Gmail and key in your name, email address, password and description and tap on Next and then Save. Now when you go to the Mail or Calendar app on your iPhone, you should have all the necessary information synced.

Mail Settings


How To Sync Contacts

To sync contacts, you’ll have to go to go to Settings > Mail, Contacts, Calendars > Add Account > Other.

Contacts

Tap on Add CardDAV Account and on the next screen, under Server, type in ‘google.com’, fill in your full email address for User Name, then enter your password and tap on Save.
Now all your Google contacts from your account will be available on the Contacts app of the iPhone.

Contacts Settings


Source hongkiat.com
How To Sync Mail, Contacts & Calendars From Android To iOS

How to archive new Gmail messages without opening Gmail

Archive Gmail in Android notifications pane Android tip: How to archive new Gmail messages without opening Gmail
Got the latest version of Gmail for Android? If so, you can now scan the first few lines of your email or even archive a message without actually opening Gmail.

First, you’ll need to make sure you’ve updated the Gmail app for Android to the latest version.
Launch the Play Store app on your handset, tap the three-dot menu button in the top-right corner of the screen, tap My Apps, and make sure Gmail is listed in the “Up to Date” section.
Also, keep in mind that your phone must be running Android version 4.1 or better for the new Gmail notifications to work. To check your handset’s Android version, tap Settings, “About phone,” then check the number next to “Android version.”
Opening a Gmail notification in Android 300x195 Android tip: How to archive new Gmail messages without opening Gmail
Just tap and hold, then drag down to reveal the Archive and Reply buttons.

All set? Now, the next time you get a new Gmail message, try this:
  • Swipe down from the top of the screen to open the Notifications pane; you should see an entry for the Gmail message you just received.
  • Tap and hold the notification, then pull down until you see the first few lines of the message, along with the Reply and Archive buttons. (Note: If a specific Gmail alert combines multiple new messages, the Reply and Archive buttons might not appear.)
  • Tap Archive, and the message will be immediately filed in your All Mail directory. Tap the Reply button, and Gmail will open directly to a newly composed reply.
Source: http://heresthethingblog.com
How to archive new Gmail messages without opening Gmail

6 voice commands fro Your Android

6 gotta try Android voice commands Android tip: 6 gotta try voice commandsNeed your Android phone to compose an email, get directions, scan a barcode, or even name a song—all with a bare minimum of taps?
Just speak into the microphone.
The latest version of Google search for Android—which, strictly speaking, is now part of a new Android app called “Google Now“—boasts a little microphone icon on the right side of the search box.
Google Voice Actions 300x268 Android tip: 6 gotta try voice commands
Tap the microphone in the Google search box, then speak a command.

Tap the icon, and you can speak your searches rather than type them.
Even better, though, you can also say voice commands—or “voice actions,” as Google calls them.
Speak the right command, and your Android phone can compose an email, scan a barcode, open an app, or even name the song that’s playing on the radio.
Here’s six nifty Android voice commands you need to try, starting with…

1. “What’s this song?”

Want to know the name of a toe-tapping tune? Tap the microphone icon in the Google search box and ask, “What’s this song?”
Your Android phone will listen carefully for a few seconds—and if it comes up with a match, it’ll pop up on the screen, complete with a link to the Google Play music store.
Android Voice Actions scan barcode 229x300 Android tip: 6 gotta try voice commands
Say “scan a bar code,” then point your Android phone’s camera at a bar code or QR code.

2. “Scan a barcode.”

Want to comparison shop at the grocery store, or wondering what’s the deal with the mysterious QR code on a billboard?
Just tap the microphone button, say “scan a barcode,” then point your phone’s camera at the barcode or QR code you’d like to scan.
Within moments, your phone will display product details, shopping results, or the web address that a QR code is pointing to.

3. “Open” an app

Can’t remember the folder in which you stuffed, say, Flipboard, Gmail or Google Maps? No problem.
Tap the microphone button again, then say “Open Flipboard,” “Open Gmail,” or “Open” + the name of any app installed on your handset.
Your phone will think for a second, then fire up the app you asked it to open.

4. “Send email”

Want to write an email and send it in just a couple taps? Let’s try it.
Tap the Google search microphone, and say: “Send email to [name of a contact], subject: let’s grab lunch, message: wanna have lunch later this week?”
After a moment or two, your phone will transcribe your words into a new mail message—and if all goes well, your last step will be to tap the “Send email” button. Want to edit the message? Just tap the body of the email.
Android Voice Actions get directions 202x300 Android tip: 6 gotta try voice commands
Need directions to the nearest ATM? Just speak into the microphone.

5. “Get directions”

Need to find a nearby ATM, post office, or directions to the Empire State Building?
Tap the microphone and say (for example), “Get directions to the nearest ATM” (or just “Directions to ATM”).
In a few seconds, a series nearby ATMs marked on a map will pop up on the screen; tap one, and driving directions will appear.
Want walking directions instead? Just say “Get walking directions to an ATM.”

6. “Note to self”

You’re strolling down the sidewalk with your Android phone in your pocket when suddenly, it comes to you—a brilliant new invention, the name of the neighbor you just passed in the street, or the one thing you really need from the grocery store.
Once more, tap the microphone button in the Google search box, then say “Note to self: Our neighbor’s name is Ted.”
Your Android phone will send you an email with a transcription of your voice memo, plus an audio recording of your mobile musings.
Source: http://heresthethingblog.com
 6 voice commands fro Your Android

How To Set iPhone On Silent Mode Except For Selected Group

There are times we find ourselves in situations that we need to keep our phone in Silent Mode, for example in a meeting, a seminar or an important event. But there are calls that cannot be missed: the call to get to the hospital because your wife is in labor, the call from your kids who are studying in a different time zone or any calls from Mom.
Wouldn’t it be great if you could keep your iPhone on silent but have it ring only for selected individuals or a special group?

Set IPhone On Silent Mode Except For Selected Group Or People
You can set this up with iOS6, under the Do Not Disturb feature. You will first need to create a group of people who can get to you regardless of your phone being on Silent Mode. Here’s how.


1. Create a Group in Contacts

To allow calls from only selected groups, first you need to create a group in your contact book. The group will consist of only the contacts that you want to allow calls from. For now, the easiest way to create a group is to create it on iCloud.
To start, browse over to iCloud and click on ‘Contacts’.
icloud select contacts

On the top part of your contact book you’ll notice a red ribbon. Click on it.

click red ribbon

You will see your contacts on the right hand side and your groups on the left side. Click on the ‘+’ symbol at the bottom of the left page to create a group.

create a group

Name the group. In this example, we will use ‘Family’. After naming it click back to the ‘All contacts’ page.

name the group

To add contacts into your group, just select the contacts (press Ctrl for multiple selections) and drag it into the group you just created.

drag and drop contact

You can click on ‘Family’ group just to double check if all of your contacts are already in the group.

check if all contacts in


2. Customize Notifications Settings

Now on your iPhone, go to your Contact book and refresh it, just to ensure that your newly created group is in your iPhone.

check if groups sync in iphone

Then, tap on Settings > Notifications > Do Not Disturb.

access dnd

On the ‘Do Not Disturb’ page, tap on ‘Allow Calls From’ and choose the group you want notifications to come in for, regardless of the Silent Mode being on.
Note that you can only set to allow calls from only one group. That means if you have two groups that you want to let ring even in silent mode, you will have to pick only one, or group both of them together.

select who to allows calls from

There is actually another alternative. You can put individual contacts under the ‘Favorites’ category, simply tap on the contact and select ‘Add to Favorites’. Then set ‘Allow Calls From’ to ‘Favorites’.


3. Activate ‘Do Not Disturb’

To activate this mode, go to the ‘Settings’ page, and turn ‘Do Not Disturb’ feature ON. Your phone goes straight into Silent Mode and will only allow the group you’ve selected to get through to you.

activate dnd feature

Source: hongkiat.com
How To Set iPhone On Silent Mode Except For Selected Group

How to sync photos to your Dropbox for Android and iPhone

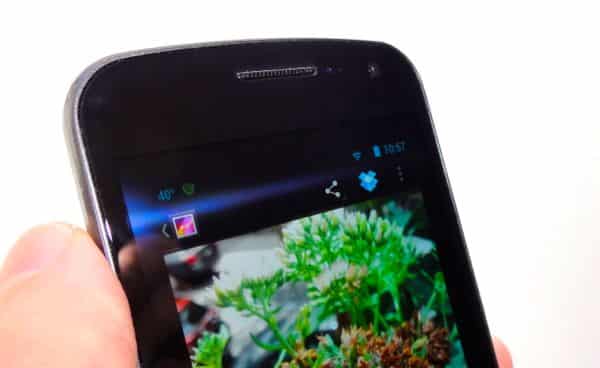
How to sync iPhone or Android photos with Dropbox Android/iPhone tip: How to sync photos to your Dropbox Don’t want to sync your iPhone or Android snapshots with iCloud or the Google+ social network? Here’s an easy alternative.
Dropbox is a handy, simple-to-use file-syncing service (click here to download and install the free Dropbox desktop utility) that boasts apps for both iPhone and Android.

You can set the Dropbox app (click here for the iPhone app, or here for the Android version) to automatically sync all your mobile photos with your Dropbox, or you can pick and choose which snapshots to upload.
Best of all, Dropbox is only as social as you want it to be. Sure, you can easily share your Dropbox photo albums with anyone, including non-Dropbox users; by default, though, your pictures are stored privately in your Dropbox account.
Ready to start syncing?
Here we go…
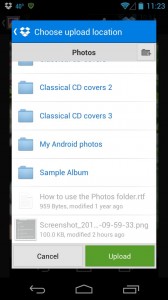
Dropbox for Android 168x300 Android/iPhone tip: How to sync photos to your Dropbox
Just select the Dropbox folder you’d like to sync your photo to, then tap the Upload button.

For Android:

  • First, install the Dropbox app onto your phone, then sign in to your Dropbox account in the Settings menu (tap Settings, then tap “Add account” under the Accounts heading*). If you get the option to turn on a feature called “Camera Upload” while you’re installing Dropbox, just tap “Cancel” for now—don’t worry, we’ll get back to it.
  • Now, let’s try syncing just a single photo to Dropbox. Go ahead and snap a photo, then open the picture in the Gallery app.
  • Tap the screen to reveal the menu buttons, then tap the blue Dropbox button; when you do, a Dropbox upload window will appear.
  • Pick a folder in your Dropbox account where you’d like to upload your photo, then tap the green Upload button. In a few seconds, the picture will sync to your Dropbox—and if you’ve installed the Dropbox utility onto your Mac or PC, you’ll see your snapshot sitting in the Dropbox folder on your desktop.
  • Want to sync every single photo you take on your Android phone, from now on? Launch the Dropbox app on your handset, tap the three-dot menu in the top-right corner of the screen, tap settings, then tap Turn on Camera Upload. You’ll get the option to automatically upload photos only when you’re on a Wi-Fi network (a good idea, lest you rack up pricey mobile data charges), and you can also check a box to sync all your existing pictures (a potentially lengthy process, so be warned).
*These settings may vary depending on the make and model of your Android phone.
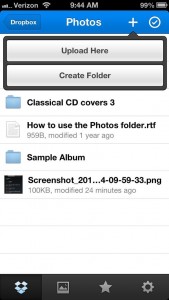
Dropbox for iPhone 169x300 Android/iPhone tip: How to sync photos to your Dropbox
Tap the “+” button in the top-right corner of the Dropbox app to upload photos from your iPhone.

For iPhone:

  • Install the Dropbox app, then sign in with your Dropbox username and password. As with the Android version of Dropbox, you’ll see a “splash” screen asking if you want to turn on the Camera Upload feature; for now, tap “Cancel.”
  • All set? Then let’s start by uploading a single photo. Take a picture with the iPhone’s Camera app, then go back to Dropbox.
  • Tap the folder where you’d like to sync your images (such as the pre-existing Photos folder), tap the “+” sign in the top-right corner of the screen, then tap the Upload Here button. Your picture should sync with Dropbox within a minute or so—and once it does, you’ll see it sitting in your Dropbox folder on your Dropbox-connected PC or Mac.
  • You can also sync all your iPhone photos with Dropbox by turning on the Camera Upload feature. Tap the Settings gear in the bottom-right corner of the screen, then tap Camera Upload, and flip the switch to “On.”
  • A secondary screen will ask whether you want your photos uploaded automatically only on Wi-Fi networks or using your iPhone’s cellular data connection; again, I suggest picking “Only Wi-Fi” to avoid excessive data charges. Once you’ve made your choice, tap the “Enable” button.
  • Now, here’s the downside to Dropbox’s Camera Upload on the iPhone versus the Android version; once you turn it on, it will (annoyingly) start uploading all the photos in your camera roll, whether you like it or not. If you don’t want to wait several minutes or even hours for all your old snapshots to sync, you’ll have to go back to the Settings menu and flip the Camera Upload switch back to “off.”

Bonus tip

Want to automatically share your Dropbox photos with a small (or not-so-small) circles of friends and loved ones?
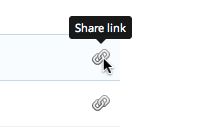
Dropbox share link option Android/iPhone tip: How to sync photos to your Dropbox
Click the link icon to share a Dropbox file or folder with anyone you like.
Easy:
  • You can send a web link to a photo or folder to anyone you like, even someone who isn’t a Dropbox user. Go to the Dropbox site on the web, move your mouse over the file or folder you want to share, click the link icon that appears on the right, copy the URL from your address bar, then share that link with friends and/or family.
  • You can also create a shared Dropbox folder with fellow Dropbox users. From the main Dropbox web page, click Sharing in the left column, then click the “New shared folder” button.
How to sync photos to your Dropbox for Android and iPhone

How to buy Kindle books on an iPhone or iPad (video)

How to buy Kindle books on an iPhone or iPad Kindle tip: How to buy Kindle books on an iPhone or iPad (video)
Wondering where Amazon hid the Kindle store on its Kindle app for the iPhone and iPad? Nope, you’re not missing anything—it simply isn’t there.
Thanks to Apple’s strict rules regarding so-called “in-app” purchase on the iPhone (I won’t bore you with the details, but you can read all about it here), Amazon long ago removed a handy button on its Kindle app that used to lead iPhone users straight to the online Kindle store.


The good news, though, is that you still can buy Kindle books directly on the iPhone—or the iPad, for that matter.
Here’s how…

For the iPhone:

  • Open the Safari web browser on your iPhone and type (or click) this link:
http://www.amazon.com/kindlemobilestore
  • At this point, you’ll have arrived at the same page where the old “Kindle Store” button on the iPhone Kindle app would have taken you. From here, you can search the entire store, or browse books, newspapers, magazines, or Kindle “Singles” (short stories, essays, and other short works, which typically cost $3 or less).
  • Once you find a Kindle book you like, tap its link, then make sure your iPhone is selected in the pull-down menu marked “Send wirelessly to.”
  • Tap “Buy now” or “Try a sample,” then go back to the iPhone Kindle app; your new book should start downloading automatically. No problem!
Kindle store on the iPad 225x300 Kindle tip: How to buy Kindle books on an iPhone or iPad (video)
You can buy Kindle books directly on your iPhone or iPad, with a little help from Safari.

For the iPad:

  • Launch the Safari browser and type (or click) this link into the address bar:
http://read.amazon.com
  • You should arrive on Amazon’s “Cloud Reader,” an online version of the Kindle e-reader for PC and Mac web browsers, as well as the iPad—and in the top-right corner of the page, you should see a button marked “Kindle Store.” Go ahead and tap it.
  • Now, you should be be looking at the touch-optimized Kindle Store for iPad, complete with a swipeable row of recommended books and about two-dozens categories to browse.
sumber: http://heresthethingblog.com
How to buy Kindle books on an iPhone or iPad (video)

How To Backup WhatsApp Chat Log From iPhone To Computer

Do you have important WhatsApp chats that you want to save or read without having to press ‘load more’ every, single, time? Or is your WhatsApp starting to slow down because of your bloated (and still growing) chat history and you want to free up some space without losing all those memories inside?
WhatsApp Chat History
With the help of iPhone Backup Extractor and WhatsApp Xtract you can save your WhatsApp chat history in your computer. With a little bit of help from Phyton you can display the chat history in browser view and read it whenever you want.

1. Backup and Extract WhatsApp Data

Connect your iPhone to your computer and open up iTunes. Back up your iPhone.
Note: Make sure that you create an unencrypted backup file as the extractor in the second part of this guide cannot handle encrypted backup files.
iTunes Backup
To extract WhatsApp data from your iPhone backed-up files, download iPhone Backup Extractor and install it. Run the program.
iPhone Backup Extractor
This program will auto-locate the location of your backup files. If your folder is not in the located folder, click the drop-down and ‘Select another backup folder’ and locate your iPhone backup folder.
iPhone Backup Extractor - Select Backup
After locating the backup files, click on Expert Mode.
Expert Mode
Then, click on ‘Application’ to expand it. Find ‘net.WhatsApp.WhatsApp’ and tick on the box next to it. Then click on Extract selected.
net.WhatsApp.WhatsApp
The extracted files will be placed in a folder named ‘Application’. The ‘Application’ folder can be located at the directory you chose after clicking ‘Extract selected’ earlier.
Before we go further, search for ‘ChatStorage.sqlite’ in the same folder. You will need this in the next step.
ChatStorage.sqlite

2. Extract & Read WhatsApp Chat History

So far, we have extracted WhatsApp data from our iPhone files. To read the chat history on the computer, we must first extract it from our WhatsApp data.
To extract, first download WhatsApp Xtract. Extract WhatsApp Xtract to a folder which is convenient for you.
You will see a ‘ChatStorage.sqlite’ in the WhatsApp Xtract folder. Replace it with your own ‘ChatStorage.sqlite’ that has been extracted from your backed up file.

To Read on Browser View

Download and install Phyton. Download the 32bit/x86 version even if you’re running on a 64bit/x64 Windows. If you choose to download the 64bit version, you’ll end up with an error when you try to use it later on.
Phyton
After installing Phyton, go back to the WhatsApp Xtract folder and search for ‘!install pyCrypto.bat’. Run it (or right click and ‘run as administrator’).
Then, run ‘WhatsApp_xtract_iphone.bat’.
WhatsApp_xtract_iphone.bat
Once it is done, it will open in your browser and all your WhatsApp chat history will be displayed.
WhatsApp chat history
Clicking on the ‘Contact Name’ will direct you to the chat history with that contact.
chat history
The HTML file will be stored in the WhatsApp Xtract folder, so you can refer back to that for future use.
WhatsApp Xtract folder

Original post is in hongkiat.com
How To Backup WhatsApp Chat Log From iPhone To Computer