Showing posts with label android tips. Show all posts

How to swipe instead of type in keypad

Android type with a swipe gesture typing Android tip: Hate typing on the keypad? Try swiping insteadNever quite got the hang of tap, tap, tapping on a touchscreen keypad? If you’re using an Android phone and you’re feeling a little daring, there’s a clever—and surprisingly elegant—alternative: swiping.
For a little more than a year now, Android has boasted a clever feature called Gesture Typing, which lets you type on your phone’s virtual keyboard by swiping your fingertip from one letter to another.
Android Gesture Typing settings 297x300 Android tip: Hate typing on the keypad? Try swiping instead
You can enable Gesture Typing from the Language & Input section of the Settings app.
As you slide your finger, Gesture Typing does its best to guess the word you want to type—and luckily, Gesture Typing’s best guess is typically quite good.
Of course, typing with touchscreen gestures takes some getting used to, but it doesn’t take long to get the hang of it—and don’t be surprised if you never go back to tapping.
Indeed, within a few minutes, I found myself “typing” with ease, with my thumb making big, looping gestures across the virtual keypad on my (now long-in-the-tooth) Galaxy Nexus phone.
Gesture Typing is “natively” supported on Android phones running on Android version 4.2 and up. (Here’s how to check which version of Android your phone is running on.)
Got an older Android phone? You can still add Gesture Typing to your device by downloading and installing Google Keyboard (which works on Android phones with version 4.0 and up of the Android OS) from the Play Store.
Want to give Gesture Typing a try? Here’s how…
  • Launch the Settings app, tap “Language & input,” then find the “Keyboard & Input Methods” heading.
  • Make sure the Google Keyboard option is checked, then tap its settings button immediately to the right.
  • Scroll down to the Gesture Typing section, then check the box next to “Enable gesture typing.” You can also tick off a few other options if you wish, including a “gesture trail” that appears as you swipe, as well as a “floating” preview of the word that Gesture Typing thinks you have in mind.
  • Now, go ahead and jump to any app that requires the keyboard, and try swiping instead of typing. Neat, right?
An alternative to Gesture Typing is Swype, a third-party Android app that’s actually been in the swipe-to-type business longer than Google has.
Swype comes with a variety of features you won’t find in Google’s Keyboard app, from gesture shortcuts (which let you, say, jump to the number keypad by using a special swipe) to custom keyboard themes. You can even tweak how much of the screen the Swype keyboard fills.
The only catch: the Swype app (which is available from the Play Store) will set you back $4, while Google Keyboard is free.

Bonus tip

Don’t bother to tap the space bar as you’re swiping; both Gesture Typing and Swype will add spaces between your words automatically.

via
How to Set an “out of office” message with the Gmail app

Set an out of office message from the Gmail for Android app Android tip: Set an out of office message with the Gmail app 
So, your bags are packed, you’re in the airport and you’re about to step on a plane heading for someplace warm, and then it hits you: you forgot to activate an “out of office” message for your email account.
Well, if you’re using Gmail, good news: Gmail for Android just added an auto-responder feature that lets you set up an “out of office” message directly from your Android phone, no PC or Mac required.
Gmail for Android vacation responder settings 300x204 Android tip: Set an out of office message with the Gmail app
You can now set an out of office message directly from the (updated) Gmail for Android app.
Here’s how…
  • First, you’ll need to install the latest version of the Gmail app. Launch the Play Store app, open the sidebar (tap in the top-left corner of the screen) and navigate to the “My apps” section, then tap the green Update All button to install any pending app updates, including (potentially) Gmail.
  • Next, launch Gmail, tap the three-dot menu button in the top-right corner of your screen, tap Settings, then tap the Gmail account for which you’d like to set up an “out of office” message.
  • Tap “Vacation responder,” then enter a starting date, and end date, a subject line (“Gone fishing!”), and a message for anyone who tries to email you during your well deserved break. You can also check the box next to “Send only to my Contacts” if you only want your family, friends and colleagues to know you’re away.
  • Flip on the switch next to “Vacation responder,” tap the Done button, then sit back and relax. 
Via http://heresthethingblog.com
Turn on “airplane mode” and Wi-Fi at the same time


Turn on Airplane Mode and Wi Fi at the same time Android/iPhone tip: Turn on airplane mode and Wi Fi at the same timeCarol writes: This may be more of a data/application question than a tech question, but here goes: Son is in Japan with his Droid Razr Maxx, trying to navigate around roaming and international charges—ouch!
Can’t get a straight answer from our carrier (Verizon); of course, they want us to sign up for international calling and data.
If he leaves his phone in “airplane mode” during the day—to take pictures, mainly—but turns on Wi-Fi in a free hotspot at night, will he be able to upload photos free of charge to Facebook or email (for example)?
We are using Viber for calling/texting, and Skype for online chatting. I am such a technosaur… :/
Hi Carol! Actually, you don’t sound like a technosaur at all. You already know about overseas data and calling networks (and that “roaming” on them costs a fortune), you’re savvy about “airplane mode” (which switches off all of your smartphone’s antennas and wireless transmitters), and you’ve figured out how to save on SMS and phone charges with free chat apps like Skype and Viber.
Not too shabby, if you ask me.
Android Wi Fi settings 300x251 Android/iPhone tip: Turn on airplane mode and Wi Fi at the same time
There’s nothing stopping you from turning Wi-Fi back on after activating “airplane mode.”
Anyway, yes—your son absolutely can upload photos to Facebook over free Wi-Fi hotspots in Japan, or anywhere abroad.
Wi-Fi hotspots have nothing to do with cellular voice or data networks (although some cellular carriers, like AT&T, offer Wi-Fi hotspots that subscribers can use), and as long as your son’s phone is set to “airplane mode,” there’s no chance he’ll run up massive mobile charges by accidentally roaming on a Japanese cellular network.
And here’s a tip: both Android phones (like the Droid Razr Maxx) and iPhones will let you turn on both Wi-Fi and “airplane mode” at the same time, meaning there’s no need to repeatedly switch “airplane mode” off and on to connect to a nearby Wi-Fi hotspot.
Here’s how…

For Android phones:

  • Tap Settings, then tap More under the “Wireless & Networks” setting.
  • Tap the “Airplane mode” checkbox (when you do, you should see a little airplane icon in the top corner of the screen), then tap Back.
  • Flip the switch next to Wi-Fi back on, then make sure you still see the airplane-mode icon at the top of the screen.
iPhone Airplane Mode settings 300x248 Android/iPhone tip: Turn on airplane mode and Wi Fi at the same time
You can also turn on both Wi-Fi and “airplane mode” on an iPhone.
(Note: the instructions above may vary depending on the make and model of your Android phone.)

For iPhone:

  • Tap Settings, then switch Airplane Mode to “On.”
  • Tap Wi-Fi, tap the switch to turn Wi-Fi back on, then connect to any nearby network. Again, you should still see the airplane-mode icon at the top of the screen.

How to print directly from your phone


How to print directly from your Android phone Android tip: How to print directly from your phone
Got a photo, a web page, or a PDF form on your Android phone that you’d like to print? Nope, there’s no need to send the document to your PC or Mac—and no, you don’t need a newfangled, web-connected printer, either.
All you really need, in fact, is a) a standard USB printer connected to your desktop or laptop, b) Google’s Chrome web browser, and c) an Android app that works with Google’s handy (and free) “Cloud Print” service.
Google Cloud Print select printer Android 300x260 Android tip: How to print directly from your phone
Just select your Cloud Print-connected printer to start printing documents straight from your Android phone.

What is Cloud Print, you ask? Well, it pretty much is what it says: a feature that lets you print documents and photos from the web, your phone, or a tablet, all via the “cloud.”
There’s a decent range of Google Print-friendly printers and apps available, and Google just released its own, official Google Print app for Android devices.
And while you can get a fancy Google Print-enabled printer that prints documents directly from the web, there’s nothing stopping you from using Google Print with the garden-variety printer you’re using right now.
Want to give it a try? Let’s get started…
  • First, you’ll need to have Google Chrome installed on the PC or Mac that your printer’s connected to. Once that’s done, sync your Google account with Chrome by clicking the menu button in the top-right corner of the browser and selecting “Sign in with Google.”
  • All set? Click the menu button again, select Settings, click “Show advanced settings” at the bottom of the page, then click the “Sign in to Google Cloud Print” button beneath the “Google Cloud Print” heading. Once you’ve signed in to Cloud Print with your Google ID, you can add your printer to your Cloud Print profile.
  • Google Cloud Print share screen 300x217 Android tip: How to print directly from your phone
    Cloud Print will let you print from any Android app with a Share option.

  • Next, you’ll need to install a Cloud Print-compatible app onto your Android phone. For this example, I’ll go with Google’s official Cloud Print app, just to keep things simple. Also, when you’re setting up your Cloud Print app, make sure to sign in to Cloud Print using the same Google ID you used when setting up Cloud Print in Chrome.
  • Done? If so, let’s try it. First, make sure both your PC and printer are turned on, then launch the Chrome web browser.
  • Open a web page on your Android phone’s browser, tap the three-dot menu button in the top corner of the screen, tap Share, then tap the Cloud Print icon. (You can also print by tapping “Share” from within any Android app.)
  • The Google Cloud Print app (or the Cloud Print app of your choice) should now open. Tap your printer from the list of available Cloud Print printers, take a quick look at the print preview screen, then tap the Print button (it’s the one that looks like an arrow, near the top of the screen). If all goes well, your printer should begin cranking out pages within a minute or so.
Source http://heresthethingblog.com
How to print directly from your phone

Scan and upload receipts to Google Drive

applications| how-tos| phones| the cloud
Scan and upload receipts to Google Drive Android tip: Scan and upload receipts to Google DriveAre you a stickler for keeping your receipts? If so, there’s a new feature in Google Drive for Android that’s right up your alley.

Just point and shoot, and the Google Drive app will convert the image of your receipt into a PDF, and then upload the file directly to your cloud-based, accessible-from-anywhere Google Drive account.
Once uploaded, Google Drive will scour the image using OCR (short for Optical Character Recognition) technology, and if the image you snapped is clear enough, you’ll be able to search for any words of numbers that Drive managed to detect.
Before you get too excited, keep in mind that Google’s OCR accuracy is somewhat hit and miss; it does much better with words and letters than with numbers, and it also hates creases, so make sure to scan your receipts before folding them up in your pocket.
Still, Google Drive’s new scanning feature (which, for now, is only available on the Android version of the Google Drive mobile app) could be handy for anyone who wants to snap and store receipts, business cards, or any other paper documents on the fly.
Google Drive scanned receipt preview 575x1024 Android tip: Scan and upload receipts to Google Drive
You can preview scanned receipts and make adjustments with the edit buttons before uploading them to Google Drive.
Ready to scan some receipts? Let’s get started…
  • First, of course, you’ll need a Google Drive account (you should already have one if you’ve got a Google account) and the latest version of Google Drive for Android. Once you’re all set, fire up the Google Drive app.
  • Before you start scanning receipts, you might want to create a folder in which to file them all. Tap the three-dot Menu button in the top-right corner of the screen, tap “Add new,” tap Folder, then give your folder a name, like “Receipts.” (You can, of course, reorganize your Google Drive files anytime you like.)
  • Time to start scanning! Tap the three-dot menu again, tap “Add new,” then tap Scan. A viewfinder should appear on the screen; when it does, aim your phone’s camera at the receipt you want to scan, make sure it’s centered on the display, then tap the virtual shutter release.
  • Next, you’ll see a preview of the image. You can twirl the image around with a “pinch” gesture, or tap the Crop or white-balance buttons to make adjustments. Are you scanning a multi-page receipt? Tap the “+” button to scan the next page.
  • Everything look good? Then tap the “check” button to upload the image to Google Drive.

Bonus tip

Having trouble searching for text or numbers in your scanned receipts? Try searching by file name instead; by default, Google Drive stitches the date of a scan into the file name, like so: “scanned_20130523″ (for May 23, 2013).
Sumber: heresthethingblog.com
Scan and upload receipts to Google Drive

How to add a contact to your Android home screen

Who needs phone favorites when you can just add a one-touch shortcut for your most important contacts, friends, and loved ones to your Android phone’s home screen?
Android contact shortcut 300x238 Android tip: How to add a contact to your home screen
Add a contact shortcut to your Android phone’s home screen for one-touch access to phone numbers, email addresses, URLs, and more.

Good question—and indeed, the ability to pin a contact directly to your home screen is such a no-brainer that I can’t believe it’s still not possible on an iPhone (or not without a third-party app, at least).
Anyway, adding a shortcut for a contact to your Android phone’s home screen is a snap.
Here’s how…
  • Open the People app on your Android phone, then browse or search for a specific contact. (Note: these steps may vary depending on the make and model of your Android phone. I tested this tip on a Samsung Galaxy Nexus running on Android version 4.2.2.)
  • Found the right contact? Tap the name, then tap the three-dot menu in the top-right corner of the screen.
  • Tap the “Place on Home Screen” option.
  • Android People app options 293x300 Android tip: How to add a contact to your home screen
    You can add a contact to your Android phone’s home screen in just a few taps.
  • Go back to your home screen to find the new shortcut for your contact. Can’t find it? If your main home screen is too cluttered, your contact may be sitting on a secondary screen; just flick left or right to shuffle through them all.
  • Tap the shortcut to get a pop-up window with a menu of phone numbers; tap one to make a call, or tap one of the little messaging icons on the right to compose a new text message. You can also tap the Gmail, Google Maps, and web tabs for email addresses, street addresses, and relevant URLs.
  • Don’t want a particular contact shortcut on your home screen anymore? Tap and hold it, then drag it up to the “Remove” icon near the top of the screen.

Bonus tip

Want to take all the contact icons on your various home screens and group them together? Just tap, hold, and drag one contact icon on top of another to create a new home-screen folder, then give it a name (like “My Favorites”).

From heresthethingblog.com
How to add a contact to your Android home screen

How to Shrink wide messages to fill the screen (gmail)

Shrink wide Gmail messages to fit your Android screen Gmail for Android tip: Shrink wide messages to fill the screen

Ever find yourself swiping back and forth on your Android display just to read a sentence in a Gmail message? Annoying, right?
That’s because Gmail for Android zooms in a bit on some email messages—mainly those with large images, banners, or other graphics—so they’re easier to read.
The only problem with the zoomed messages, though, is that the actual text tends to spill off the side of the screen, meaning you’ll need to swipe to back and forth to complete a sentence.

Gmail for Android auto fit setting 300x189 Gmail for Android tip: Shrink wide messages to fill the screen
You can set Gmail for Android to automatically shrink wide messages to fill the screen.

Want to save yourself the trouble? All you have to do is tweak a single setting.
  • Open Gmail on your Android phone, tap the three-dot Menu button in the bottom-right corner of the page, tap Settings, then tap General Settings.
  • Near the bottom of the screen, tap checkbox next to the “Auto-fit messages” setting.
Now, go back and open a few Gmail message—and when you do, you’ll notice that the width of each message fills the screen, no swiping required.
Of course, shrinking your Gmail messages to fit the screen may result in teeny, tiny text—but if that happens, you can always “pinch” the screen to zoom in.
Sure, you’re swiping again, but at least you won’t have to swipe unless you really need to.
From heresthethingblog.com
How to Shrink wide messages to fill the screen (gmail)

How to take a screenshot in Android


How to take a screenshot on your Android phone Android tip: How to take a screenshotEver wish you could snap a quick photo of whatever’s on the screen of your Android phone—say, a “screenshot” of an interesting app, or of an eyebrow-raising message thread?
Well, taking a picture (or a “screen capture,” as it’s called in tech circles) of your Android phone’s display is a fairly easy process, so long as you’re using a relatively recent Android device.
Android screenshot in notification pane 295x300 Android tip: How to take a screenshot
You can jump to a recently taken screenshot by opening your phone’s notification pane; just swipe down from the top of the screen.
Specifically, your phone must be running on version 4.0 of the Android operating system to use the “native” Android screenshot feature.
To find out which version of Android is loaded on your phone, tap Settings, “About phone,” and then check the number listed under the “Android version” heading.
So, ready to start snapping screenshots?
Here’s how…
  • See something interesting on your Android phone’s screen you want to save for posterity? Try this: at the same time, press and hold both the Power button and the volume-down button.
  • Android screenshot sharing options 300x276 Android tip: How to take a screenshot
    Tap the Share button to see all the sharing options for your new screenshot.
  • After about a second, a virtual snapshot of your screen will appear and then slide into the corner of the screen. You should also see a “Saving screenshot…” message in the notification bar along the top of your phone’s display.
  • Swipe down from the top of the screen to open your Android phone’s notification pane, then tap the “Screenshot captured” entry to jump to your new screenshot. You can also access the image from the “Screenshots” folder in the Gallery app.
  • Want to share your screenshot? Tap it, tap the Share icon at the top of the screen (it’s the one with two lines connected by three dots), then tap a sharing option—anything from Google Drive and Gmail to Messages and Google+.
  • To edit or delete your screenshot, tap the three-dot menu button and then pick an option from the drop-down menu.

Bonus tip

Specific makes and models of Android phones may have their own custom screenshot features.
For example, certain HTC and Samsung phones will let you take a screenshot by pressing and holding the Power and Home keys.
The Samsung Galaxy Note, meanwhile, lets you take a screenshot using the “S Pen” stylus—just press and hold the S Pen button, then press and hold the display with the tip of the pen.
How to take a screenshot in Android

10 time-saving Google searches you need to try

10 time saving Google searches you need to try 10 time saving Google searches you need to tryNeed to track a package, get the status of a flight, do a little math, or find out if the ground really was just shaking beneath your feet?
Believe it or not, you can do all that and more straight from the Google search box—and in most cases, you’ll get the details you need the instant you tap the Search button.

Read on for 10 clever, time-saving Google searches, from converting currency and units of measurement to looking up definitions and—no kidding—tracking the latest earthquakes.

1. Track a package

Expecting a package? If it’s being shipped by FedEx, UPS, or the U.S. Postal Service, you can just plug the tracking number into the Google Search box.
When you click the Search button, you’ll get a link that’ll take directly to tracking results on the shipper’s web site.
Google search currency 300x205 10 time saving Google searches you need to try
Need to know the current value of the Japanese yen? Just ask Google.

2. Convert currency

So, how many Japanese yen to a U.S. dollar today? Easy.
Just type “1 USD in yen” (or something similar) into the Google Search box to get an instant conversion, including a history of the currency’s relative strength and a form for performing new conversions on the fly.

3. Get local movie showtimes

Want to go to the movies? Find out what’s playing—and when—by typing “movies” and a ZIP code into the Google search box.
Have a specific movie in mind? Type its name into the Google box and (again) add a ZIP code.
Hint: If you skip the ZIP code when looking up local movie times, Google will make a rough guestimate of your location.

4. Look up a definition

Ah, “vagary.” Cool word. What does it mean, again?
Type “define vagary” into the Google search box and you’ll get the full definition, a phonetic spelling, and synonyms. You can even hear the word spoken by clicking the speaker icon.
Google flight search 300x201 10 time saving Google searches you need to try
You can get the status of just about any flight with a simple Google query.

5. Track a flight

Need to know whether your flight’s delayed—or when another flight is slated to land?
Type the airline and flight number into the search box (“united 458″) and you’ll get a status report, a terminal and a gate number.

6. Convert units of measurement

How many kilometers in a mile … didn’t we learn that in high school?
If you’re still not sure, just type “1 mile to km” or “how many kilometers in a mile?” into the search box, and the answer will appear in a measurement converter.

7. Get the weather

Find out how beautiful the weather is in, say, Hawaii by typing “weather maui” or “weather honolulu” into the Google search box.
You’ll get the current temperature, a 7-day forecast, and even hourly details on rain and wind.
Google web calculator 300x269 10 time saving Google searches you need to try
Six times seven? Forty-two—or so Google tells me.

8. Do the math

You don’t need a calculator on your desk if you’ve got Google in a browser tab.
Type in “6*7″ (or “what’s six times seven?”), “132/3,” or “square root 100″ and you’ll get an answer the moment you click the Search button, along with a web calculator for solving more equations.

9. Check the time

Can’t remember whether Chicago is in the Eastern or Central time zone?
Type “time chicago” in the Google Search box to get the current time in the Windy City, along with details on which time zone it’s in (Central, in case you’re wondering).

10. Confirm a quake

Whoa! Did you feel that? If you think you just felt an earthquake—or if you know you felt one—type “earthquake” into the Google search box.
The first listing will be for the US Geological Survey, and just beneath you’ll see a list of most recent temblors on the planet, complete with magnitudes and map links to the various epicenters.
10 time-saving Google searches you need to try

How to add widgets to the lock screen


Add a lock screen widget to your Android phone Android tip: How to add widgets to the lock screenWish you could browse the latest scores, glance at your inbox, check the weather, or even identify a song directly from your Android phone’s lock screen, no passcode required?
Well, you can, actually, thanks to the new lock-screen “widgets” in the latest version of Android.
Adding a widget to the lock screen on your Android phone is a snap, and dozens of lock screen-friendly widgets are available depending on the apps you have installed.
Google Now lock screen widget for Android 300x184 Android tip: How to add widgets to the lock screen
You can add lock-screen widgets for weather, sports, news, your latest email, calendar events, and more.
Of course, you may want to think twice before making, say, your email inbox or your calendar visible from your Android phone’s lock screen. Personally, I’d rather keep my inbox and other personal info safely secured with a password, but the choice is yours.
Also, keep in mind that your phone must be running on version 4.2 or better of Android to add widgets to the lock screen.
Let’s get started!
  • First, put your phone to sleep, then click the power button to light up the lock screen.
  • Next, swipe from the left edge of the display to the right edge—and as you do, a secondary lock screen with a big “+” sign in the middle will slide into view.
  • Tap the “+” sign to see a list of available lock-screen widgets. If your phone is protected by a passcode, you’ll need to enter it first before you can browse your available widgets.
  • See a widget you like? Tap to add it to the lock screen. You can add up to five lock-screen widgets, with one widget per swipable screen.
  • Want to get rid of a lock-screen widget? Tap and hold it, then drag it up to the “Remove” icon.

Bonus tip

You can boost your selection of lock-screen widgets by downloading more apps from the Google Play Store. ESPN’s ScoreCenter app, for example, comes with its own lock-screen widget, as does Google’s Sound Search app.
source: http://heresthethingblog.com
How to add widgets to the lock screen

How To Sync Mail, Contacts & Calendars From Android To iOS

If you ever thought of switching from Android to iPhone or to use the iPhone or iPad Mini as a secondary device, then you certainly would want to sync your mail, contacts and calendar information on both devices. With the Google account used on your Android device to backup these information, a final backup will ensure that everything you need will be properly synced to your iOS device.
To get all your important mail and schedules paired up in your Android and iOS devices, there just 2 things you need to do: sync your Mail and Calendar, and sync your Contacts. All you have to do is sign in to your Google account, twice.

How To Sync Mail and Calendar

First, go to Settings > Mail, Contacts, Calendars > Add Account.

Mail and Calendar

Select Gmail and key in your name, email address, password and description and tap on Next and then Save. Now when you go to the Mail or Calendar app on your iPhone, you should have all the necessary information synced.

Mail Settings


How To Sync Contacts

To sync contacts, you’ll have to go to go to Settings > Mail, Contacts, Calendars > Add Account > Other.

Contacts

Tap on Add CardDAV Account and on the next screen, under Server, type in ‘google.com’, fill in your full email address for User Name, then enter your password and tap on Save.
Now all your Google contacts from your account will be available on the Contacts app of the iPhone.

Contacts Settings


Source hongkiat.com
How To Sync Mail, Contacts & Calendars From Android To iOS

How to archive new Gmail messages without opening Gmail

Archive Gmail in Android notifications pane Android tip: How to archive new Gmail messages without opening Gmail
Got the latest version of Gmail for Android? If so, you can now scan the first few lines of your email or even archive a message without actually opening Gmail.

First, you’ll need to make sure you’ve updated the Gmail app for Android to the latest version.
Launch the Play Store app on your handset, tap the three-dot menu button in the top-right corner of the screen, tap My Apps, and make sure Gmail is listed in the “Up to Date” section.
Also, keep in mind that your phone must be running Android version 4.1 or better for the new Gmail notifications to work. To check your handset’s Android version, tap Settings, “About phone,” then check the number next to “Android version.”
Opening a Gmail notification in Android 300x195 Android tip: How to archive new Gmail messages without opening Gmail
Just tap and hold, then drag down to reveal the Archive and Reply buttons.

All set? Now, the next time you get a new Gmail message, try this:
  • Swipe down from the top of the screen to open the Notifications pane; you should see an entry for the Gmail message you just received.
  • Tap and hold the notification, then pull down until you see the first few lines of the message, along with the Reply and Archive buttons. (Note: If a specific Gmail alert combines multiple new messages, the Reply and Archive buttons might not appear.)
  • Tap Archive, and the message will be immediately filed in your All Mail directory. Tap the Reply button, and Gmail will open directly to a newly composed reply.
Source: http://heresthethingblog.com
How to archive new Gmail messages without opening Gmail

6 voice commands fro Your Android

6 gotta try Android voice commands Android tip: 6 gotta try voice commandsNeed your Android phone to compose an email, get directions, scan a barcode, or even name a song—all with a bare minimum of taps?
Just speak into the microphone.
The latest version of Google search for Android—which, strictly speaking, is now part of a new Android app called “Google Now“—boasts a little microphone icon on the right side of the search box.
Google Voice Actions 300x268 Android tip: 6 gotta try voice commands
Tap the microphone in the Google search box, then speak a command.

Tap the icon, and you can speak your searches rather than type them.
Even better, though, you can also say voice commands—or “voice actions,” as Google calls them.
Speak the right command, and your Android phone can compose an email, scan a barcode, open an app, or even name the song that’s playing on the radio.
Here’s six nifty Android voice commands you need to try, starting with…

1. “What’s this song?”

Want to know the name of a toe-tapping tune? Tap the microphone icon in the Google search box and ask, “What’s this song?”
Your Android phone will listen carefully for a few seconds—and if it comes up with a match, it’ll pop up on the screen, complete with a link to the Google Play music store.
Android Voice Actions scan barcode 229x300 Android tip: 6 gotta try voice commands
Say “scan a bar code,” then point your Android phone’s camera at a bar code or QR code.

2. “Scan a barcode.”

Want to comparison shop at the grocery store, or wondering what’s the deal with the mysterious QR code on a billboard?
Just tap the microphone button, say “scan a barcode,” then point your phone’s camera at the barcode or QR code you’d like to scan.
Within moments, your phone will display product details, shopping results, or the web address that a QR code is pointing to.

3. “Open” an app

Can’t remember the folder in which you stuffed, say, Flipboard, Gmail or Google Maps? No problem.
Tap the microphone button again, then say “Open Flipboard,” “Open Gmail,” or “Open” + the name of any app installed on your handset.
Your phone will think for a second, then fire up the app you asked it to open.

4. “Send email”

Want to write an email and send it in just a couple taps? Let’s try it.
Tap the Google search microphone, and say: “Send email to [name of a contact], subject: let’s grab lunch, message: wanna have lunch later this week?”
After a moment or two, your phone will transcribe your words into a new mail message—and if all goes well, your last step will be to tap the “Send email” button. Want to edit the message? Just tap the body of the email.
Android Voice Actions get directions 202x300 Android tip: 6 gotta try voice commands
Need directions to the nearest ATM? Just speak into the microphone.

5. “Get directions”

Need to find a nearby ATM, post office, or directions to the Empire State Building?
Tap the microphone and say (for example), “Get directions to the nearest ATM” (or just “Directions to ATM”).
In a few seconds, a series nearby ATMs marked on a map will pop up on the screen; tap one, and driving directions will appear.
Want walking directions instead? Just say “Get walking directions to an ATM.”

6. “Note to self”

You’re strolling down the sidewalk with your Android phone in your pocket when suddenly, it comes to you—a brilliant new invention, the name of the neighbor you just passed in the street, or the one thing you really need from the grocery store.
Once more, tap the microphone button in the Google search box, then say “Note to self: Our neighbor’s name is Ted.”
Your Android phone will send you an email with a transcription of your voice memo, plus an audio recording of your mobile musings.
Source: http://heresthethingblog.com
 6 voice commands fro Your Android

How to sync photos to your Dropbox for Android and iPhone

How to sync iPhone or Android photos with Dropbox Android/iPhone tip: How to sync photos to your Dropbox Don’t want to sync your iPhone or Android snapshots with iCloud or the Google+ social network? Here’s an easy alternative.
Dropbox is a handy, simple-to-use file-syncing service (click here to download and install the free Dropbox desktop utility) that boasts apps for both iPhone and Android.

You can set the Dropbox app (click here for the iPhone app, or here for the Android version) to automatically sync all your mobile photos with your Dropbox, or you can pick and choose which snapshots to upload.
Best of all, Dropbox is only as social as you want it to be. Sure, you can easily share your Dropbox photo albums with anyone, including non-Dropbox users; by default, though, your pictures are stored privately in your Dropbox account.
Ready to start syncing?
Here we go…
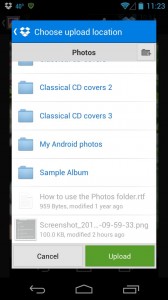
Dropbox for Android 168x300 Android/iPhone tip: How to sync photos to your Dropbox
Just select the Dropbox folder you’d like to sync your photo to, then tap the Upload button.

For Android:

  • First, install the Dropbox app onto your phone, then sign in to your Dropbox account in the Settings menu (tap Settings, then tap “Add account” under the Accounts heading*). If you get the option to turn on a feature called “Camera Upload” while you’re installing Dropbox, just tap “Cancel” for now—don’t worry, we’ll get back to it.
  • Now, let’s try syncing just a single photo to Dropbox. Go ahead and snap a photo, then open the picture in the Gallery app.
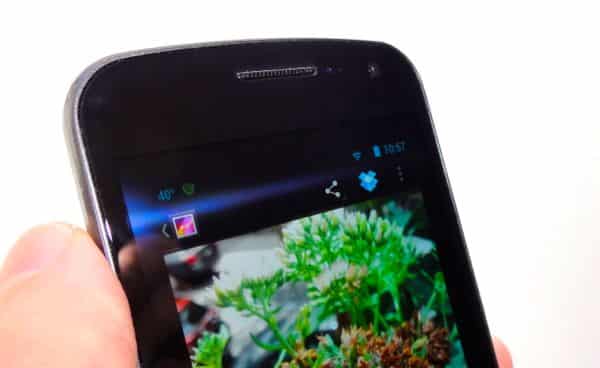
  • Tap the screen to reveal the menu buttons, then tap the blue Dropbox button; when you do, a Dropbox upload window will appear.
  • Pick a folder in your Dropbox account where you’d like to upload your photo, then tap the green Upload button. In a few seconds, the picture will sync to your Dropbox—and if you’ve installed the Dropbox utility onto your Mac or PC, you’ll see your snapshot sitting in the Dropbox folder on your desktop.
  • Want to sync every single photo you take on your Android phone, from now on? Launch the Dropbox app on your handset, tap the three-dot menu in the top-right corner of the screen, tap settings, then tap Turn on Camera Upload. You’ll get the option to automatically upload photos only when you’re on a Wi-Fi network (a good idea, lest you rack up pricey mobile data charges), and you can also check a box to sync all your existing pictures (a potentially lengthy process, so be warned).
*These settings may vary depending on the make and model of your Android phone.
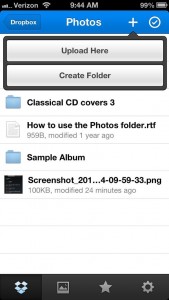
Dropbox for iPhone 169x300 Android/iPhone tip: How to sync photos to your Dropbox
Tap the “+” button in the top-right corner of the Dropbox app to upload photos from your iPhone.

For iPhone:

  • Install the Dropbox app, then sign in with your Dropbox username and password. As with the Android version of Dropbox, you’ll see a “splash” screen asking if you want to turn on the Camera Upload feature; for now, tap “Cancel.”
  • All set? Then let’s start by uploading a single photo. Take a picture with the iPhone’s Camera app, then go back to Dropbox.
  • Tap the folder where you’d like to sync your images (such as the pre-existing Photos folder), tap the “+” sign in the top-right corner of the screen, then tap the Upload Here button. Your picture should sync with Dropbox within a minute or so—and once it does, you’ll see it sitting in your Dropbox folder on your Dropbox-connected PC or Mac.
  • You can also sync all your iPhone photos with Dropbox by turning on the Camera Upload feature. Tap the Settings gear in the bottom-right corner of the screen, then tap Camera Upload, and flip the switch to “On.”
  • A secondary screen will ask whether you want your photos uploaded automatically only on Wi-Fi networks or using your iPhone’s cellular data connection; again, I suggest picking “Only Wi-Fi” to avoid excessive data charges. Once you’ve made your choice, tap the “Enable” button.
  • Now, here’s the downside to Dropbox’s Camera Upload on the iPhone versus the Android version; once you turn it on, it will (annoyingly) start uploading all the photos in your camera roll, whether you like it or not. If you don’t want to wait several minutes or even hours for all your old snapshots to sync, you’ll have to go back to the Settings menu and flip the Camera Upload switch back to “off.”

Bonus tip

Want to automatically share your Dropbox photos with a small (or not-so-small) circles of friends and loved ones?
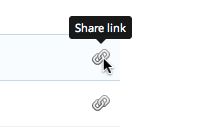
Dropbox share link option Android/iPhone tip: How to sync photos to your Dropbox
Click the link icon to share a Dropbox file or folder with anyone you like.
Easy:
  • You can send a web link to a photo or folder to anyone you like, even someone who isn’t a Dropbox user. Go to the Dropbox site on the web, move your mouse over the file or folder you want to share, click the link icon that appears on the right, copy the URL from your address bar, then share that link with friends and/or family.
  • You can also create a shared Dropbox folder with fellow Dropbox users. From the main Dropbox web page, click Sharing in the left column, then click the “New shared folder” button.
How to sync photos to your Dropbox for Android and iPhone

How to unlock your Android phone with your face


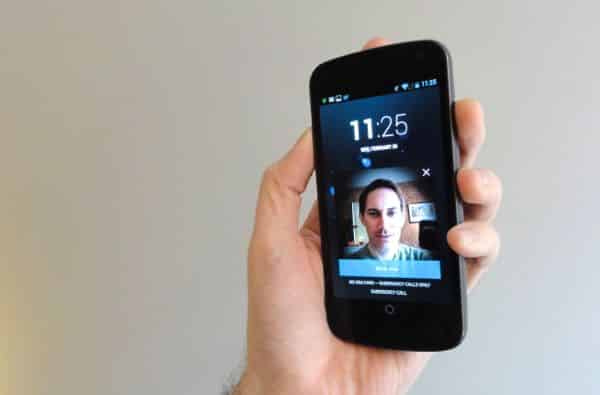
Unlock your Android phone with your face Android tip: How to unlock your Android phone with your faceCan’t be bothered to tap in a passcode to unlock your sleeping smartphone? Well, the latest Android phones have another way to verify that you’re you: by scanning your face.
The idea behind Face Unlock (a feature that requires Android version 4.0 or better, by the way) is simple: the phone’s camera scans your face for a few seconds, then compares it to one or more previously saved head shots.
If it gets a match, then presto! You’ll arrive at your phone’s home page, no PIN required.
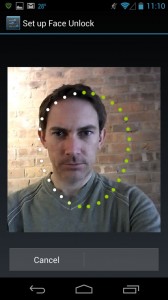
Android Face Unlock setup 168x300 Android tip: How to unlock your Android phone with your face
You can unlock your phone with a glance once Face Unlock scans your face.
It’s a nifty trick, but it’s not quite foolproof.
Before setting up the feature on your own Android phone, you’ll be warned that Face Unlock isn’t nearly as secure as using a numeric passcode.
Indeed, there’s always the possibility of a false match if someone who looks “similar” to you sneaks a peek at your handset.
In other words, think twice before protecting your phone with Face Unlock if you’ve stored military secrets on it, or if your online banking password is saved in your Android browser.
So, ready to use your face to unlock your Android phone?
Here’s how…
  • Go to the Settings menu and tap Security, Screen Lock.*
  • Tap the Face Unlock option to see the litany of notes and caveats about the feature (including the assurance that your stored profile picture will be “kept private” on your handset). Ready to continue? Tap “Set it up.”
  • Next, you should see … well, yourself. Hold the phone until your face fits in the dotted outline; once the camera thinks it has a good shot of your face, it’ll snap a photo automatically. (For the best results, Google advises taking a Face Unlock photo indoors, where it’s not “too bright or too dim.”) Once you’ve made it to the “Face Captured” page, tap “Continue.”
  • You’ll also need a backup PIN or a security “pattern” to trace on the phone’s touchscreen, which you’ll be asked to set up once you’re done snapping photos of your face. The backup passcode will come in handy if Face Unlock can’t quite recognize you (which, as I’ve learned, happens on a fairly regular basis).
  • Now, time to test. Lock your phone, then press the “sleep/wake” button and hold the handset right in front of your face; the phone should unlock itself within seconds of “seeing” you.
*Note: These steps may vary depending on the make and model of your Android phone. I tested this tip on a Samsung Galaxy Nexus running on Android version 4.2.2.

Bonus tip

Want to make Face Unlock a bit more secure? Here’s how…
  • Take multiple Face Unlock photos of yourself in different conditions—say, with your glasses on and off, or both outdoors and indoors—to give the phone a better chance of identifying you correctly. Just go back to the Settings menu, tap Security, then select “Improve face matching.”
  • Worried someone might try to unlock your phone with a still photo of you? You can set Face Unlock to unlock your phone only if it sees you blink. Just tap Settings, Security, then enable the “Liveness check” option.
http://heresthethingblog.com
How to unlock your Android phone with your face

Tamagotchi Comes Back to Your Pocket — on Android

Tamagotchi-app
For anyone nostalgic for the '90s virtual pet craze, you can now carry your Tamagotchi in your pocket once again, with a free app released Thursday for Android.

The Tamagotchi L.i.f.e. App recreates the experience of caring for and feeding your own pocket creature. The app's release marks the brand's re-expansion to North America, after it was a powerhouse in the late 1990s.
The Tamagotchi app recreates the classic experience of owning a virtual pet in its Toy Mode, which replicates the classic egg keychain design best known by fans on the phone's screen. It features the three familiar buttons to navigate the menus.

Players can get into "App Mode" by swiping with two fingers, which brings the Tamagotchi into full color on the screen. You'll be able to access all the menu functions with touch controls from there. You'll recognize the actions to feed, vaccinate, poke and clean up after your pet. You can also check its weight, happiness and discipline.

A new feature you'll find: being able to play Rock Paper Scissors with your Tamagotchi. (Letting it win will make your pet happier.)


You can also take photos and share them on Facebook directly from the app.
Tamagotchi was released by Namco Bandai in 1997, and more than 79 million of the hard-shelled electronic toys have been sold since. The brand still has a huge presence in Japan, with a popular cartoon tie-in just renewed for a sixth season. Sync Beatz Entertainment acquired the license from Namco Bandai for this app and future products, and partnered with the company on its creation.

The app's expected audience, says Sync Beatz CMO Shin Ueno, are 22- to 29-year-olds who carried their Tamagotchis to school — and then had them confiscated in class in the late '90s.
The app is only available through Google Play now but will come to iOS devices soon, Ueno says.
Do you have fond memories of your Tamagotchi? Share them in the comments below.
Photos and Post by Mashable
Tamagotchi Comes Back to Your Pocket — on Android

Light up your charging phone with “Daydream” screensavers

Set your Android phone to daydream while it charges Android tip: Light up your charging phone with Daydream screensaversWish the screen on your asleep-but-charging Android phone could do something a little more interesting than just go blank?
If so, good news: a feature in the latest version of Android will turn your phone’s sleeping display into a digital clock, a photo gallery, a scrolling grid of headlines and news photos, and more.
Think of “Daydream” as a screensaver that turns itself on whenever your Android handset is sitting in a phone dock or connected to its charging cable.
Android Daydream Photo Table screensaver 300x224 Android tip: Light up your charging phone with Daydream screensavers
You can set Daydream to display your Instagram photos, abstract colors, a digital clock, and more.
What your phone’s screen does while it’s daydreaming is, of course, up to you.
One option is to have it display a faint digital clock, perfect for a dimly lit bedroom.
“Daydream” can also create an ever-shifting array of abstract shapes and colors, or crank out a slideshow of snapshots from the Gallery app, Instagram, or your online Google account.
You can even set Daydream to show trending headlines, photos, and social links from apps like Google Currents or Flipboard.
What’s the catch? Well, Daydream is only available on handsets running on Android version 4.2 or later.
(To check which version of Android powers your phone, tap Settings, “About phone,” then check the number under the “Android version” heading. You can also check for available Android updates by tapping “System updates” at the top of the “About phone” screen.)
So, ready to let you Android phone do a little daydreaming?
Android Daydream settings 168x300 Android tip: Light up your charging phone with Daydream screensavers
Just pick a screensaver from the Daydream settings, then tap Start Now to go for a test drive.
Here’s how…
  • Tap Settings, Display, then Daydream. (Note: the specific settings may vary depending on the make and model of your Android phone. I tested this tip on a Samsung Galaxy Nexus running on Android version 4.2.1).
  • On the next screen, make sure the Daydream switch in the top-right corner is set to “On.”
  • Tap the “When to Daydream” button at the bottom of the screen, and pick an option: “While docked” (meaning while your Android phone is sitting in a charging cradle or, say, a clock-radio dock), “While charging,” or “Either.”
  • Now, time to choose a Daydream screensaver. Besides the standard digital clock and photo frame, you’ll also find Colors (those random multicolored shapes I mentioned earlier) and Photo Table (a growing pile of images that twirl into view).
  • Want more Daydream screensaver choices? Try installing some new, Daydream-friendly apps, such as Google Currents and Flipboard.
  • Certain Daydream screensavers may have their own settings and customizations; for example, tap the settings icon next to Photo Frame to display photos from your Instagram account.
  • All set? Tap the Start Now button to give your Daydream screensaver a test drive.
Source http://heresthethingblog.com
Light up your charging phone with “Daydream” screensavers

How To Transfer iPhone Contacts With Android

When switching from an iPhone to an Android phone, it’s not only a change of brand but also a change of its entire operating system. Switching operating systems may result in file and format incompatibility.
This makes the transfer of private data such as Contacts, Mail and Messages a tricky process as you need to convert the files to a format that the Android operating system can read… or you can use Google Contacts.


Today, we will guide you on how to transfer iPhone contacts to Android phone using Google Contacts. You will first have to sync your contacts from your iPhone to Google contacts, then restore it to your new Android phone. With these methods, there are no use of additional apps, and you don’t require any format change when you transfer via Google Contacts.

Syncing Contacts

There are two ways to sync your contacts with Google Contacts, one with iTunes and the other with the iCloud.

1.1 Using iTunes

If you have a Google account and manually backup your iPhone to your computer using iTunes, here’s an easy way to export your iPhone contacts to your Google account.
First, open iTunes and plug in your iPhone to your computer via USB cable. Select your iPhone in iTunes. Under the ‘Info’ tab, choose to Sync Contacts with Google Contacts.


It will prompt you to enter your Gmail username and password. Wait for it to sync. Once it is done, head to Gmail and log in to your account. Then go to Gmail > Contacts.


You’ll find that your contacts will have been imported to your Google Contacts.

1.2 Using iCloud.com

If you back up your important data on your iPhone to iCloud, go to iCloud.com and login to your iCloud account.


After that, click on Contacts and you will see all of your iPhone contacts which have been backed up in iCloud.


Press Ctrl + A to select all contacts, click on the Settings button on the bottom left, then select "Export vCard…".


Login to your Gmail and go to Gmail > Contacts.


After that, click on ‘Import Contacts…’ and an alert will be prompted. Choose your exported vCard… file and click Import to import all iPhone contacts to Google Contacts.

2. Merge Duplicate Google Contacts

Once you’ve imported iPhone contacts to Google Contacts, you can get rid of duplicate contacts before restoring your contacts on your phone. It is easier to do this on on your computer than on your smartphone.
Click on More and then click on Find & merge duplicates...


A page with the names of duplicated contacts will pop up. After going through the names, select those that have duplicate contacts and click Merge.

3. Restore Contacts on Android

Now that you have succesfully exported and merged duplicates of your iPhone contacts to Google Contacts, you can begin to restore it to your Android phone. On your Android phone go to Menu > Settings > Accounts and Sync. Tap on Add Account and choose Google.


Then, tap on Sign in and key in the Gmail account you used to sync your contacts to.


Wait for a while. When communications to the Google Servers are complete, you will arrive at a page to a page where you’re given options on what you want to sync into your phone. Tick ‘Sync Contacts’ and tap on Finish.


With that, you’re done! To verify that you have successfully transferred all of your contacts into your phone, check your contacts book.

Wrap Up

Without Step 2, you will see repeated entries in your Contacts. You can choose to merge them in your new phone or go back to doing it the faster way on Google Contacts.
One great thing about using Google Contacts to sync your contacts is that even if you lose your phone or switch to another smartphone, you will never lose your contacts. They are kept save within your Google account.
Original post from hongkiat.com
How To Transfer And Sync Your iPhone Contacts With Android