Showing posts with label iPhone tips. Show all posts

How to create a new photo album

How to create a new photo album on an iPhone iPad/iPhone tip: How to create a new photo album (updated)Want to organize the pile of snapshots sitting in your iPhone’s camera roll? Try this: just create a new album or two, then start sorting.
There are actually a couple of ways to make a photo album on your iPhone or iPad: one is to create a new, empty album and then start adding photos to it, while the other is to select one or more images first and then create a new album.
Add iPhone photos to a new album 300x250 iPad/iPhone tip: How to create a new photo album (updated)
Just tap the photos you want to add to a new album, then tap the “Add To” button.

Here’s how to get started…
  • Let’s begin by selecting some photos and adding them into a new album. Tap the Photos icon from your iPhone’s or iPad’s home screen, tap the Albums tab, select Camera Roll, then tap the Edit button.
  • Now, it’s time to pick some photos. Tap a few—as many as you like—then press the “Add To” button at the bottom (on an iPhone) or top (on an iPad) of the screen.
  • Next, an “Add to New Album” button will appear. Go ahead and tap it, then type a name for your album in the pop-up window. If you’ve already created some new photos albums on your iPhone/iPad, you’ll see an “Add to Existing Album” button in addition to “Add to New Album.”
  • Finally, tap the “Save” button, and voilĂ —your new photo album will appear at the bottom of the Album list.
Want to create a new album first and then start adding photos to it? No problem.
  • From the Album screen, tap the “+” button sitting on the top-left corner of the screen.
  • Name your new photo album and tap “Save.”
  • If you’re using an iPad, you’ll next see a screen of images from your Camera Roll; tap to select photos to add to your new album, then tap the Done button when you’re finished.
  • On an iPhone, tap a photo album from the list that appears, then start tapping photos to add to your new album. You can also pick and choose from your Photo Stream by tapping the Photo Stream tab at the bottom of the screen.

Bonus tip

You can rearrange or delete photo albums on the iPhone by tapping the Edit button on the Albums screen. On the iPad, just tap, hold, and drag a photo album to rearrange it, or tap the Edit button and tap the little “x” on an album to delete it.
Oh, and one more thing: Keep in mind that you can delete an album without trashing the photos inside it.
Source http://heresthethingblog.com
How to create a new photo album
Going to the movies with Passbook

Going to the movies with Passbook for iPhone iPhone tip: Going to the movies with PassbookIt’s been about eight months since Apple’s Passbook app made its debut on the iPhone—and like many of you, I’m guessing, I opened Passbook exactly once, looked at it for about 30 seconds, and promptly forgot about it.
But after a recent (and quasi-accidental) Passbook-assisted trip to the movies, my interest is suddenly piqued.
Passbook, as you may recall, is basically a digital wallet that lets you store concert tickets, coupons, loyalty cards, boarding passes, and more, all in a single iPhone app.
List of Passbook apps on iPhone 268x300 iPhone tip: Going to the movies with Passbook
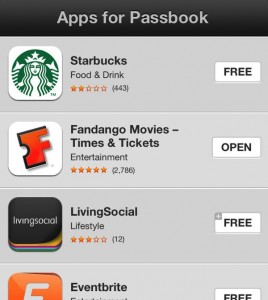
The list of Passbook-friendly apps is limited, but (slowly) growing.
Well, not all your tickets and coupons, unfortunately. One of the biggest limitations of Passbook is that it only works with Passbook-supported iPhone apps, of which there were only 10 or so when Passbook launched last fall.
The Passbook app situation has improved somewhat in the past several months; there are now more than 30 Passbook-friendly apps, ranging from American Airlines and United to Dunkin’ Donuts and Starbucks.
Still, I hadn’t bothered to fiddle with Passbook again until just a few days ago, as my wife and I were heading to the movies.
We’d decided to stop for coffee and I figured I’d go ahead and buy the tickets (for “Before Midnight”—loved it, but whoa) while we were sitting at the counter.
iPhone Passbook banner 300x214 iPhone tip: Going to the movies with Passbook
Have a movie ticket stored in Passbook? When you approach the theater, a banner will appear on your iPhone’s screen; just swipe it to access your tickets.
I opened the Fandango movie app, bought our tickets, and was about to slip my iPhone back in my pocket when I noticed an “Add this ticket to Passbook” button. What the heck, I figured.
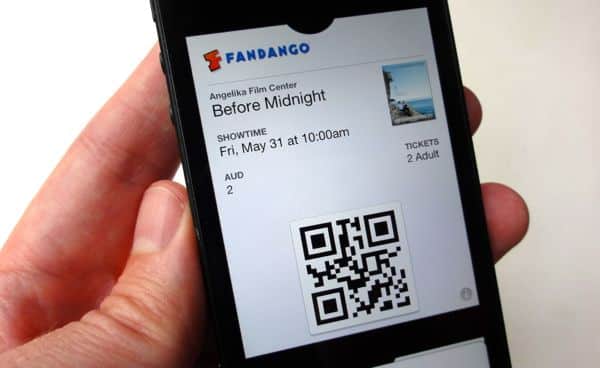
I tapped the button, opened Passbook (you’ll find the Passbook app on one of your iPhone home screens, provided you’ve updated your handset to the latest iOS 6 software), and a digital ticket for our movie slid into view, complete with theater details and a QR code.
So far, so good—but I was even more impressed when a banner that read “Fandango: Nearby” flashed on my iPhone’s lock screen as we arrived at the theater.
iPhone Passbook card details 229x300 iPhone tip: Going to the movies with Passbook
Tap the little “i” in the bottom corner of a Passbook card to see details and notification settings for your ticket or coupon.
Approaching the box office, I swiped the Fandango banner on my iPhone, and our tickets appeared on the screen.
The usher pulled out a handheld scanner, “dinged” the QR code on my iPhone’s display, and that was that. Easy.
Now, just to be clear, you can’t buy tickets at every movie theater with Fandango—and for that matter, Passbook won’t do you much good if you’re shopping at Walmart (although Target has a Passbook-ready app), nor will it help with daily deals at Rite Aid (but Walgreens is a go).
That said, I was pleasantly surprised by how smoothly and efficiently Passbook works when it’s in its element—and indeed, I used Passbook again a couple of days later for another movie night (“Star Trek Into Darkness”—loud, lots of punching).
So, got questions about Passbook, or a Passbook story you’d like to share? Let us know in the comments below!

Bonus tips

  • You can change the notification settings for your individual Passbook items by tapping the little “i” icon in the bottom corner of the digital card.
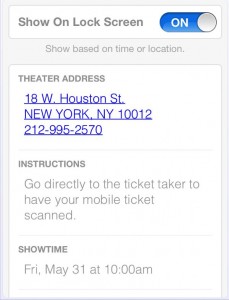
  • The settings screen also displays the venue’s location, as well as instructions on how to redeem your ticket or coupon.
  • Also: Want to see the current list of Passbook-compatible apps? Just open Passbook, then tap the “Apps for Passbook” button on the Welcome card.
Source http://heresthethingblog.com
Going to the movies with Passbook

Facebook for iPhone: 5 handy features you need to try

5 gotta try Facebook for iPhone features Facebook for iPhone: 5 handy features you need to tryWant to turn that photo you just shot on your iPhone into your Facebook profile picture? Sure thing—and yes, you can do it directly from the Facebook mobile app.
Read on for more gotta-try features in the rapidly evolving Facebook for iPhone app, from how to filter your news feed to an easy way to save snapshots posted by your friends.
Facebook for iPhone filter news feed 264x300 Facebook for iPhone: 5 handy features you need to try
Tap an option to see just the most recent news feed updates, only photo posts, stories from close friends, and more.

1. Filter your news feed

Don’t have time to scroll through dozens of random news feed updates? I know the feeling.
Instead, try this: when you first open your news feed on the Facebook for iPhone app, pull down on the first update you see.
When you do, you’ll open Facebook’s mobile news feed filter, which lets you view only the most recent updates, posts from those on your various Friend Lists (such as Family and Close Friends), photo posts, and more.

2. Save a photo to your Camera Roll

Until recently, there was no way to save a photo from your Facebook news feed to your iPhone other than taking a screenshot.
Facebook for iPhone save photo 276x300 Facebook for iPhone: 5 handy features you need to try
Thanks to a recent Facebook for iPhone update, you can now save photos posted by friends to your iPhone’s Camera Roll.
Thanks to a recent update, though, you can now save Facebook photos to your iPhone’s Camera Roll in just a few taps.
  • Tap a photo in your news feed to open it.
  • Tap the three-dot menu button at the bottom of the screen.
  • Tap the “Save Photo” button.

3. Change your profile photo or your “cover” image

Want to customize the look of your Facebook timeline while you’re on the go?
No problem—and in fact, you can easily replace your Facebook profile image or the “cover” photo at the top of your timeline with a fresh snapshot from your iPhone.
  • Tap the menu button in the top-left corner of the screen, then tap your name to go to your timeline.
  • Tap either your profile photo or the larger “cover” photo, then tap “Choose from Library” to pick a new image from your iPhone’s photo library, or “Take Photo” to snap a new image on the fly.
Facebook for iPhone hide a post arrow 300x240 Facebook for iPhone: 5 handy features you need to try
Tap the little arrow (see it?) to hide an unwanted post from your news feed.

4. Hide a post

Want to zap an annoying update or advertisement from your news feed? Easy.
  • Look closely at the top-right corner of a news feed post, and you’ll see a faint downward arrow. Tap it, and a trio of buttons will slide into view.
  • Tap the “Hide” button to hide an unwanted update from your news feed, or tap “Report/Mark as Spam” if you think a post is “spammy” or particularly offensive.

5. Generate a security code

Ever heard of Facebook’s “login approvals” feature? If not, you should, because it’s one of the best way to keep hackers from hijacking your account.
Once login approvals are turned on (here’s how to do it), Facebook will demand a six-digit code whenever anyone tries to log into your account from an unrecognized browser or mobile device.
Facebook for iPhone Code Generator 279x300 Facebook for iPhone: 5 handy features you need to try
Once activated, the mobile Code Generator will spit out a new six-digit security code every 30 seconds, no data connection required.

Normally, those special security codes are sent to your cell phone via SMS—but what happens if you’re trying to log into your account and there’s no cellular connection?
Luckily, the Facebook for iPhone app has its own “Code Generator” that spits out fresh six-digit codes every 30 seconds—and yes, the Code Generator works even without a data signal.
Just tap the menu button in the top-left corner of the Facebook mobile interface, scroll down, then tap Code Generator.
Once you tap the “Activate” button, a six-digit code will appear on the screen, and it’ll be refreshed every 30 seconds.
Source: http://heresthethingblog.com
Facebook for iPhone: 5 handy features you need to try

Save web links for later, even when you’re offline in iPhone

How to save web links for later on an iPhone or iPad iPhone/iPad tip: Save web links for later, even when youre offlineFound a link on your iPhone or iPad to a long, enticing web article that you don’t have time to read right now? Or maybe you do have time, but not the cellular signal.
Well, there’s a better way to save web links for later than, say, simply pasting them into your iPhone’s (or iPad’s) Notes app.
The trick: using Apple’s “Reading List” feature, which saves links from Mail, Safari, and other iPhone apps and (once you’ve got a data connection again) downloads full web pages to your iOS device’s memory.
Prefer using a third-party “read it later” app like Instapaper ($3.99) or Pocket (free)? We’ll cover them, too.
Let’s get started…
Reading List on iPhone 300x245 iPhone/iPad tip: Save web links for later, even when youre offline
You can access saved web links from the Reading List in your iPhone’s or iPad’s Safari bookmarks.

Using Reading List

  • So, you just found a web link you wanted to open on your iPhone or iPad, but there’s no cell connection—or you’re just short on time. First, tap and hold the link you want to open.
  • A series of buttons will slide (or pop up, on the iPad) into view: “Open,” “Add to Reading List,” and “Copy.” Tap “Add to Reading List”—and yes, this option will work even if your iOS device doesn’t have a data connection.
  • Once you’ve got time or a cell connection again, open Safari, tap the Bookmarks icon at the bottom of the screen, then tap Reading List. (You may have to tap the Back button at the top of the screen a few times to get to the main Bookmarks directory; Reading List sits at the top.)
  • Now you’ll see the list of links saved in your Reading List, and the link you just saved should be at the top of the list—and if you were offline when you saved the link, your iPhone/iPad will save the page to your handset’s memory once it gets a data connection back.
Copy web link to Instapaper 300x287 iPhone/iPad tip: Save web links for later, even when youre offline
You can save links to reading apps like Instapaper and Pocket even if your iPhone/iPad doesn’t have a data connection.

Using Instapaper or Pocket

  • Once again, tap and hold the link you want to save—but this time, tap the “Copy” button instead of “Reading List.”
  • Next, open the app with which you’d like to save your link—either Instapaper or Pocket. When you do, a prompt will ask if you’d like to add the copied URL to the app’s list of saved links. Tap OK (or “Read Later,” in the case of Instapaper).
  • Trying to save a link without a data connection? No problem. When you’re back in cellular or Wi-Fi range, open the app again, and app will automatically download the web page for the link you saved.
A Tip from heresthethingblog.com
Save web links for later, even when you’re offline in iPhone

Create a calendar event or contact directly from email

Create an iPhone event directly from email iPhone/iPad tip: Create a calendar event or contact directly from emailAn invite to a can’t-miss event just landed in your inbox, and you want to mark it in your iPhone’s calendar before you forget—and while you’re at it, you’d like to add the sender’s name to your address book.
Well, good news: you’re just a few taps away from saving the date in your iPhone’s (or iPad’s) Calendar app, or from creating a new entry in your Contacts app—all directly from the original email message.
Here’s how…

Create a calendar event from email

  • Open the email, look for the date and time (which should already be highlighted in blue by your iPhone), tap it, then tap the “Create Event” button from the slide-up window. Once you do, an “Add Event” window will appear with the salient details already filled in.
  • iPhone Add Event screen 249x300 iPhone/iPad tip: Create a calendar event or contact directly from email
    Once you tap the “Create Event” button, an “Add Event” screen will appear with the salient details already filled in.

  • Go ahead and edit the new event or add more information (such as a location or a reminder), then tap the “Done” button. You’re all set!
  • You can also tap “Show in Calendar” to see if you’re free during that time slot, or “Copy” to copy the date and time to the iPhone’s virtual clipboard.

Create a contact

  • Go to the top of the email, tap the name you’d like to save in the “From:” field, and then tap the “Create New Contact” button.
  • A new contact form will appear with the name and email fields completed. Edit or add more details as you see fit, then tap the “Done” button.
Create a calendar event or contact directly from email

How to completely turn off an app’s notifications

How to completely turn off iPhone notifications iPhone/iPad tip: How to completely turn off an apps notificationsSo, you thought you turned off the notifications for an iPhone or iPad app, but it’s still bugging you with unwanted banners, beeps and badges. What gives?
Well, just because you switched an app’s “Alert style” setting to “none” doesn’t mean you’ve turned off all of its alerts.
There are, in fact, a few more notification settings that need tweaking—and if you don’t, expect more messages on your iPhone’s “lock” screen, red badges on your home screen, and blaring alert tones when you least expect them.
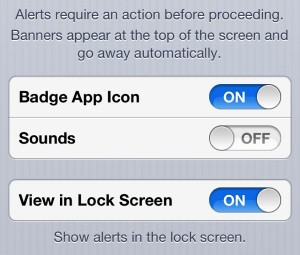
iPhone notification settings 300x255 iPhone/iPad tip: How to completely turn off an apps notifications
Make sure you don’t miss these options when tweaking your iPhone’s notification settings.
Read on for three notification settings that are easy to miss, starting with…

1. Lock-screen notifications

Even if you diligently turn off all the other alerts for a given app, the app may still flash alert banners on your iPhone’s (or iPad’s) “lock” screen from time to time.
Related tip: What’s the difference between an alert, a banner, and a badge?
Want to banish the banners for good?
  • Tap Settings, Notifications, then scroll down and tap the name of the offending app.
  • Scroll down again until you see the “View in Lock Screen” setting, and make sure it’s switched off.

2. Red app badges

Seeing lots of little red badges stuck to the apps on your iPhone’s home screen?
Those numbered alerts are there to notify you of…well, just about anything, from an unread email message to a nagging reminder that you haven’t played “Words With Friends” for a month.
How to get rid of the red badges on your iPhone apps 300x192 iPhone/iPad tip: How to completely turn off an apps notifications
Had enough of these nagging little red badges? You can turn them off in just a few taps.

If there’s a specific red badge that’s driving you particularly batty, you can turn it off in just a few taps.
  • Again, tap Settings, Notifications, and tap the name of the app that’s flashing an unwanted badge.
  • Scroll down once more, then switch off the “Badge App Icon” setting.

3. Sound alerts

You set your iPhone to “silent” for an important company meeting, only to hear an embarrassingly loud “beep!” coming from your pocket right in the middle of your boss’s presentation. Ack!
Yep, the alert tones for some iPhone apps may still sound off even when your handset’s ringer switch is off. Annoying, right?
To shush an app’s alert tones, just…
  • You guessed it—head back to the iPhone’s Notifications settings (Settings, Notifications) and tap the app you want to silence.
  • Scroll down until you get to the “Sound” setting and switch it off—or, if there’s a choice of alert tones, make sure it’s set to “None.”

Bonus tip

You can temporarily silence all iPhone notifications and calls by turning on the “Do Not Disturb” mode.
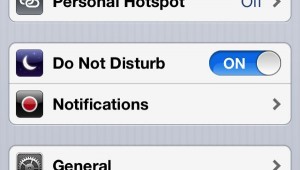
iOS Do Not Disturb mode 300x170 iPhone/iPad tip: How to completely turn off an apps notifications
You can get a temporary break from iPhone notifications thanks to the “Do Not Disturb” setting.

Tap Settings, then flip the switch next to “Do Not Disturb,” or tap Settings, Notifications, Do Not Disturb to schedule a daily quiet period.
Keep in mind, though, that Do Not Disturb will only block notifications while your iPhone is locked—and don’t forget to switch it back off when you’re ready to get calls again.
source http://heresthethingblog.com
How to completely turn off an app’s notifications

How to jump back many web pages at a time

Jump back several web pages on iPhone or iPad iPhone/iPad tip: How to jump back many web pages at a timeTo get back to where you were five pages ago in a desktop browser, you can just glance at your web history or—better yet—click and hold the Back button.
iPhone tap and hold Back button in Safari 258x300 iPhone/iPad tip: How to jump back many web pages at a time
Just tap and hold the Back button, then tap the page you want to jump back to.
But what if you want to jump back several pages in a single bound with Safari for iPhone or iPad?
Believe it or not, you can do pretty much the same thing you’d do on a desktop browser: just tap and hold the Back button.
When you do, a pop-up will show more than two dozen of your previously viewed web pages for a given Safari tab.
Tap any page to jump back to it.
And yes—you can also tap and hold the Forward button, if you wish.

How to create new collections for your iBooks


How to create new collections in iBooks iPad/iPhone tip: How to create new collections for your iBooksIs your digital library of iBooks getting a bit cluttered? If so, good news: there’s an easy way to tidy up the virtual bookshelves on your iPhone or iPad.
In just a few taps, you can create new folders—or “collections,” as Apple calls them—for your iBooks, perfect for rearranging your e-books in practically any way you wish.
iPad create new iBooks collection 300x210 iPad/iPhone tip: How to create new collections for your iBooks
You can reorganize the iBooks on your iPad or iPhone by creating new collections.
Here’s how…
  • Open the iBooks app, then tap either the Books button (on the iPhone, at the top of the screen) or the Collections button (on the iPad, in the top-left corner of the display). When you do, a pop-up will list all the iBook collections currently available on your device, including Books, Purchased Books, and PDFs.
  • Tap the New button, type in the name of a new collection—say, Classics—then tap the Done button.
  • Now, time to start organizing. Go back to your Books collection, tap the Edit button in the top-left (on the iPhone) or top-right (for iPad) corner of the screen, then tap the covers of the iBooks that you want to move to your new Classics collection.
  • Tap the Move button to bring up your list of iBooks collections, then tap Classics.
  • Whoosh! You’ve just stocked your Classics collection, and you’re now ready to create some new collections.

Bonus tip

Want to reorder your iBooks collections? Tap the collections button, tap Edit, then drag your collections up or down with the handles on the right.
You can also delete a collection (don’t worry—any books in a deleted collection will slide back into one of your remaining collections) by swiping it and tapping the Delete button.

source: http://heresthethingblog.com
How to create new collections for your iBooks

How to Erase All Your Personal Content from an iPhone or iPad

Do you have an older iPhone or iPad that you want to sell or give to someone and you want to remove all your personal data and apps? Or maybe your device has gotten clogged up after a lot of use and you just want to restore it back to its pristine factory condition. The procedure is quite straightforward and here is how it works.
  1. Open “Settings”
  2. Tap “General”
  3. Scroll to “Reset” and tap it
  4. A list of possible actions will be shown, as illustrated in the figure below
  5. To return the device to its original factory condition, tap “Erase All Content and Settings”
Resetting iOS devices
The process goes pretty quickly and then you will have a clean system with all your personal data and apps removed, including your Apple ID. Next time the device is turned on it will go through a first-time setup just as if it were new.
How to Erase All Your Personal Content from an iPhone or iPad

How To Set iPhone On Silent Mode Except For Selected Group

There are times we find ourselves in situations that we need to keep our phone in Silent Mode, for example in a meeting, a seminar or an important event. But there are calls that cannot be missed: the call to get to the hospital because your wife is in labor, the call from your kids who are studying in a different time zone or any calls from Mom.
Wouldn’t it be great if you could keep your iPhone on silent but have it ring only for selected individuals or a special group?

Set IPhone On Silent Mode Except For Selected Group Or People
You can set this up with iOS6, under the Do Not Disturb feature. You will first need to create a group of people who can get to you regardless of your phone being on Silent Mode. Here’s how.


1. Create a Group in Contacts

To allow calls from only selected groups, first you need to create a group in your contact book. The group will consist of only the contacts that you want to allow calls from. For now, the easiest way to create a group is to create it on iCloud.
To start, browse over to iCloud and click on ‘Contacts’.
icloud select contacts

On the top part of your contact book you’ll notice a red ribbon. Click on it.

click red ribbon

You will see your contacts on the right hand side and your groups on the left side. Click on the ‘+’ symbol at the bottom of the left page to create a group.

create a group

Name the group. In this example, we will use ‘Family’. After naming it click back to the ‘All contacts’ page.

name the group

To add contacts into your group, just select the contacts (press Ctrl for multiple selections) and drag it into the group you just created.

drag and drop contact

You can click on ‘Family’ group just to double check if all of your contacts are already in the group.

check if all contacts in


2. Customize Notifications Settings

Now on your iPhone, go to your Contact book and refresh it, just to ensure that your newly created group is in your iPhone.

check if groups sync in iphone

Then, tap on Settings > Notifications > Do Not Disturb.

access dnd

On the ‘Do Not Disturb’ page, tap on ‘Allow Calls From’ and choose the group you want notifications to come in for, regardless of the Silent Mode being on.
Note that you can only set to allow calls from only one group. That means if you have two groups that you want to let ring even in silent mode, you will have to pick only one, or group both of them together.

select who to allows calls from

There is actually another alternative. You can put individual contacts under the ‘Favorites’ category, simply tap on the contact and select ‘Add to Favorites’. Then set ‘Allow Calls From’ to ‘Favorites’.


3. Activate ‘Do Not Disturb’

To activate this mode, go to the ‘Settings’ page, and turn ‘Do Not Disturb’ feature ON. Your phone goes straight into Silent Mode and will only allow the group you’ve selected to get through to you.

activate dnd feature

Source: hongkiat.com
How To Set iPhone On Silent Mode Except For Selected Group

How to sync photos to your Dropbox for Android and iPhone

How to sync iPhone or Android photos with Dropbox Android/iPhone tip: How to sync photos to your Dropbox Don’t want to sync your iPhone or Android snapshots with iCloud or the Google+ social network? Here’s an easy alternative.
Dropbox is a handy, simple-to-use file-syncing service (click here to download and install the free Dropbox desktop utility) that boasts apps for both iPhone and Android.

You can set the Dropbox app (click here for the iPhone app, or here for the Android version) to automatically sync all your mobile photos with your Dropbox, or you can pick and choose which snapshots to upload.
Best of all, Dropbox is only as social as you want it to be. Sure, you can easily share your Dropbox photo albums with anyone, including non-Dropbox users; by default, though, your pictures are stored privately in your Dropbox account.
Ready to start syncing?
Here we go…
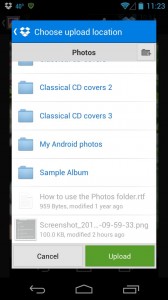
Dropbox for Android 168x300 Android/iPhone tip: How to sync photos to your Dropbox
Just select the Dropbox folder you’d like to sync your photo to, then tap the Upload button.

For Android:

  • First, install the Dropbox app onto your phone, then sign in to your Dropbox account in the Settings menu (tap Settings, then tap “Add account” under the Accounts heading*). If you get the option to turn on a feature called “Camera Upload” while you’re installing Dropbox, just tap “Cancel” for now—don’t worry, we’ll get back to it.
  • Now, let’s try syncing just a single photo to Dropbox. Go ahead and snap a photo, then open the picture in the Gallery app.
  • Tap the screen to reveal the menu buttons, then tap the blue Dropbox button; when you do, a Dropbox upload window will appear.
  • Pick a folder in your Dropbox account where you’d like to upload your photo, then tap the green Upload button. In a few seconds, the picture will sync to your Dropbox—and if you’ve installed the Dropbox utility onto your Mac or PC, you’ll see your snapshot sitting in the Dropbox folder on your desktop.
  • Want to sync every single photo you take on your Android phone, from now on? Launch the Dropbox app on your handset, tap the three-dot menu in the top-right corner of the screen, tap settings, then tap Turn on Camera Upload. You’ll get the option to automatically upload photos only when you’re on a Wi-Fi network (a good idea, lest you rack up pricey mobile data charges), and you can also check a box to sync all your existing pictures (a potentially lengthy process, so be warned).
*These settings may vary depending on the make and model of your Android phone.
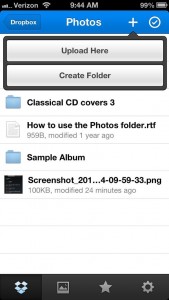
Dropbox for iPhone 169x300 Android/iPhone tip: How to sync photos to your Dropbox
Tap the “+” button in the top-right corner of the Dropbox app to upload photos from your iPhone.

For iPhone:

  • Install the Dropbox app, then sign in with your Dropbox username and password. As with the Android version of Dropbox, you’ll see a “splash” screen asking if you want to turn on the Camera Upload feature; for now, tap “Cancel.”
  • All set? Then let’s start by uploading a single photo. Take a picture with the iPhone’s Camera app, then go back to Dropbox.
  • Tap the folder where you’d like to sync your images (such as the pre-existing Photos folder), tap the “+” sign in the top-right corner of the screen, then tap the Upload Here button. Your picture should sync with Dropbox within a minute or so—and once it does, you’ll see it sitting in your Dropbox folder on your Dropbox-connected PC or Mac.
  • You can also sync all your iPhone photos with Dropbox by turning on the Camera Upload feature. Tap the Settings gear in the bottom-right corner of the screen, then tap Camera Upload, and flip the switch to “On.”
  • A secondary screen will ask whether you want your photos uploaded automatically only on Wi-Fi networks or using your iPhone’s cellular data connection; again, I suggest picking “Only Wi-Fi” to avoid excessive data charges. Once you’ve made your choice, tap the “Enable” button.
  • Now, here’s the downside to Dropbox’s Camera Upload on the iPhone versus the Android version; once you turn it on, it will (annoyingly) start uploading all the photos in your camera roll, whether you like it or not. If you don’t want to wait several minutes or even hours for all your old snapshots to sync, you’ll have to go back to the Settings menu and flip the Camera Upload switch back to “off.”

Bonus tip

Want to automatically share your Dropbox photos with a small (or not-so-small) circles of friends and loved ones?
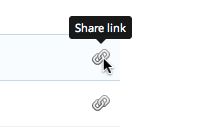
Dropbox share link option Android/iPhone tip: How to sync photos to your Dropbox
Click the link icon to share a Dropbox file or folder with anyone you like.
Easy:
  • You can send a web link to a photo or folder to anyone you like, even someone who isn’t a Dropbox user. Go to the Dropbox site on the web, move your mouse over the file or folder you want to share, click the link icon that appears on the right, copy the URL from your address bar, then share that link with friends and/or family.
  • You can also create a shared Dropbox folder with fellow Dropbox users. From the main Dropbox web page, click Sharing in the left column, then click the “New shared folder” button.
How to sync photos to your Dropbox for Android and iPhone

Make it easier to double-click the Home key

Make the iPhone home key easier to double click iPhone tip: Make it easier to double click the Home key
For some of us, double-clicking the iPhone’s Home key to get to the multitasking bar at the bottom of the screen isn’t quite as easy as it sounds.
If you don’t (or can’t) click fast enough, you’ll just wind up back on the home screen, or maybe even on the “Spotlight” search page.
iPhone home click speed setting 300x285 iPhone tip: Make it easier to double click the Home key
By tweaking a single setting, you can make the iPhone’s “home-click” speed much easier on your thumb.
Well, here’s the thing: you can actually slow down the speed with which you need to double-click (or triple-click, as the case may be) the Home key, perfect for those of us lacking split-second reflexes.
Here’s how…
  • Tap Settings, General, Accessibility, then scroll all the way down and tap “Home-click Speed” (it’s under the “Physical & Motor” setting).
  • Now, pick a new double-click speed—either Slow or Slowest.
  • When you tap a new option, your iPhone will “buzz” three times to give you an idea of how quickly (or slowly) you need to double-click.

Bonus tip

Got an iPad? If so, you can use a special four- or five-finger gesture to reveal the multitasking bar. Get the details right here.

Make it easier to double-click the Home key

How To Transfer iPhone Contacts With Android

When switching from an iPhone to an Android phone, it’s not only a change of brand but also a change of its entire operating system. Switching operating systems may result in file and format incompatibility.
This makes the transfer of private data such as Contacts, Mail and Messages a tricky process as you need to convert the files to a format that the Android operating system can read… or you can use Google Contacts.


Today, we will guide you on how to transfer iPhone contacts to Android phone using Google Contacts. You will first have to sync your contacts from your iPhone to Google contacts, then restore it to your new Android phone. With these methods, there are no use of additional apps, and you don’t require any format change when you transfer via Google Contacts.

Syncing Contacts

There are two ways to sync your contacts with Google Contacts, one with iTunes and the other with the iCloud.

1.1 Using iTunes

If you have a Google account and manually backup your iPhone to your computer using iTunes, here’s an easy way to export your iPhone contacts to your Google account.
First, open iTunes and plug in your iPhone to your computer via USB cable. Select your iPhone in iTunes. Under the ‘Info’ tab, choose to Sync Contacts with Google Contacts.


It will prompt you to enter your Gmail username and password. Wait for it to sync. Once it is done, head to Gmail and log in to your account. Then go to Gmail > Contacts.


You’ll find that your contacts will have been imported to your Google Contacts.

1.2 Using iCloud.com

If you back up your important data on your iPhone to iCloud, go to iCloud.com and login to your iCloud account.


After that, click on Contacts and you will see all of your iPhone contacts which have been backed up in iCloud.


Press Ctrl + A to select all contacts, click on the Settings button on the bottom left, then select "Export vCard…".


Login to your Gmail and go to Gmail > Contacts.


After that, click on ‘Import Contacts…’ and an alert will be prompted. Choose your exported vCard… file and click Import to import all iPhone contacts to Google Contacts.

2. Merge Duplicate Google Contacts

Once you’ve imported iPhone contacts to Google Contacts, you can get rid of duplicate contacts before restoring your contacts on your phone. It is easier to do this on on your computer than on your smartphone.
Click on More and then click on Find & merge duplicates...


A page with the names of duplicated contacts will pop up. After going through the names, select those that have duplicate contacts and click Merge.

3. Restore Contacts on Android

Now that you have succesfully exported and merged duplicates of your iPhone contacts to Google Contacts, you can begin to restore it to your Android phone. On your Android phone go to Menu > Settings > Accounts and Sync. Tap on Add Account and choose Google.


Then, tap on Sign in and key in the Gmail account you used to sync your contacts to.


Wait for a while. When communications to the Google Servers are complete, you will arrive at a page to a page where you’re given options on what you want to sync into your phone. Tick ‘Sync Contacts’ and tap on Finish.


With that, you’re done! To verify that you have successfully transferred all of your contacts into your phone, check your contacts book.

Wrap Up

Without Step 2, you will see repeated entries in your Contacts. You can choose to merge them in your new phone or go back to doing it the faster way on Google Contacts.
One great thing about using Google Contacts to sync your contacts is that even if you lose your phone or switch to another smartphone, you will never lose your contacts. They are kept save within your Google account.
Original post from hongkiat.com
How To Transfer And Sync Your iPhone Contacts With Android