Showing posts with label mac tips. Show all posts

4 ways to take a screenshot

4 ways to take a screenshot on your Mac Mac tip: 4 ways to take a screenshot
So, you know how to snap an image of your iPhone’s screen—but what if you want to take a screenshot of your Mac’s desktop?
Well, there are actually four ways to snap a screenshot on your Mac, and they’re all just a few keystrokes away.

1. Take a screenshot of the entire screen

Press and hold the SHIFT, COMMAND, and NUMBER 3 keys, and an image file of the screenshot will appear on your Mac’s desktop.

2. Copy an image of the entire screen to your Mac’s clipboard

Press and hold CONTROL, SHIFT, COMMAND, and the NUMBER 3 keys to snap a screenshot and copy it to your Mac’s clipboard, perfect for pasting the image (COMMAND + V) into another document.
Take a screenshot of a selected area of your Mac desktop 300x188 Mac tip: 4 ways to take a screenshot
You can take a screenshot of just a portion of your Mac’s screen; press and hold Shift, Command, and the number 4 key, then click and drag.

3. Take a screenshot of a selected area of the screen

Want to capture an image of, say, just a single corner of your Mac’s desktop, rather than the entire screen?
Press and hold the SHIFT, COMMAND, and NUMBER 4 keys; when you do, your mouse pointer will turn into a target.
Click, hold and drag your mouse over the area you’d like to capture, then release the mouse button. Your screenshot will appear as an image file on your desktop.

4. Copy an image of a selected area of the screen to your Mac’s clipboard

Same basic idea as the command above, except you’re copying a picture of the selected screen area to your Mac’s clipboard.
Press and hold CONTROL, SHIFT, COMMAND, and the NUMBER 4 keys, then paste the screenshot into a document by pressing COMMAND + V.

Bonus tip

Having a hard time pressing and holding all those keys? You can create new, easier keyboard shortcuts for taking screenshots from the Keyboard preferences pane.
Click the Apple menu in the top-left corner of the screen, select System Preferences, click the Keyboard icon, then click the Keyboard Shortcuts tab.
From here, you can tweak all kinds of keyboard shortcut settings—including those for screenshots. Just click the “Screen Shots” heading in the left column to get started. (I went ahead and picked the F5 key for snapping a screenshot of the whole screen.)
Sources http://heresthethingblog.com
4 ways to take a screenshot

How to force a frozen program to quit

How to force a frozen program to quit Mac/Windows tip: How to force a frozen program to quitI’m sure this has happened to you before: You’re checking mail on Microsoft Outlook or reading the news on Apple’s Safari browser when all of a sudden, your cursor turns into a spinning blue disc (on a Windows PC) or a beach ball (on the Mac).
That usually means something (hopefully minor) is amiss on your system. Maybe your computer is running low on memory because it’s doing a few too many things at once; or, perhaps, the program you’re using wandered into a situation it can’t get itself out of.
The best way to deal with either the spinning Windows disc (or an hourglass on an pre-Windows 7 or 8 PC) or the Mac’s beach ball is, typically, to do nothing. With any luck, your system or application will settle down after a few seconds or so.
Windows Task Manager window 300x281 Mac/Windows tip: How to force a frozen program to quit
You can force a misbehaving Windows program to quit with a little help from the Task Manager.
But if several minutes have passed and you’re still staring at a frozen program, it might be time to take matters into your own hands and force the stalled program to quit.
Doing so may, of course, lead to losing any unsaved data; then again, you may not have much choice.
Ready to unstick a stuck program? Here’s how.

For Windows:

  • Still seeing the hourglass or spinny circle after waiting a few minutes? Time to call up the Task Manager, a tool that details all the programs and other system “processes” that are currently running on your PC. To do so, press and hold the CONTROL, ALT, and DELETE keys all at the same time, then click the Task Manager option.
  • Once Task Manager is running (if you’re using a Windows 7 PC, make sure the Applications tab is selected), check out the list of running programs; you should see the misbehaving program flagged with a status of “Not Responding.” Click the program, then click the “End Task” button at the bottom of the Task Manager window.
  • Next, you’ll be prompted to either a) wait a little longer for the program to right itself, or b) go ahead and quit the program. Waited long enough? Then click “quit.”
Force Quit Applications on a Mac 300x147 Mac/Windows tip: How to force a frozen program to quit
Your Mac isn’t immune to frozen programs—hence, the Force Quit tool, which sits under the Apple menu.

For Mac:

  • Open the Apple menu (just click the Apple icon in the top-left corner of the screen) and select “Force Quit”—or, if you like, press the COMMAND, OPTION, and ESCAPE buttons all at the same time.
  • You should now see a list of all the running programs on your Mac, including the application that’s frozen (probably labeled “Not Responding”). Click the name of the program, then click the “Force Quit” keys in the bottom corner of the Force Quit menu.
  • A prompt will appear warning that you may lose any unsaved changes if you force the program to quit. Ready to put your program out of its misery? Click the Force Quit button once more, or Cancel if you’re rather wait it out.
source http://heresthethingblog.com
How to force a frozen program to quit

How to find and merge duplicate contacts

How to dedupe contacts on your Mac Mac tip: How to find and merge duplicate contactsMartin writes: Since converting from Microsoft to Apple, all my contacts have been duplicated—sometimes up to five times!
Some information is coming from Outlook Contacts but I can’t find the source and iCloud seems to be procreating without any help.
Please help me to eradicate these multiple contacts and regain my sanity.
Hi Martin! Sounds like there was a little confusion while your address book was making its way from your Windows PC to your Mac—and yes, it’s pretty annoying to get five results for a contact search when you were looking for just one.
Luckily, there’s a fairly easy way to seek out and merge duplicate entries in the Mac’s Contacts app.
Contacts look for duplicates option Mac tip: How to find and merge duplicate contacts
The Mac’s “Contacts” app can find and merge duplicate contacts automatically—but make sure to back up your contacts before starting the process.
Here’s how…
  • First, make sure to back up your address book before you start merging or deleting any contacts. Open the Contacts app, click File, Export, then Contacts Archive. Pick a place on your Mac’s hard drive that’s easy to remember (like the Documents directory), then click the Save button.
  • Next, click the Card menu at the top of the screen, then select “Look for Duplicates.”
  • After scouring your address book for a few seconds, the Contacts app will report back with its results. For instance, when I recently checked for duplicate contacts, I got a message that read: “17 duplicate cards and 10 duplicated entries were found.”
  • Now, time for the moment of truth. Click the Merge button to let your Mac merge any duplicate contacts it found. Unfortunately, you can’t review the changes before they’re made—and that’s why it’s so important to make a backup before the merge.
  • Once the “deduping” process is completed, give your contacts a look. See anything you don’t like? If so, you can restore the backup you made by clicking File, Import, and then selecting the Contacts archive you saved earlier.
  • If, on the other hand, everything looks good, then you’re all set—and remember, if you’re an iCloud user (and it sounds like you are, Martin), all your merged contacts should sync automatically with any iCloud-connected iPhones and iPads.
Source: heresthethingblog.com
How to find and merge duplicate contacts

35 Basics tips for Mac X's You must know

Need a little help figuring out your new iMac or MacBook? You’ve come to the right place.
Check out our updated survival guide for the basics on Mac OS X, including details on the latest “Mountain Lion” features, illustrated guides for updating and backing up your Mac, must-know tips, and more.

The basics

What is Mac OS X?

It’s the software that powers all the day-to-day features on your iMac or MacBook. Every time you click a menu at the top of the screen, open a folder on your desktop, or search for a document on your hard drive, you have the Mac operating system (or “OS”) to thank.

OK, so what does the “X” in “Mac OS X” stand for?

It stands for “10,” as in the Roman numeral—and specifically, it means we’re currently using the tenth major version of the Mac OS. Mac OS X first arrived for desktop Macs way back in 2001, and had been preceded by—you guessed it—Mac OS 9.
Install Mountain Lion now or wait 300x189 Mac OS X: All the basics, plus 35 must know tips & how tos
“Mountain Lion” is the latest version of Mac OS X, the software that powers your iMac or MacBook.

What is “Mountain Lion”?

Over the past dozen years, there have been seven big updates to Mac OS X, and the latest update, 10.8, is nicknamed “Mountain Lion.” Previous updates to Mac OS X have been named “Panther,” “Leopard,” “Snow Leopard,” and plain-old “Lion.” Yes, it’s safe to say that Apple has a thing for felines.
Anyway, Mac OS X “Mountain Lion” (which came out in July 2012) adds more than 200 new features to the Mac operating system, including a “Notification Center” with alerts for incoming e-mail and calendar alerts, voice dictation, text messaging with iPhone, iPad, and other Mac users, and the ability to “mirror” a newer Mac’s display to an Apple TV-connected HDTV.
Check out Apple’s rundown of the 200 new features in Lion right here.

Where to get Mountain Lion

Lion is available for download from the Mac App Store for $20.
About This Mac window 300x175 Mac OS X: All the basics, plus 35 must know tips & how tos
The “About This Mac” window will tell you is your Mac is new enough for Mountain Lion.

Can your Mac handle Lion?

Generally speaking, you’ll need an iMac or MacBook Pro that was manufactured no earlier than 2007, or a MacBook circa 2008 or later.
Specific iMac and MacBook models have different requirements, however; click here for more details.

How to install Mountain Lion

The Lion installation process is fairly straightforward, but it will require at least an hour of your time.
Once you purchase Mountain Lion from the Mac App Store, your system will download the update and alert you when it’s ready to begin the installation process. Just follow the prompts (there are only a few), sit back and wait. After a restart or two, your Mac should be all et.

How to back up your Mac

Don’t even thing of updating your Mac’s operating system without backing up your hard drive first. Luckily, backing up your hard drive is easy thanks for a Mac OS X utility called Time Machine; here’s how to use it.

35 must-know Mac tips and tricks

How to pause notifications on your Mac 300x194 Mac OS X: All the basics, plus 35 must know tips & how tos
You can pause your Notification Center alerts with a quick swipe and click.

1. How to pause all your Notification Center alerts

Want a break from all the banners and alerts from the Mac’s new Notification Center? You put all your notifications on “pause” with a simple swipe and click.

2. Getting the hang of desktop “spaces” in Mission Control

The Mac’s handy Mission Control feature lets you manage multiple desktop “spaces” at once, each filled with its own assortment of open documents and applications. Sounds confusing, I know. But once you get the hang of it, these additional, virtual desktops can become addicting—and even essential.

3. Why “natural” scrolling feels backwards—and how to turn it off

Does scrolling on your Mac feel backwards to you? Blame Apple’s new “natural” scrolling feature. Luckily, turning it off is a cinch.
How to get scroll bars back on a Mac 300x181 Mac OS X: All the basics, plus 35 must know tips & how tos
Wish you could get your scroll bars back? All you have to do is tweak the right setting.

4. How to get your missing scroll bars back

Hey, what happened to the scroll bars on your windows? Don’t worry—you can get them back in a few clicks.

5. 12 handy trackpad gestures you need to try

Want to zoom in on a web page, twirl a snapshot in iPhoto, sneak a peek at the desktop, or look up the definition of a head-scratching word? You can do all that and more with a simple swipe, “pinch,” or tap on your Mac’s trackpad.

6. Turn on your Mac’s speaking clock

Your Mac has a built-in speaking clock that will read you the time every hour, on the hour—or the half hour, or even quarter hour. Here’s how to turn it on.
Create a new Mac Mission Control desktop1 300x300 Mac OS X: All the basics, plus 35 must know tips & how tos
You can add a new Mission Control desktop with a little help from your mouse.

7. Create a new desktop in Mission Control

Making a new “space” in Mission Control, the Lion feature that gives you a bird’s eye view of all your virtual desktops, is easy—if you know where to look.

8. Pin an app to a specific Mission Control desktop

There’s a way to assign an app to a specific desktop in Mission Control, perfect for keeping your programs in their proper “spaces.”

9. How to paste your signature into a PDF, no scanner or printer required

Got a contract or some other document that you need to sign and return via email? Just snap a photo of your John Hancock with your Mac’s iSight camera (just about any recent iMac or MacBook should have one), then paste it into the document you need to sign.

10. 8 ways to make the most of the Mac desktop dock

Thanks to the handy Dock at the bottom of your Mac desktop, your favorite programs, files, and folders are never more than a click away—and if you know where to look, you can make the Dock behave practically any way you want.
How to turn on sticky keys 300x177 Mac OS X: All the basics, plus 35 must know tips & how tos
“Sticky Keys” make for a clever alternative to playing “Twister” with your fingers.

11. How to enable “sticky keys”

Having a tough time maneuvering your fingertips around multi-key combos like SHIFT + ALT + DELETE? The “sticky keys” feature in Mac OS X can help.

12. 5 ways to take a “Quick Look” at almost any file

Meet “Quick Look,” a handy, built-in Mac tool that lets you take a quick glance at almost any file or folder without committing to firing up a program.

13. 12 Mac keyboard shortcuts you need to know

Switch applications, take a “quick look” at a file, get help, and more, all without touching your Mac’s mouse or trackpad.

14. 6 ways to give your Mac desktop icons a makeover

Got a jumble of icons cluttering your Mac’s desktop? Are you desktop icons too big—or too small? Wish they would just arrange themselves? Help is here!

15. 5 ways to make the most of the sidebar

Looking to add your own folders to the Mac sidebar? Or perhaps you’d rather make the sidebar bigger, smaller, or just plain gone. Help is here!
How to make the mouse cursor bigger 300x211 Mac OS X: All the basics, plus 35 must know tips & how tos
Just dip into your Mac’s system settings to make the mouse pointer bigger.

16. How to boost the size of the mouse pointer

Want to save both your eyesight and your sanity? Here’s an easy way: by dipping into your system settings and boosting the size of the mouse pointer.

17. How to control your desktop with “Hot Corners”

Turn on the Mac’s hot-corner feature to jump to Mission Control, clear your desktop, and more, all with a simple flick of your fingertip.

18. How to “unthread” your e-mail conversations

It’s easy to “unthread” the mail conversations in your Mac’s Mail inbox messages—or at least it is once you know the setting you need to tweak.

19. How to disable the Caps Lock key

Sick of striking the Caps Lock key by mistake? The good news is that turning off Caps Lock for good on a Mac is easy.

20. How to stop programs from launching automatically

How long does it take for your Mac to start up? Too long? Maybe your Mac is trying to launch too many apps when it’s first starting up.
How to zoom the display on your PC or Mac 300x183 Mac OS X: All the basics, plus 35 must know tips & how tos
You can zoom your Mac’s display with a few keyboard combinations.

21. How to zoom the display

Squinting at your computer screen? You can zoom the entire display on your PC or Mac, a handy trick for anyone with iffy eyesight. Here’s how.

22. Choose your default web browser

Sick of having Safari pop up when you really wanted another browser, like Chrome or Firefox? There’s single, centralized place on your Mac where you can set your default web browser once and for all.

23. Create a “recent files” folder on your desktop

It’s easy to create a folder on your desktop that’ll display only the files you’ve created or worked with in the past day, week, month … you name it.

24. Set your Mac to automatically start up (or shut down) each day

Want to wake up each morning to a freshly brewed pot of coffee and a fully powered-on Mac? It’s easier than you might think.

25. 16 Mac keyboard shortcuts you need to know

Want to switch applications, empty the trash, search your hard drive, or put your Mac to sleep, all without touching your mouse? Read on for 16 keyboard shortcuts that’ll let you zip around your Mac like a pro.
How to use the function keys without Fn on a Mac 300x188 Mac OS X: All the basics, plus 35 must know tips & how tos
By tweaking a single setting, you can use your Mac’s function keys without having to press and hold the “Fn” key.

26. Use the function keys without pressing “Fn”

On most Mac keyboards, the function keys—you know, those keys along the top of the keyboard marked “F1,” “F2,” “F3,” and so on—don’t get the luxury of having an entire key to themselves. Want to switch things around so you don’t need to press and hold “fn” to use a function key? No problem.

27. Set multiple “home” or “start” pages for your web browser

Want more than just a single home page to appear when you fire up your web browser in the morning? No problem.

28. Cram a bunch of files into a single “zip” archive

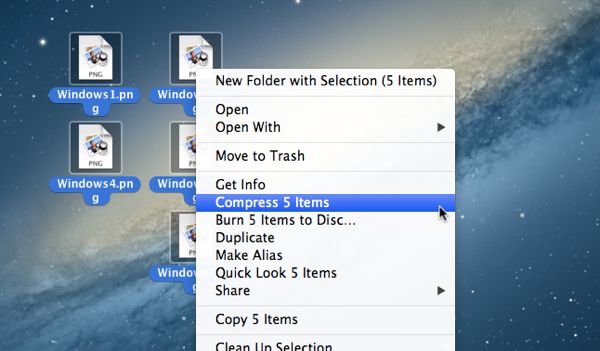
Got a bunch of little files that you want to send to a friend? Well, you could always drag them all into an email and send them as attachments, but talk about messy. A cleaner, tidier alternative is to take all those little (or not-so-little) files and compress them into an archive—or, to be more specific, a “zip” archive.

29. Turn any printable document or web page into a PDF

It’s actually quite easy to convert a Word document into a PDF, and you won’t have to pay a dime to do it. In fact, here’s the rule of thumb when it comes to turning documents or even web pages into PDFs: if you can print ‘em, you can convert ‘em.
How to click with a tap on a Mac 300x200 Mac OS X: All the basics, plus 35 must know tips & how tos
Tapping to click takes getting used to, but it’s surprisingly addicting, not to mention easier on your fingers.

30. How to “click” the trackpad with a tap

Having a hard time clicking the MacBook’s squishy trackpad? If so, here’s an alternative: setting the Mac trackpad to “click” with a simple tap rather than an actual click.

31. Share files between nearby Macs with AirDrop

Got a file on one Mac that you’d like to send to another Mac just a few feet away? A built-in Mac feature called AirDrop lets you…well, “drop” a file from one Mac onto another.

32. Change the default programs for your files

Annoyed that the Mac’s Preview app, and not Adobe Reader, always gets to open your PDF files? There’s a way to permanently change the “default” program that opens a given type of document.

33. Customize the buttons in program toolbars

Ever wish there were a Print button next to the Reply and Forward buttons in the Mac’s Mail app, or a pair of Zoom buttons on the top of every Safari browser window? Well, here’s the thing: you can add, remove, and rearrange the buttons in the “toolbar” of several familiar Mac programs.
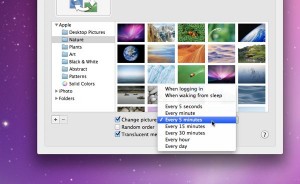
How to shuffle your Mac or PC desktop backgrounds 300x184 Mac OS X: All the basics, plus 35 must know tips & how tos
You can set your wallpaper to change at any interval you choose, from once a day to once every 5 seconds.

34. Put your desktop wallpaper on shuffle

Getting tired of the same old wallpaper on your Mac desktop? If so, try this: just set your Mac to shuffle some or all of your favorite desktop wallpaper (or “background”) photos, at any interval you choose.

35. 4 ways to right-click on a Mac trackpad

There are actually several different ways to right-click on the MacBook’s trackpad, which (nowadays, at least) is essentially one big button.

 35 Basics tips for Mac X's You must know

4 ways to right-click on a Mac trackpad

How to right click on a Mac trackpad Mac tip: 4 ways to right click on a Mac trackpadNicole writes: In your article about changing a default program you say, “The first step is to right-click a PDF on your desktop.” But how do I right-click by tapping the trackpad of my MacBook Pro?
Hi Nicole! Yep, it’s a little weird that Mac users are constantly being asked to right-click (or “secondary” click) when their trackpads don’t have actual right-click buttons.
Never fear, though: there are actually several different ways to right-click on the MacBook’s trackpad, which (nowadays, at least) is essentially one big button.
For starters, you can…

Method No. 1:

Press and hold the CONTROL key, then click, or…

Method No. 2:

Click the trackpad with two fingertips at once instead of just one.
Mac right click options 300x250 Mac tip: 4 ways to right click on a Mac trackpad
There are, in fact, a few different ways to right-click on a Mac trackpad.
That’s a good start—but what if you want more ways to right-click?
No problem, provided you’re willing to take a few extra steps first.
Click the Apple menu in the top-left corner of the screen, select System Preferences, click the Trackpad icon, then make sure the “Point & Click” tab at the top of the window is selected.
Now, see the “Secondary click” heading? Click the “Click or tap with two fingers” setting to reveal…

Method No. 3:

Click in bottom-right corner of the trackpad, or…

Method No. 4:

Click in the bottom-left corner.
Source: heresthethingblog.com
4 ways to right-click on a Mac trackpad

How to customize the buttons in program toolbars in Mac

How to customize Mac toolbars Mac tip: How to customize the buttons in program toolbarsEver wish there were a Print button next to the Reply and Forward buttons in the Mac’s Mail app, or a pair of Zoom buttons on the top of every Safari browser window?
Well, here’s the thing: you can add, remove, and rearrange the buttons in the “toolbar” of several familiar Mac programs.
Not every Mac application has a toolbar of buttons that you can customize, but many of them do, including Safari, Mail, Firefox, and even garden-variety desktop folders.
Mac customize toolbar option Mac tip: How to customize the buttons in program toolbars
Just click View, Customize Toolbar to rearrange the toolbar buttons in your various Mac apps.
For example, say you wanted to add a Print button to the Mail app’s toolbar. To do so, just…
  • Open Mail, click View at the top of the screen, then select “Customize Toolbar.” When you do, a menu with more than two-dozen available buttons will slide into view.
  • Find the Print button, then click and drag it into the Mail toolbar.
  • When the Print button is right where you want it (nearby buttons will scoot out of the way), release the mouse button.
  • All set? Click the Done button.
You can also follow the same steps to add Zoom buttons in Safari, a Label button to the folder toolbar, and more.
And while you’re at it, you can drag unwanted buttons out of the toolbar, add more space between buttons, or even add or remove a Search box (assuming Search is an available option).

Bonus tip

Want to hide a toolbar? Just click View, then Hide Toolbar, or use the OPTION + COMMAND + T keyboard shortcut.
Source: http://heresthethingblog.com
How to customize the buttons in program toolbars in Mac

How to change the default programs for your files [Mac]

How to change default programs on a Mac Mac tip: How to change the default programs for your filesAnnoyed that the Mac’s Preview app, and not Adobe Reader, always gets to open your PDF files, or that Safari has dibs on your HTML documents rather than your favorite text editor?
Well, one way to open your documents with the programs you want is to right-click the file in question and select “Open with…” from the pop-up menu.
But there’s also a way to permanently change the “default” program that opens a given type of document.
Mac default program get info Mac tip: How to change the default programs for your files
Right-click a file and select “Get Info” to pick a new default program for the document.
Here’s how…
  • Let’s say you want Adobe Reader, and not Preview, to open your PDF files. The first step is to right-click a PDF on your desktop (any PDF will do) and select “Get Info” from the pop-up menu. When you do, a lengthy pane of information about the file will appear on your desktop.
  • In the middle of the information pane, you’ll find a section titled “Open with”—and there, you’ll see a pull-down menu with the current default program for PDFs (Preview, in this example) selected. Click the menu, then select Adobe Reader. Keep in mind that Adobe Reader, or whatever program you want as the default choice for PDFs, must be installed on your Mac for it to appear in the menu.
  • At this point, you’ve only designated Adobe Reader to be the default program for the single PDF file you’ve been tinkering with. To make Reader the default for all PDFs on your Mac, click the “Change All” button. Finally, click the “Continue” button on the “Are you sure…?” confirmation prompt.
  • That’s it! You should now see that the folder icons for all your PDF files have switched from Preview to Adobe Reader—and when you double-click your next PDF, it will open in Reader by default.
Original post in  http://heresthethingblog.com/2013/04/04/mac-tip-change-default-programs
How to change the default programs for your files [Mac]

How to Send & Receive SMS on Computer with Mysms App

Forget messaging apps like WhatsApp, Line and Viber, sending and receiving free text messages should not and is no longer restricted to smartphones only. If you’re looking for a cross-platform iMessage-like service, this post is for you.
mysms Messenger App
Today, we’re going to introduce to you a powerful cross-platform messaging app – mysms, which allows you to send and receive free text messages to other mysms users right from your desktop computer, regardless of it being a Mac or Windows. Mysms may eventually be the only messaging app you’ll ever need on your smartphone.

mysms Android & iOS App

To begin using mysms, get it on your smartphone first.
  1. Download and install mysms messenger app on your smartphone: iOS | Android.
  2. Register and activate your phone number by keying in your phone number and password for desktop and web access.
    Login
That’s it! Now let’s have a look how mysms Messenger works on different platforms.

mysms on Smartphone

mysms works like any other messaging app for smartphones: both sender and recipient must have mysms installed to start texting for free. Then, they can start sending all sorts of messages, files, images, videos or even word documents.
mysms Messenger on Smartphone

mysms on Computer

To send messages straight from your Mac or PC, just get mysms installed on your computer. Best of all, your messages will always stay in sync, no matter which device you’re using.
For Android users, you can even use mysms to send SMS via your network service provider, charges will apply.
mysms Messenger on Computer

mysms on Web Browser

Besides the smartphone and computer, mysms also provides a web app for you to manage all of your messages and contacts. The automatic backup feature keeps all your messages safe and accessible from anywhere.

Conclusion

If you want the flexibility to be in contact with anyone on the go via smartphone yet still have the comfort of sending messages from your computer, all for free, give mysms a shot.
Picts and source http://www.hongkiat.com/blog/send-receive-sms-mysms/
How to Send & Receive SMS on Computer with Mysms App

Cram a bunch of files into a single “zip” archive

How to cram a bunch of files into a zip archive Mac/Windows tip: Cram a bunch of files into a single zip archive

Got a bunch of little files that you want to send to a friend? Well, you could always drag them all into an email and send them as attachments, but talk about messy.

Think of a zip archive as a suitcase containing a series of smaller files. Just select the documents, photos, or other files you want to compress, then “zip” them up into a single, tightly packed archive that’s smaller than the overall size of the originals.
Both Mac and Windows systems have their own, easy-to-use archive utilities. Indeed, they’re only a right-click away from your desktop.
The downside to creating a zip archive is that there’s no easy way to see what’s inside an archive folder—or at least, there’s no easy way using the “native” archive utilities in Mac OS X and Windows.
That said, there are plenty of third-party apps (such as WinZip, perhaps the most single popular “shareware” utility of all time) that will inspect the contents of a zip archive, among other things.
So, ready to start zipping? Here we go…

For Mac:

  • First, select the files you want to compress into an archive. You can also select an existing folder if you wish, or even a combination of files and folders.
  • Next, right-click the selected files and/or folders and select “Compress” from the pop-up menu.
  • In a few seconds or so (depending on the size of the files you’re compressing), a file titled “Archive.zip”—containing copies of all the files and folders you just compressed—will appear on your desktop. Meanwhile, your original, uncompressed files will be sitting right where you left them.
  • Go ahead and rename the archive file (click its icon, click its name, and then start typing), then feel free to move it anywhere on your hard drive or send it to a friend.
  • To “unzip” the file, simply double-click it; when you do, your Mac will decompress the archive automatically.
Windows zip archive 300x180 Mac/Windows tip: Cram a bunch of files into a single zip archive
A simple right-click is all it takes to create a “zip” archive in Windows.

For Windows:

  • As on a Mac, first select the files and/or folders you want to stuff into a zip archive.
  • Right-click the selected files, select “Send to” from the pop-up menu, then select “Compressed (zipped) Folder” from the secondary menu.
  • After a few seconds, a file titled “New Compressed (zipped) Folder” will appear, containing copies of all your zipped files. If you want to rename the archive, now’s a good time to do so (right-click, then select “Rename” from the menu).
  • Unlike on a Mac, Windows will let you take a quick peek at the files compressed into a zip archive; just open the archive folder to see a list of your archived files. Keep in mind, though, that you won’t be able to preview the contents of a particular file.
  • Want to unzip your archive? Right-click it and select “Extract all,” or open the archive folder and click the “Extract all files” button near the top of the window.
  • You can also pluck individual files out of the archive, if you wish. Just open the archive folder, select a file, and drag it onto your desktop.
Want to create an empty archive folder first, then add files to it later? On a Windows PC, you sure, can.
Just right-click on your desktop, select “New” from the pop-up menu, then select “Compressed (zipped) folder” from the secondary menu.
Once the empty zip folder appears, just open it, then start dragging and dropping files.
Looking for more Mac tips? Click here, or click here for more Windows tips.

Cram a bunch of files into a single “zip” archive