Block friends (and frenemies) from posting on your timeline


How to block Facebook friends from posting to your timeline Facebook tip: Block friends (and frenemies) from posting on your timelineDon’t like the idea that any and all of your Facebook friends can post updates, links, photos, or just about anything else they want to your timeline?

Once you change the right setting, neither friends nor frenemies will see the “Write something…” window on your timeline anymore.
The downside, of course, is that you won’t get any more friendly greetings posted to your timeline—and yes, that means no more “happy birthday!” posts.
So, ready to slam the door on random timeline posts from your Facebook friends?
Facebook timeline who can post settings 300x111 Facebook tip: Block friends (and frenemies) from posting on your timeline
You can block friends from posting to your Facebook timeline by changing a key account setting.
Let’s get started…
  • Click the little gear icon in the top-right corner of the page, then select Account Settings.
  • Click “Timeline & Tagging in the left column, find the “Who can add things to my timeline” heading, then click the “Edit” link next to the “Who can post on your timeline?” setting.
  • Change the selector from “Friends” to “Only Me.”
  • Click the “Close” link. You’re done!
from http://heresthethingblog.com
Block friends (and frenemies) from posting on your timeline

Improve Your Smartphone's Photo Quality With This Chip

Smartphone cameras are great — except, usually, for zooming in, lighting and producing high-quality photos.
Researchers at MIT, however, have developed a processor chip that they say can instantly convert mobile device snapshots into professional-looking pictures.
The chip, pictured here, integrates into any mobile device or digital camera, and can be used to improve lighting, apply effects and kill low-light background noise. Plus, researchers say, it uses significantly less power than full computer processors or video cards.
One of the chip's tasks enhances low light photos. "Typically when taking pictures in a low-light situation, if we don’t use flash on the camera we get images that are pretty dark and noisy," Rahul Rithe, a graduate student in MIT's Department of Electrical Engineering and Computer Science, says in a press release. "And if we do use the flash we get bright images but with harsh lighting, and the ambience created by the natural lighting in the room is lost."

So, to avoid photos turning out like this, the chip takes two images — one using flash, one without it — and combines only the most desirable parts of both photos into a composite image.


It's unclear when the processor will come to market. The group presented their findings at the International Solid-State Circuits Conference in San Francisco, which wrapped up today.
Does this sound like something you'd use?
Watch the video above to learn more, and read the official release here.
Improve Your Smartphone's Photo Quality With This Chip

How to unlock your Android phone with your face


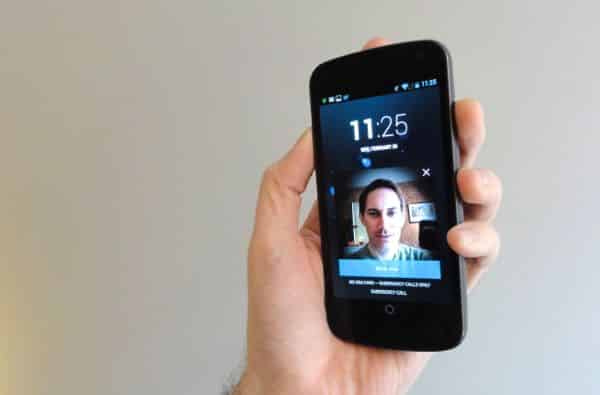
Unlock your Android phone with your face Android tip: How to unlock your Android phone with your faceCan’t be bothered to tap in a passcode to unlock your sleeping smartphone? Well, the latest Android phones have another way to verify that you’re you: by scanning your face.
The idea behind Face Unlock (a feature that requires Android version 4.0 or better, by the way) is simple: the phone’s camera scans your face for a few seconds, then compares it to one or more previously saved head shots.
If it gets a match, then presto! You’ll arrive at your phone’s home page, no PIN required.
Android Face Unlock setup 168x300 Android tip: How to unlock your Android phone with your face
You can unlock your phone with a glance once Face Unlock scans your face.
It’s a nifty trick, but it’s not quite foolproof.
Before setting up the feature on your own Android phone, you’ll be warned that Face Unlock isn’t nearly as secure as using a numeric passcode.
Indeed, there’s always the possibility of a false match if someone who looks “similar” to you sneaks a peek at your handset.
In other words, think twice before protecting your phone with Face Unlock if you’ve stored military secrets on it, or if your online banking password is saved in your Android browser.
So, ready to use your face to unlock your Android phone?
Here’s how…
  • Go to the Settings menu and tap Security, Screen Lock.*
  • Tap the Face Unlock option to see the litany of notes and caveats about the feature (including the assurance that your stored profile picture will be “kept private” on your handset). Ready to continue? Tap “Set it up.”
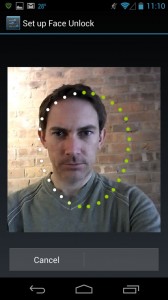
  • Next, you should see … well, yourself. Hold the phone until your face fits in the dotted outline; once the camera thinks it has a good shot of your face, it’ll snap a photo automatically. (For the best results, Google advises taking a Face Unlock photo indoors, where it’s not “too bright or too dim.”) Once you’ve made it to the “Face Captured” page, tap “Continue.”
  • You’ll also need a backup PIN or a security “pattern” to trace on the phone’s touchscreen, which you’ll be asked to set up once you’re done snapping photos of your face. The backup passcode will come in handy if Face Unlock can’t quite recognize you (which, as I’ve learned, happens on a fairly regular basis).
  • Now, time to test. Lock your phone, then press the “sleep/wake” button and hold the handset right in front of your face; the phone should unlock itself within seconds of “seeing” you.
*Note: These steps may vary depending on the make and model of your Android phone. I tested this tip on a Samsung Galaxy Nexus running on Android version 4.2.2.

Bonus tip

Want to make Face Unlock a bit more secure? Here’s how…
  • Take multiple Face Unlock photos of yourself in different conditions—say, with your glasses on and off, or both outdoors and indoors—to give the phone a better chance of identifying you correctly. Just go back to the Settings menu, tap Security, then select “Improve face matching.”
  • Worried someone might try to unlock your phone with a still photo of you? You can set Face Unlock to unlock your phone only if it sees you blink. Just tap Settings, Security, then enable the “Liveness check” option.
http://heresthethingblog.com
How to unlock your Android phone with your face

How to split the iPad keyboard in two

How to split the iPad keyboard iPad tip: How to split the keyboard in twoEver tried typing on your iPad’s keyboard with your thumbs while holding the iPad in your hands? Talk about awkward.
Well, there’s an easy way to make the iPad’s keyboard a lot more thumb-friendly: by splitting it in two.
A simple gesture is all it takes, provided you’ve got a key (no pun intended) setting enabled.
Here’s how…

  • Tap Settings, then tap General, scroll down the page a bit, and then tap Keyboard. Scroll down to the “Split Keyboard” setting and make sure it’s set to “On.”
  • Press the Home key, then pull up the iPad keyboard in any app you wish (such as, say, Safari).
  • Now, tap and hold the keyboard with two fingers—one on each side of the keyboard—and spread your fingertips apart. As you do, the keyboard will split in half.
  • Want to make the keyboard whole again? Just tap and hold each half of the keyboard with two fingers and push them back together.
Originally here

Tamagotchi Comes Back to Your Pocket — on Android

Tamagotchi-app
For anyone nostalgic for the '90s virtual pet craze, you can now carry your Tamagotchi in your pocket once again, with a free app released Thursday for Android.

The Tamagotchi L.i.f.e. App recreates the experience of caring for and feeding your own pocket creature. The app's release marks the brand's re-expansion to North America, after it was a powerhouse in the late 1990s.
The Tamagotchi app recreates the classic experience of owning a virtual pet in its Toy Mode, which replicates the classic egg keychain design best known by fans on the phone's screen. It features the three familiar buttons to navigate the menus.

Players can get into "App Mode" by swiping with two fingers, which brings the Tamagotchi into full color on the screen. You'll be able to access all the menu functions with touch controls from there. You'll recognize the actions to feed, vaccinate, poke and clean up after your pet. You can also check its weight, happiness and discipline.

A new feature you'll find: being able to play Rock Paper Scissors with your Tamagotchi. (Letting it win will make your pet happier.)


You can also take photos and share them on Facebook directly from the app.
Tamagotchi was released by Namco Bandai in 1997, and more than 79 million of the hard-shelled electronic toys have been sold since. The brand still has a huge presence in Japan, with a popular cartoon tie-in just renewed for a sixth season. Sync Beatz Entertainment acquired the license from Namco Bandai for this app and future products, and partnered with the company on its creation.

The app's expected audience, says Sync Beatz CMO Shin Ueno, are 22- to 29-year-olds who carried their Tamagotchis to school — and then had them confiscated in class in the late '90s.
The app is only available through Google Play now but will come to iOS devices soon, Ueno says.
Do you have fond memories of your Tamagotchi? Share them in the comments below.
Photos and Post by Mashable
Tamagotchi Comes Back to Your Pocket — on Android

Make it easier to double-click the Home key

Make the iPhone home key easier to double click iPhone tip: Make it easier to double click the Home key
For some of us, double-clicking the iPhone’s Home key to get to the multitasking bar at the bottom of the screen isn’t quite as easy as it sounds.
If you don’t (or can’t) click fast enough, you’ll just wind up back on the home screen, or maybe even on the “Spotlight” search page.
iPhone home click speed setting 300x285 iPhone tip: Make it easier to double click the Home key
By tweaking a single setting, you can make the iPhone’s “home-click” speed much easier on your thumb.
Well, here’s the thing: you can actually slow down the speed with which you need to double-click (or triple-click, as the case may be) the Home key, perfect for those of us lacking split-second reflexes.
Here’s how…
  • Tap Settings, General, Accessibility, then scroll all the way down and tap “Home-click Speed” (it’s under the “Physical & Motor” setting).
  • Now, pick a new double-click speed—either Slow or Slowest.
  • When you tap a new option, your iPhone will “buzz” three times to give you an idea of how quickly (or slowly) you need to double-click.

Bonus tip

Got an iPad? If so, you can use a special four- or five-finger gesture to reveal the multitasking bar. Get the details right here.

Make it easier to double-click the Home key

Transfer music and media to and from iOS devices, with PhoneTrans

PhoneTrans is a free program for Windows which connects to any attached iOS device. It acts as an iTunes alternative and allows for moving music and media from the PC to the phone or the other way around, moving media from any iOS device onto the hard drive.  It does not care about whether you previously synced with iTunes or not, or about which devices you are connecting to and whether you’ve done the million things that Apple apparently wants you to do.

Phonetrans Screrenshot1

If you are looking for a quick and easy way to transfer music and media to or from your iOS device, without being subject to Apple and iTunes’ constant obsessive compulsive supervision, definitely give PhoneTrans a shot.

Get PhoneTrans Here. (Requires MS .NET Framework 3.5)
sources http://www.freewaregenius.com/transfer-music-and-media-from-and-to-ios-devices-with-phonetrans/#pzOdovXY27D43yPx.99

Light up your charging phone with “Daydream” screensavers

Set your Android phone to daydream while it charges Android tip: Light up your charging phone with Daydream screensaversWish the screen on your asleep-but-charging Android phone could do something a little more interesting than just go blank?
If so, good news: a feature in the latest version of Android will turn your phone’s sleeping display into a digital clock, a photo gallery, a scrolling grid of headlines and news photos, and more.
Think of “Daydream” as a screensaver that turns itself on whenever your Android handset is sitting in a phone dock or connected to its charging cable.
Android Daydream Photo Table screensaver 300x224 Android tip: Light up your charging phone with Daydream screensavers
You can set Daydream to display your Instagram photos, abstract colors, a digital clock, and more.
What your phone’s screen does while it’s daydreaming is, of course, up to you.
One option is to have it display a faint digital clock, perfect for a dimly lit bedroom.
“Daydream” can also create an ever-shifting array of abstract shapes and colors, or crank out a slideshow of snapshots from the Gallery app, Instagram, or your online Google account.
You can even set Daydream to show trending headlines, photos, and social links from apps like Google Currents or Flipboard.
What’s the catch? Well, Daydream is only available on handsets running on Android version 4.2 or later.
(To check which version of Android powers your phone, tap Settings, “About phone,” then check the number under the “Android version” heading. You can also check for available Android updates by tapping “System updates” at the top of the “About phone” screen.)
So, ready to let you Android phone do a little daydreaming?
Android Daydream settings 168x300 Android tip: Light up your charging phone with Daydream screensavers
Just pick a screensaver from the Daydream settings, then tap Start Now to go for a test drive.
Here’s how…
  • Tap Settings, Display, then Daydream. (Note: the specific settings may vary depending on the make and model of your Android phone. I tested this tip on a Samsung Galaxy Nexus running on Android version 4.2.1).
  • On the next screen, make sure the Daydream switch in the top-right corner is set to “On.”
  • Tap the “When to Daydream” button at the bottom of the screen, and pick an option: “While docked” (meaning while your Android phone is sitting in a charging cradle or, say, a clock-radio dock), “While charging,” or “Either.”
  • Now, time to choose a Daydream screensaver. Besides the standard digital clock and photo frame, you’ll also find Colors (those random multicolored shapes I mentioned earlier) and Photo Table (a growing pile of images that twirl into view).
  • Want more Daydream screensaver choices? Try installing some new, Daydream-friendly apps, such as Google Currents and Flipboard.
  • Certain Daydream screensavers may have their own settings and customizations; for example, tap the settings icon next to Photo Frame to display photos from your Instagram account.
  • All set? Tap the Start Now button to give your Daydream screensaver a test drive.
Source http://heresthethingblog.com
Light up your charging phone with “Daydream” screensavers

10 WhatsApp Alternatives For Your Smartphone

If you are part of the crowd who don’t like paying for messaging apps, we’ve got 10 awesome alternative free messaging apps you can try.

(Image Source: Toolfools)
Not only are the following messaging apps the perfect alternatives for iOS and Android users, we also looked into getting alternatives for other mobile operating systems like Blackberry and Windows Phone. This way, you can contact more of your friends regardless of the mobile OS they are on. What was that beep? Did you just get another WhatsApp reminder to upgrade? Time to make the switch.

1. Viber

Viber is very similar to WhatsApp as it uses mobile contact numbers to identify users. You get an access code sent to your mobile number via text message. It’ll then access your address book to see if any of your contacts are connected to Viber; you can then instantly connect with them. Unlike WhatsApp, Viber allows you to call users, provided your smartphone is connected to the Internet.
Platforms: iOS | Android | Windows Phone | BlackBerry | Nokia | Bada
Viber

2. LINE

LINE registers your phone number into its database where you can then connect with your phone contacts who are LINE users. An advantage of LINE is that it allows you to reply to messages by installing a PC or MacOS program, provided you register your number with an email account. Besides text messaging, you can call other LINE contacts through the app with an Internet connection.
Platforms: iOS | Android | Windows Phone | BlackBerry
LINE

3. KakaoTalk Messenger

KakaoTalk Messenger also uses your mobile phone number to send you a 4-digit verification code when you register for an account. It then goes through your contacts to find for other KakaoTalk users, similar to how WhatsApp does it. There is also the ability to start group chats, send pictures or audio notes, and share calendar and contact information. Oh, and it does calls too, to other Kakaotalk users over an Internet connection.
Platforms: iOS | Android | Windows Phone | BlackBerry
KakaoTalk

4. Facebook Messenger

The Facebook Messenger app for both iOS and Android has been around for some time now and since you’re connected to most of the friends you want to communicate with, Facebook Messenger can be a great WhatsApp replacement. Only drawback is that you can’t use it to communicate with friends who are not on Facebook.
Platforms: iOS | Android | BlackBerry
Facebook Messenger

5. Skype

Skype recently merged its contacts with old MSN or Hotmail accounts and its contacts, connecting you to some pretty longtime friends. Nostalgia aside, Skype is not only a great way to call for free, it also allows for text messaging with your contacts. Unlike WhatsApp, you’ll have to approve contacts before you can start sending messages but its reliability and stability makes it a suitable replacement.
Platforms: iOS | Android | Windows Phone | BlackBerry
Skype

6. LiveProfile

LiveProfile starts off by asking you to register with an email account. After that, you have the ability to add your phone number where other users can find and contact you. Each account will also be given a LiveProfile PIN, this lets you share that PIN to others without giving them your phone number. It has no calling features but it does have standard messaging features with the abilty to start a group chat and send pictures or videos.
Platforms: iOS | Android | BlackBerry
LiveProfile

7. Groupme

Groupme caters to people who want to chat in a group. You log in with your email and then verify your phone number by sending an SMS with a code to the provided number. What’s unique about this app is that it supports group messaging over SMS. So in the event where someone in the group doesn’t have a 3G connection, the person can still receive group messages for a small fee. Each message sent or received will be charged as an SMS sent to the United States.
Platforms: iOS | Android | Windows Phone | BlackBerry
Groupme

8. Kik Messenger

You register on Kik with your email address, then choose a unique username to allow other users to find you. The app is very simple and does a good job in sending messages to individuals or group. There are no calling capabilities but you have the overall basic messaging functionality supported on a wide variety of mobile systems, for free.
Platforms: iOS | Android | Windows Phone | BlackBerry | Nokia
Kik Messenger

9. ChatON

ChatON is an app created by Samsung and is a basic messaging app with no calling features. However the app has found its way to many other markets or platforms. You can choose to sign in with your Samsung account or skip the process and just enter your name. Verify your phone number and the app will start checking all your onboard contacts to see if any of them are on ChatON. The chat is on when you find fellow ChatON users.
Platforms: iOS | Android | Windows Phone | BlackBerry
ChatON

10. WeChat

WeChat is one of the most popular messaging apps in China. Similar to how you register with WhatsApp, you start by entering your phone number. An SMS will follow, giving you the verification code. You can then connect your Facebook and email account to let people find you more easily. Other functionalities include sharing pictures, WeChat contacts, your current location, and the ability to video chat through the app.
Platforms: iOS | Android | Windows Phone | BlackBerry | Nokia


WeChat

Send PDFs and other documents to your Kindle

How to send a document from your desktop to a Kindle Mac/Windows tip: Send PDFs and other documents to your KindleGot a PDF or Word file on your desktop that you’d rather read on your Kindle? Thanks to a handy utility from Amazon, you can send text documents from your PC or Mac directly to any Kindle e-reader or app, in just a few clicks.
Available for both Mac and Windows users, the “Send to Kindle” tool lets you send documents and even images to your Kindle from your Mac or Windows desktop, or via Windows Explorer.
Of course, you can already send Word, PDF, TXT, and other text documents to your Kindle via email; all you have to do is go dig up your personalized Kindle email address.
That said, “Send to Kindle” saves you the hassle of firing up your email client and attaching the file to a new message.
So, ready to start sending files to your Kindle?
Here we go…
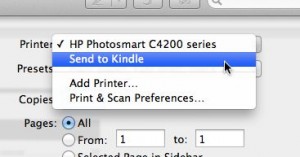
Send to Kindle from Mac Print menu 300x157 Mac/Windows tip: Send PDFs and other documents to your Kindle
You can also send text or image files to your Kindle from the Mac’s Print menu.

On a Mac:

  • First, visit this page on Amazon.com and click the “download and install” link. To finish the installation, open the brown “.PKG” file that appears in your Downloads directory; once you do, the Send to Kindle app should appear in your desktop dock.
  • Go ahead and launch Send to Kindle, then enter your Amazon username and password at the prompt.
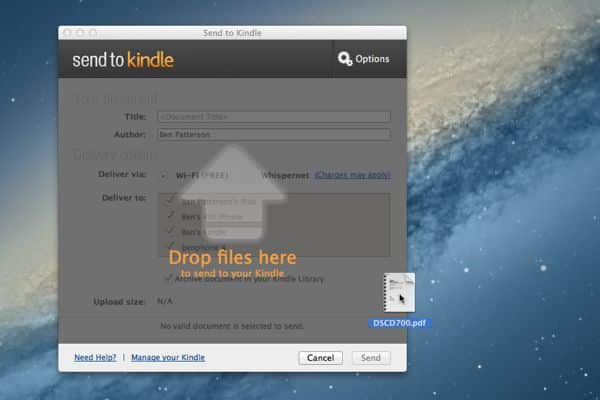
  • Now, let’s give Send to Kindle a try. Drag and drop a PDF or Word file from your desktop to the Send to Kindle window, right on top of the “Drop files here” arrow. Before the file is actually sent, you’ll get the chance to name it, pick which Kindle devices and/or apps you’d like to send the document to, and choose whether you’d like it sent via Wi-Fi or Amazon’s wireless “Whispernet” service. If you choose Whispernet, keep in mind that Amazon will charge you a fee for the privilege.
  • All set? Click “Send,” and wait. Within a few minutes, your document should pop up on your Kindle’s home screen.
  • Want to “print” a document to your Kindle instead? Just select “Print” from any application, and select “Send to Kindle” as the printer.
  • Last but not least, you can send a document to your Kindle by right-clicking the file, selecting “Open with…”, and then picking “Send to Kindle” from the pop-up menu.
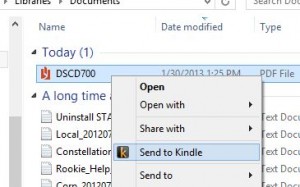
Send to Kindle from Windows Explorer 300x187 Mac/Windows tip: Send PDFs and other documents to your Kindle
Just right-click to send a file straight to your Kindle from Windows Explorer.

On a Windows PC:

  • Visit this page and click the “download and install” link; the installation process should begin automatically.
  • When prompted, enter your Amazon account login information to register the “Send to Kindle” app with your online Kindle library.
  • Now, open Windows Explorer (or “File Explorer,” as it’s now called in Windows 8), find a text document or image file you’d like to send, and right-click it. From the menu that appears, select “Send to Kindle.” You’ll also find the “Send to Kindle” option by right-clicking a file on your desktop.
  • As with the Mac version of “Send to Kindle,” you’ll get a confirmation window that lets you rename the file and pick one or more destinations. Once you’ve made your choices, click the Send button.
  • You can also (again, same as on a Mac) “print” a document to your Kindle by selecting “Send to Kindle” from the Print menu.
Send PDFs and other documents to your Kindle

How To Transfer iPhone Contacts With Android

When switching from an iPhone to an Android phone, it’s not only a change of brand but also a change of its entire operating system. Switching operating systems may result in file and format incompatibility.
This makes the transfer of private data such as Contacts, Mail and Messages a tricky process as you need to convert the files to a format that the Android operating system can read… or you can use Google Contacts.


Today, we will guide you on how to transfer iPhone contacts to Android phone using Google Contacts. You will first have to sync your contacts from your iPhone to Google contacts, then restore it to your new Android phone. With these methods, there are no use of additional apps, and you don’t require any format change when you transfer via Google Contacts.

Syncing Contacts

There are two ways to sync your contacts with Google Contacts, one with iTunes and the other with the iCloud.

1.1 Using iTunes

If you have a Google account and manually backup your iPhone to your computer using iTunes, here’s an easy way to export your iPhone contacts to your Google account.
First, open iTunes and plug in your iPhone to your computer via USB cable. Select your iPhone in iTunes. Under the ‘Info’ tab, choose to Sync Contacts with Google Contacts.


It will prompt you to enter your Gmail username and password. Wait for it to sync. Once it is done, head to Gmail and log in to your account. Then go to Gmail > Contacts.


You’ll find that your contacts will have been imported to your Google Contacts.

1.2 Using iCloud.com

If you back up your important data on your iPhone to iCloud, go to iCloud.com and login to your iCloud account.


After that, click on Contacts and you will see all of your iPhone contacts which have been backed up in iCloud.


Press Ctrl + A to select all contacts, click on the Settings button on the bottom left, then select "Export vCard…".


Login to your Gmail and go to Gmail > Contacts.


After that, click on ‘Import Contacts…’ and an alert will be prompted. Choose your exported vCard… file and click Import to import all iPhone contacts to Google Contacts.

2. Merge Duplicate Google Contacts

Once you’ve imported iPhone contacts to Google Contacts, you can get rid of duplicate contacts before restoring your contacts on your phone. It is easier to do this on on your computer than on your smartphone.
Click on More and then click on Find & merge duplicates...


A page with the names of duplicated contacts will pop up. After going through the names, select those that have duplicate contacts and click Merge.

3. Restore Contacts on Android

Now that you have succesfully exported and merged duplicates of your iPhone contacts to Google Contacts, you can begin to restore it to your Android phone. On your Android phone go to Menu > Settings > Accounts and Sync. Tap on Add Account and choose Google.


Then, tap on Sign in and key in the Gmail account you used to sync your contacts to.


Wait for a while. When communications to the Google Servers are complete, you will arrive at a page to a page where you’re given options on what you want to sync into your phone. Tick ‘Sync Contacts’ and tap on Finish.


With that, you’re done! To verify that you have successfully transferred all of your contacts into your phone, check your contacts book.

Wrap Up

Without Step 2, you will see repeated entries in your Contacts. You can choose to merge them in your new phone or go back to doing it the faster way on Google Contacts.
One great thing about using Google Contacts to sync your contacts is that even if you lose your phone or switch to another smartphone, you will never lose your contacts. They are kept save within your Google account.
Original post from hongkiat.com
How To Transfer And Sync Your iPhone Contacts With Android