How to set a hard data limit for Android phone

The latest 4G-enabled Android phones tend to consume wireless data at an alarmingly rapid pace—and that’s a problem, particularly since most of the big U.S. carriers only offer a limited monthly allowance of high-speed data.

That’s why I’m bullish about a feature in the new “Ice Cream Sandwich” version of Google’s mobile Android software: a data-usage monitor that warns you if you’re approaching your monthly data limit, plus the option to turn off 3G or 4G data entirely before your carrier starts charging you extra.
Now, keep in mind that “Ice Cream Sandwich,” a.k.a. Android 4.0, is a relatively new version of Google’s Android platform—hence, it’s only available on a handful of phones. In the coming months, though, more and more Android smartphones will arrive with a healthy scoop of Ice Cream Sandwich.

And one more thing: keep in mind that “mobile data” refers to 3G and 4G data from your carrier, not your Wi-Fi network at home or Wi-Fi hotspots elsewhere.
  • Launch the Settings application and tap “Data Usage.”
  • You’ll see a chart showing your 3G and/or 4G data usage over a period of days, weeks and month, along with yellow and red sliders that let you set data “warning” and “limit” levels. Beneath the chart is a breakdown of your most data-hungry apps.
  • To set a “hard” data limit for your phone, check the box next to “Set mobile data limit,” then tap and move the red slider. My advice: pick a limit that’s the same as the mobile data “cap” set by your carrier. In the example here, I settled on 200 MB, the upper limit of AT&T’s $15-a-month “DataPlus” plan. Verizon Wireless users should probably go with 5 GB, which is the size of Verizon’s smallest smartphone data plan.
  • Next, choose a “warning” level—the point at which your phone will alert you that you’re approaching your “hard” data limit—by tapping and moving the yellow slider.
  • Last but not least, set your data usage cycle by tapping and moving the date ranges in the chart. So, when does your data billing cycle begin and end? Check your monthly bill, access your online carrier account, or just call your carrier and ask.
That’s it! Now, when you’re on the road streaming music via Pandora or watching movies on the mobile Netflix app, you’ll get an alert when you’re creeping up on your “hard” data limit. And once you hit the limit, a pop-up will appear that reads: “Mobile data disabled; the specified data usage limit has been reached.”

You will, of course, have the option to turn your mobile data back on; if you do, though, expect to see an extra charge for additional data on your next wireless bill.
How to sync all Gmail folders, not just the inbox

Got your Gmail on your Android phone? If so, you may have noticed that the Gmail app for Android only syncs your inbox, sent mail, and “priority” messages automatically, not all your other folders—and that’s not necessarily a bad thing, given the amount of juice it would take to keep all your various Gmail folders in sync.

But here’s the thing: you can, if you wish, go ahead and force your Android phone to regularly sync some or all of your custom Gmail sub-folders (or “labels,” as Google calls them), so long as you’re willing to settle for a little less battery life. (How much less depends on the particular make and model of your phone, of course.)

Here’s how to do it.
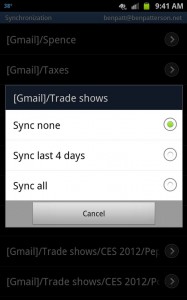
Select new Gmail labels to sync 187x300 Android tip: How to sync all your Gmail folders, not just the inbox
Just select a label in Gmail's Synchronization settings menu to sync it automatically.
  • Launch your phone’s Gmail app, tap the Menu button, then select More, Settings.
  • Under the “Account settings” heading, tap the email address for the Gmail account you’d like to tweak (you’ll most likely have just a single choice, unless you’ve set up multiple email accounts in the Gmail app), then tap the “Sync inboxes and labels” option.
  • Next, you’ll be presented with a (potentially lengthy) list of folders—er, labels—in you Gmail account. Any label that’s already being synced will have a little blue note beneath telling you whether some or all of its messages are getting checked.
  • Want one (or more) of your non-synced labels to get synced automatically? Tap the arrow to the right of the label name, then select an option: “Sync none” (which should already be selected), “Sync last 4 days,” (I’ll show you how to change the number of days in a moment), or “Sync all.” The moment you tap a new setting, your changes will take effect.
  • Now, what if you want to sync five days of email rather than four? To do so, scroll to the top of the page, tap “Amount of mail to sync,” and pick a number. Unfortunately, you can’t set the Android Gmail app to, say, sync five days of email for one label and four for another; the setting you pick will apply to all your email labels. Oh well.
Sync Gmail labels on your Android phone Android tip: How to sync all your Gmail folders, not just the inbox

How to use voice commands on Android phone

The new voice-activated “intelligent assistant” for the upcoming iPhone 4S , may be getting all the buzz, but you can already bark commands at your handset if you own a relatively recent Android smartphone.
No, Android’s “Voice Actions” feature won’t check your calendar or tell you if you’ll need a raincoat today like Siri (supposedly) can, but it will compose text messages, queue up songs, place phone calls, and even figure out driving directions. Just say the word.
Android Voice Actions text message 300x245 How to use voice commands on your Android phone
Just say "send text" to compose a quick text message with the power of your voice.
Ready to start bossing your Android device around? Let’s get started.
  • First, make sure your Android phone actually supports Google’s “Voice Actions” feature. Tap Applications, then Settings. Next, tap “About this phone” and select the “Software information” option. Under the “Android version” heading, does it read “2.2″ or higher? If so, your phone is ready for Voice Actions. If not, back up to the main Settings page and tap “Software update” to see if there’s an update available for your phone—and if that doesn’t work … sorry, no dice.
  • Now, it’s time to download some apps. You’ll need the latest versions of both Voice Search and Google Search installed on your phone; click here and here to install them from the web-based Android Market, or launch the Android Market app on your phone to search for them.
  • Ready for your first voice command? Press and hold the Search button; on most Android phones, it’s marked with a magnifying glass and sits just beneath the display, to the right. You can also tap Search, then tap the little microphone icon next to the search box.
  • When the “Speak now” pop-up window appears, try saying “map of New York.” After chewing on your command for a second or two, you’ll get a confirmation message that reads “Map of new york”; hit the “Go” button, and Google Maps will open, complete with an arrow pinpointing the Big Apple.
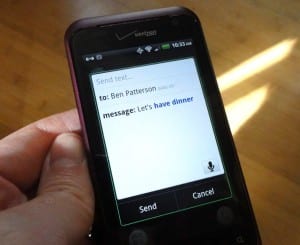
  • How about a text message? Press and hold the Search button again, and say “send text to [name of a friend in your contact book] let’s have dinner.” In a few seconds, a draft text message should appear, complete with the correct phone number (hopefully, anyway) of your pal already listed in the “To:” field. Tap the “Send” button to send your message, or press the little microphone icon to “speak” more text.
  • So, what else can Voice Actions do? You can “call” a person or a business, “send email” to someone, “go to” a website, “listen” to a song or artist, get “directions to” somewhere, or get turn-by-turn directions by saying “navigate t.o” Click here for a more detailed list of commands.

How to view Google Maps in 3D

If Google Maps on your Android phone has been feeling a little flat lately, get ready to add a little depth to the experience.


A feature in the latest version of Google Maps for Android lets you tilt the map view for a 3D-like perspective, complete with 3D buildings for more than a dozen major cities.
Google Maps tips  300x298 Android phone tip: How to view Google Maps in 3D
Just drag down with two fingertips to tilt Google Maps for a 3D-like perspective.

The 3D feature is well hidden—indeed, digging around the various menus on the Google Maps app for Android won’t do you much good.
But here’s the trick: just drag down on the screen with two fingertips.
As you do, Google Maps will tilt down to about 45 degrees or so.
And if you zoom in close enough (just “pinch” with your fingertips), you’ll see 3D outlines of buildings and skyscrapers in cities like Boston, New York, Vancouver, Chicago, San Francisco, and Paris.

Want to go back to the usual flat view? Just drag your two fingertips back “up” on the screen.
Note: Keep in mind that older Android phones may not support the 3D feature in Google Maps.

How to sync desktop browser tabs with Android phone

iPhone users will get on-the-go, iCloud-enabled access to any open browser tabs on their desktops. It’s a nifty new feature for anyone who’s heading out the door but wants to keep web surfing—and it also happens to be a trick you can perform on your Android phone right now.
All you need is a Google account and the mobile version of Google’s impressive Chrome web browser, which is now available (and free) for Android handsets.

Update [6/28/12]: The mobile version of Chrome—including the ability to sync your open browser tabs—is now available for iPhone and iPad, as well.
List of synched Chrome tabs 168x300 How to sync your desktop browser tabs with your Android phone
Just tap a button (it’s the one with the arrows in the bottom-right corner) to see a list of all your synced Chrome tabs.

Ready to take your desktop browser tabs on the road? Here’s how:
  • First, you’ll need to install Google’s Chrome browser on both your desktop and your Android phone. You can download the desktop version of Chrome here, then grab the mobile Chrome over here.
  • Next, you must sync the desktop version of Chrome with your Google account. (Don’t have one? You can sign up for free here.) On your desktop, launch Chrome, click the little wrench in the top-right corner of the browser, select “Sign in to Chrome,” click in the “Sign in to Chrome” button near the top of the following page, then enter your Google email address and password.
  • Once that’s done, a pop-up window will ask if you’d like to sync all your Chrome data—including Chrome apps, bookmarks, themes, and other settings—with Google. I recommend you go ahead and click the “Sync everything” button, but you can also click the “Advanced settings” link to pick and choose which items you’d like to sync—and which you’d rather not.
  • All set? Time to fire up Chrome on your Android phone. Once you do, you’ll be prompted to sign in with your Google account—and once that’s all set, your desktop Chrome browser and Chrome on your phone will be linked.
  • Now, open a new browser tab on the desktop Chrome—say, the New York Times. Done? Then pull out your Android phone, open mobile Chrome, and tap the tab with the syncing arrows in the bottom-right corner of the screen.
  • You should now see a list of “other devices,” such as the desktop version of Chrome, that are syncing with Chrome on your phone—and under the heading for your desktop PC, you should see a tab for the New York Times. Tap it, and voilĂ —you just loaded a browser tab from your desktop to Chrome on your Android phone.

How to decline a call with a text message

Don’t have time to take an incoming call, but don’t want to just send your caller to voicemail? If you’ve got a newer Android phone, there’s another option: you can also send a quick, pre-written text message while you’re declining the call.


Most Android handsets running on the latest “Ice Cream Sandwich” version of Google’s Android operating system have this so-called “quick response” feature, which lets you choose from a short list of canned text messages (such as “I’ll call you later” and “Can’t talk right now, what’s up?”) as you’re declining an incoming call.
List of quick responses 300x232 Android tip: How to decline a call with a text message
Just tap a pre-written message to send it instantly to a caller you've sent to voicemail.
It’s a fairly straightforward process, but keep in mind that it may work slightly differently on your particular make and model of Android phone.
In this article, I’ll be describing how “quick responses” work on the Samsung Galaxy Nexus , which runs on the standard, “stock” version of “Ice Cream Sandwich” (a.k.a. Android 4.0).
  • The next time your Android phone starts ringing, look closely at the options that appear on your phone’s lock screen. In addition to the “Pick up” and “Decline” icons, you may see a third text-message icon; just tap that icon, or drag the “ring” on the lock screen to select the button. (Note: You might not see the text-message option until after you decline a call, depending on the make of your Android phone.)
  • You should now see a short list of quick-response text messages; tap one to send it instantly to the call you just declined. You can also send a custom message if you wish.
  • Want to customize your list of quick responses? Just dig into your phone’s calling settings. On the Galaxy Nexus, for example, open the Phone application, tap the Menu button in the bottom right corner of the screen, tap Settings, “Quick responses,” then tap the message you’d like to edit.